Spicy Roasted Pumpkin Seeds Flavorful Crunchy Snack

Looking for a tasty and crunchy snack? You’re in the right place! In this article, I’ll share my favorite recipe for Spicy Roasted Pumpkin Seeds. These seeds are packed with flavor and easy to make. Whether you enjoy a little heat or prefer something milder, I’ll show you how to customize your batch. Let’s dive into the delicious world of roasted pumpkin seeds together!
Ingredients
Essential Ingredients for Spicy Roasted Pumpkin Seeds
To make spicy roasted pumpkin seeds, you need a few key items. Here’s a simple list:
- 1 cup raw pumpkin seeds (pepitas)
- 2 tablespoons olive oil
- 1 teaspoon chili powder
- 1/2 teaspoon smoked paprika
- 1/2 teaspoon cayenne pepper (adjust based on desired spice level)
- 1/2 teaspoon garlic powder
- 1/2 teaspoon salt
- 1/4 teaspoon freshly ground black pepper
- 1 tablespoon honey (optional, for a hint of sweetness)
These ingredients bring flavor and crunch to your snack. The pumpkin seeds are the star. They are rich in nutrients and great for snacking.
Suggested Seasonings and Extras
While the base recipe is fantastic, you can get creative with seasonings. Here are some ideas to make your seeds even better:
- Nutritional yeast for a cheesy flavor
- Ground cumin for an earthy twist
- Dried herbs like rosemary or thyme for an aromatic touch
- A splash of lime juice for brightness
Feel free to mix and match! This is your chance to personalize your snack.
Alternatives to Common Ingredients
If you don’t have some ingredients, don’t worry! Here are some substitutes:
- Use sunflower seeds if you can’t find pumpkin seeds.
- Swap olive oil with coconut oil for a different flavor.
- Instead of chili powder, try curry powder for a unique spice.
- Agave syrup can replace honey for a vegan option.
These alternatives can help you use what you have on hand. The key is to keep experimenting until you find your perfect spicy roasted pumpkin seeds.
Step-by-Step Instructions
Preparing Your Ingredients
Start by gathering your ingredients for spicy roasted pumpkin seeds. You will need:
- 1 cup raw pumpkin seeds (pepitas)
- 2 tablespoons olive oil
- 1 teaspoon chili powder
- 1/2 teaspoon smoked paprika
- 1/2 teaspoon cayenne pepper (adjust based on desired spice level)
- 1/2 teaspoon garlic powder
- 1/2 teaspoon salt
- 1/4 teaspoon freshly ground black pepper
- 1 tablespoon honey (optional, for a hint of sweetness)
If you have fresh pumpkin seeds, rinse them first. This step removes any pumpkin bits. Next, dry them well with a clean kitchen towel. Moist seeds won’t roast evenly.
Roasting Process for Perfect Crispiness
Now, preheat your oven to 350°F (175°C). This temperature helps the seeds roast evenly.
In a large bowl, mix your dried seeds with olive oil and spices. Make sure every seed gets coated. If you like a touch of sweetness, add honey here.
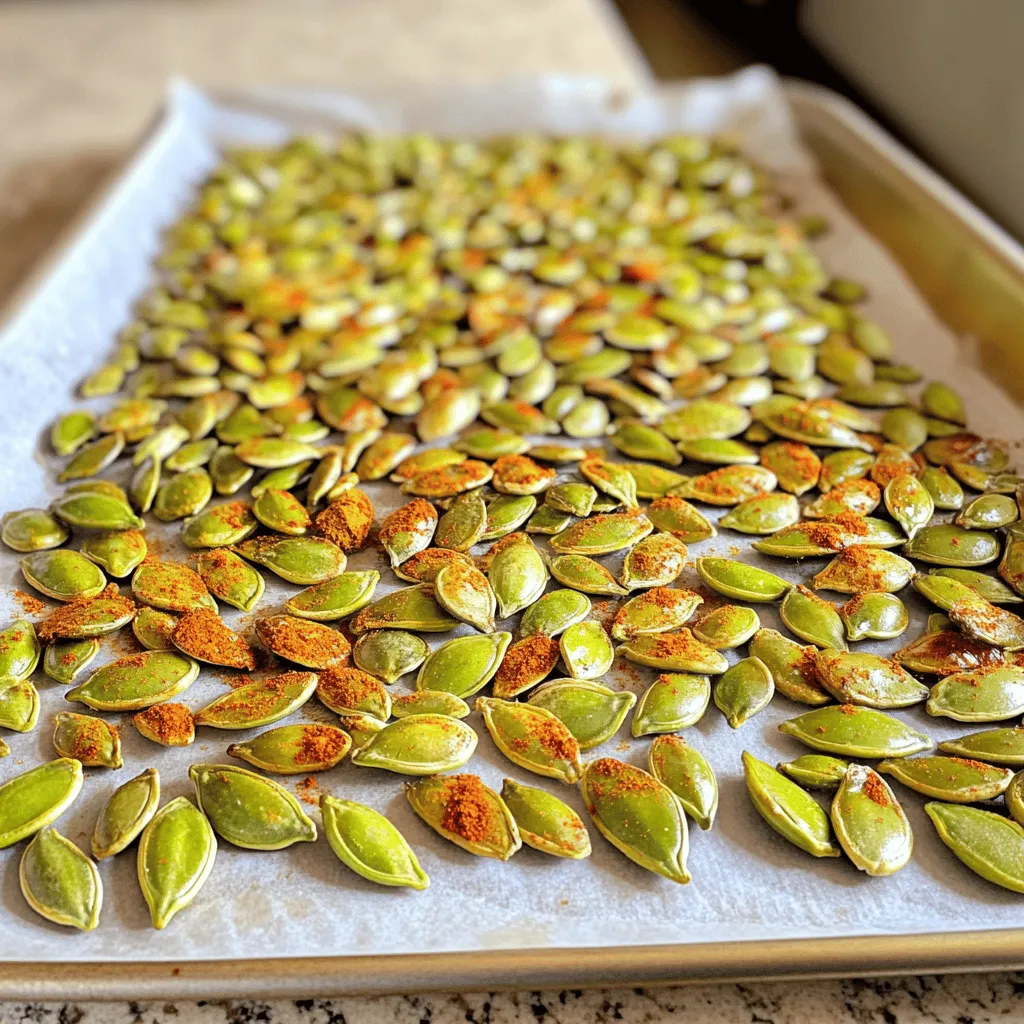
Next, line a baking sheet with parchment paper. Spread the seasoned seeds in a single layer. Avoid crowding them, as this can lead to uneven roasting.
Place the baking sheet in the oven. Roast the seeds for about 15-20 minutes. Stir or shake them every 5-7 minutes. This keeps them from burning and ensures they cook evenly. Watch them closely, as ovens can vary.
When the seeds turn golden brown and smell toasty, they are done. Remove them from the oven and let them cool completely. They will become crunchier as they cool.
Serving Suggestions
Once cooled, transfer your spicy roasted pumpkin seeds to a serving bowl. They make a great snack on their own. You can also use them as a crunchy topping on salads or soups. Try serving them with a dipping sauce for extra fun.
For a nice presentation, put the seeds in a rustic bowl. Add a sprig of parsley on top for color. Enjoy these flavorful bites with your friends or family!
Tips & Tricks
How to Select the Best Pumpkin Seeds
When choosing pumpkin seeds, look for raw seeds. They should be plump and shiny. Avoid any that are discolored or have dark spots. Fresh seeds taste the best. You can buy them in bulk at health food stores or online.
Adjusting Spice Levels for Personal Preference
Not everyone likes the same heat. Start with less cayenne pepper if you want a milder flavor. You can always add more spice later. If you love heat, double the cayenne for a kick. Taste the mix before roasting. This way, you can adjust it to your liking.
Ensuring Optimal Roasting without Burning
Roasting can be tricky. Set your oven to 350°F (175°C). Stir the seeds every 5-7 minutes. This helps them cook evenly. Keep an eye on them! If they start to smell burnt, take them out right away. Cool them on the baking sheet to keep them crisp.

Variations
Flavor Combinations to Try
You can play with flavors when making spicy roasted pumpkin seeds. Try adding some lime zest or a touch of soy sauce for a tangy kick. You can even mix in some grated Parmesan for a cheesy twist. If you love heat, why not add a splash of hot sauce or a sprinkle of red pepper flakes? These options add depth and make your snack more exciting.
Sweet vs. Savory Options
Sweet and savory can go hand in hand. For a sweet treat, consider adding cinnamon and sugar instead of chili powder. You can also mix in a bit of maple syrup with your olive oil. This gives the seeds a nice caramelized flavor. On the savory side, you can use herbs like rosemary or thyme. These herbs can add a fresh twist to the roasted seeds.
Mixing and Matching Ingredients
Mix and match your favorite spices and herbs to create something unique. Use cumin for a warm, earthy flavor or coriander for something bright. You can also try adding sesame seeds or nuts like almonds or pecans. This will give you a crunchy texture that contrasts well with the pumpkin seeds. The best part is that you can adjust the spice levels based on your taste. Just remember to start small and taste as you go. This way, you can find your perfect blend.
Storage Information
Best Practices for Storing Spicy Roasted Pumpkin Seeds
To keep your spicy roasted pumpkin seeds fresh, store them in an airtight container. Glass jars work great for this. You can also use a resealable plastic bag. Make sure to remove as much air as possible to prevent moisture. Store the seeds in a cool, dark place, like your pantry. Avoid putting them in direct sunlight or near heat sources, as this can make them go stale quickly.
How Long Can They Last?
When stored properly, spicy roasted pumpkin seeds can last for about two weeks. If you want to keep them longer, consider freezing them. In the freezer, they can last for up to three months. Just place them in a freezer-safe bag or container. Label the bag with the date so you can keep track of their freshness.
Reheating Tips for Enjoyment Later
If you decide to save some seeds, reheating is easy. Preheat your oven to 350°F (175°C). Spread the seeds on a baking sheet in a single layer. Heat them for about 5-10 minutes. Keep a close eye on them to avoid burning. This method brings back their crunch. You can also enjoy them cold straight from the container. Just remember, they taste best when fresh!
FAQs
What can I do with leftover pumpkin seeds?
You can use leftover pumpkin seeds in many ways. First, you can roast them for a tasty snack.Second, sprinkle them on salads or soups for added crunch. You can also blend them into smoothies or make a seed butter. They add flavor and healthy fats to your meals.
Can I make these in an air fryer?
Yes, you can make spicy roasted pumpkin seeds in an air fryer! Preheat your air fryer to 350°F (175°C). Follow the same steps for seasoning the seeds. Place them in the air fryer basket in a single layer. Cook for about 10-15 minutes, shaking the basket halfway through. This method gives you a crunchy texture quickly!
Are spicy roasted pumpkin seeds healthy?
Yes, spicy roasted pumpkin seeds are healthy! They are high in protein, healthy fats, and fiber. Pumpkin seeds also contain vitamins and minerals like magnesium and zinc. The spices add flavor without extra calories. Just watch the oil and salt you use, and you’ll have a nutritious snack.
Spicy roasted pumpkin seeds are easy to make and full of flavor. We explored the key ingredients, from essential spices to fun add-ins. I shared a simple roasting method and provided tips for perfect texture. You can get creative with flavors or stick to classics. Remember to store your seeds properly for lasting crunch. With these insights and tips, you can enjoy delicious snacks anytime. Now, it’s your turn to try roasting and savoring the results!


![To make Parmesan roasted cauliflower, gather these simple ingredients: - 1 large head of cauliflower, cut into bite-sized florets - 3 tablespoons extra virgin olive oil - 1 cup freshly grated Parmesan cheese - 2 teaspoons garlic powder - 1 teaspoon onion powder - 1 teaspoon smoked paprika - Salt and freshly ground black pepper, to taste - Fresh parsley, finely chopped (for garnish) Using fresh ingredients makes a big difference in taste. Look for a cauliflower head that is firm and free of blemishes. The olive oil should be extra virgin for the best flavor. Freshly grated Parmesan cheese melts better than pre-grated. It has a richer taste and adds a creamy texture. Spices should be fresh too. This helps ensure you get the best flavor in every bite. If you want to change things up, try these add-ins: - Red pepper flakes for heat - Lemon zest for a fresh twist - Balsamic glaze drizzled on top for sweetness - Other cheeses like mozzarella or cheddar for different flavors These options let you customize the dish to fit your taste. Feel free to mix and match! For the full recipe, check out the details above. Start with a large head of cauliflower. Cut it into small, bite-sized florets. This size helps them cook evenly. Rinse the florets under cold water. Then, dry them well with a towel. Removing excess moisture helps them roast better. In a large mixing bowl, add the dried cauliflower florets. Pour in three tablespoons of extra virgin olive oil. Toss the florets until they are well-coated. In another bowl, mix one cup of freshly grated Parmesan cheese, two teaspoons of garlic powder, one teaspoon of onion powder, and one teaspoon of smoked paprika. Add salt and freshly ground black pepper to taste. Combine these dry ingredients well. Spread the coated cauliflower onto a lined baking sheet. Make sure they are in a single layer. This step helps them roast evenly. Preheat your oven to 425°F (220°C). Place the baking sheet in the oven and roast for 25 to 30 minutes. Flip the florets halfway through for even cooking. Look for a golden brown color and a tender texture. Once done, take the cauliflower out of the oven. Let it cool for a few minutes. Garnish with fresh parsley for a pop of color. Serve it on a bright platter for a beautiful display. You can also drizzle a little olive oil on top for extra flavor. This dish pairs well with grilled meats or as part of a veggie spread. Enjoy your delicious Parmesan roasted cauliflower! For more detailed guidance, check out the Full Recipe. To get that perfect roast, you need the right oven temperature. Preheat your oven to 425°F (220°C). This high heat crisps the edges and makes the cauliflower tender. Spread the florets in a single layer on the baking sheet. If they are too crowded, they will steam instead of roast. Flip them halfway through cooking for even browning. Aim for a golden color; that's when they taste the best. One common mistake is not drying the cauliflower. After washing, make sure it's dry. Excess water can lead to soggy florets. Another mistake is using old Parmesan cheese. Fresh cheese melts better and has more flavor. Lastly, don't skip the seasoning. A light touch of salt and pepper really makes a difference. You can easily make this dish even tastier. Try adding a squeeze of lemon juice before serving for a zesty kick. Fresh herbs like thyme or rosemary also add depth. For spice lovers, sprinkle some red pepper flakes for heat. You can find all these flavor ideas in the [Full Recipe]. {{image_4}} You can switch up the cheese for more flavor. Try pecorino Romano for a saltier bite. Goat cheese adds creaminess and tang. For a milder taste, use mozzarella or cheddar. Each cheese brings a unique twist to the dish. So, feel free to experiment with what you have on hand. If you like heat, add some cayenne pepper or crushed red pepper flakes. Start with a pinch and taste as you go. For a milder flavor, skip the smoked paprika. You can also use Italian seasoning for a different herb mix. Adjusting spices lets you make the dish your own. You can mix in other veggies for fun. Try bell peppers, carrots, or zucchini. Cut them into similar sizes as the cauliflower. This way, everything cooks evenly. Roasting a mix adds color and taste. You get a delightful medley on your plate. Check out the Full Recipe for more ideas on making this dish stand out! To keep your Parmesan roasted cauliflower fresh, place it in an airtight container. Make sure it cools to room temperature first. This helps prevent moisture buildup. Store it in the fridge for up to four days. If you want to enjoy it later, make sure to check the smell and texture before eating. When it's time to enjoy your leftovers, reheating is key. I recommend using the oven for the best results. Preheat your oven to 350°F (175°C). Spread the cauliflower on a baking sheet. Heat for about 10 to 15 minutes. This will crisp it up again and keep the cheese flavor strong. You can also use a microwave for quick reheating. Just heat for one to two minutes. But keep in mind, it won’t be as crispy. If you want to store the cauliflower for longer, freezing is a great option. Start by letting it cool completely. Then, place it in a freezer-safe bag. Squeeze out as much air as possible before sealing it. You can freeze it for up to three months. When ready to eat, thaw it overnight in the fridge. Then, reheat in the oven for the best taste. For more details, check out the full recipe. Roasting cauliflower takes about 25 to 30 minutes. Preheat your oven to 425°F (220°C). Place the cauliflower on a baking sheet in a single layer. Halfway through, flip the florets for even cooking. You want them to be golden brown and fork-tender. Yes, you can make this dish ahead of time. Roast the cauliflower and let it cool. Store it in an airtight container in the fridge for up to three days. When you’re ready to serve, just reheat it in the oven. This keeps it crisp and tasty. Parmesan roasted cauliflower pairs well with many dishes. Serve it alongside grilled chicken or fish for a balanced meal. It also complements pasta or a fresh salad. You can even use it as a topping for grain bowls. This dish adds a flavorful crunch to your plate. For the full recipe, check out the details above! In this blog post, we explored how to make delicious Parmesan Roasted Cauliflower. We outlined the key ingredients and shared tips for picking top-quality ones. I provided step-by-step instructions, covering preparation, mixing, roasting, and serving. You learned tips to ensure perfect roasting and avoid common mistakes. We discussed variations like different cheeses and spices, along with storage and reheating advice. With these insights, you can enjoy this tasty dish in many ways. Take your time and have fun creating your own version!](https://dishtreats.com/wp-content/uploads/2025/06/1026dd12-7014-4148-8186-1edda0f6a7e3-768x768.webp)
. - Ensure even space on the baking sheet for optimal roasting. - Toss halfway through cooking for uniform caramelization. Roasting carrots and chickpeas makes them sweet and crunchy. When you spread them out, they cook evenly. If they touch, they steam instead of roast. This can make them soggy and less tasty. Tossing the mixture halfway is key. It helps to brown all sides well. This step adds more flavor and a lovely texture. - Experiment with different citrus juices like lime or orange. - Substitute tahini with Greek yogurt for a creamy dressing. The dressing can change the whole dish. Use lime juice for a zesty twist. Orange juice gives a sweet touch. Both add freshness and brightness. If you want a creamy option, use Greek yogurt instead of tahini. It makes the dressing rich and smooth. This swap gives a fun flavor change too. - Serve in individual bowls for a refined presentation. - Add a lemon wedge for guests to use. Presenting this salad in bowls looks nice. It makes each serving feel special. Guests can enjoy their own portion. Adding a lemon wedge on the side is a great idea. It lets everyone add a splash of fresh juice. This brightens the salad even more. For the full recipe, check the details above. Enjoy your cooking! {{image_4}} You can make this salad even better. Try adding other roasted veggies. Bell peppers bring sweetness. Sweet potatoes add creaminess. Both enhance flavor and texture. You can also toss in nuts or seeds. Almonds or sunflower seeds add a nice crunch. They make the salad more filling and fun. If you want more protein, try grilled chicken or tofu. Both options work well with roasted carrots and chickpeas. Grilled chicken adds a savory touch, while tofu keeps it plant-based. You can also use canned tuna. It gives the salad a different flavor and makes it heartier. Want to boost flavor? Experiment with fresh herbs. Cilantro or mint can brighten the taste. They add freshness that complements the roasted veggies. You can also spice it up with hot sauce. Just a dash gives the salad a nice kick. It’s a fun way to change the flavor profile. For the complete recipe, check out the Full Recipe section above. Store leftovers in an airtight container in the fridge. They are best consumed within 2-3 days. After that, the carrots may lose their crunch, and the flavors fade. Freezing this salad is not recommended. The dressing may separate when frozen. This can change the texture and taste of your salad. You can enjoy this salad cold or at room temperature. If you prefer, reheat in the oven. This helps retain the texture of the roasted carrots and chickpeas. Yes, use maple syrup instead of honey and omit the feta cheese. This keeps the flavors rich and plant-based. You won’t miss the cheese, trust me. The roasted carrots and chickpeas bring enough taste and texture to satisfy everyone. You can use black beans or white beans as alternatives. Both options provide protein and fiber. They also add a nice twist to the taste. Black beans bring a bit of earthiness, while white beans offer a creamier texture. Serve the dressing on the side to keep the greens crisp until serving. This way, they stay fresh and crunchy. Drizzle the dressing just before you eat for the best taste and texture. Spinach, arugula, or chopped kale work well for base greens. Each option adds a different flavor. Spinach is mild, arugula is peppery, and kale adds a hearty bite. Choose what you like best! This blog post shares a tasty recipe featuring roasted carrots and chickpeas on fresh greens. It walks through each step, from prep to assembly, and includes tips for perfect results. You can even tweak the dressing and add your favorite proteins. Don’t hesitate to make this salad your own. Experimenting with flavors makes cooking fun! Enjoy your healthy, vibrant salad that brings flavor and nutrition to your table.](https://dishtreats.com/wp-content/uploads/2025/07/15b40619-46f3-4baf-96e6-94c974b2a42a-768x768.webp)
![Creating a Grilled Peach Caprese Salad is simple and fun. Here’s what you need: - Ripe peaches - Fresh mozzarella - Mixed greens - Cherry tomatoes - Fresh basil leaves - Balsamic glaze - Extra virgin olive oil - Salt and black pepper Each ingredient plays a key role in this dish. Ripe peaches bring sweetness. Fresh mozzarella adds creaminess. Mixed greens provide a nice crunch. Cherry tomatoes add color and flavor. Fresh basil contributes a fragrant touch. The balsamic glaze adds a tangy finish. Extra virgin olive oil enhances the taste. Lastly, salt and pepper bring everything together. For the full recipe, check out the steps to make this tasty salad. Trust me, your taste buds will thank you! - Preheat the grill to medium-high heat. This helps create great grill marks. - Ensure your grill grates are clean and lightly oiled. This prevents sticking. - Start by cutting the peaches in half and removing the pit. - Brush the cut sides of the peach halves with olive oil. This adds flavor and helps them grill well. - Place the peach halves cut side down on the grill. Grill for about 3-4 minutes. You want those nice grill marks. - Once they soften slightly, remove them. Let them cool for a couple of minutes. - Grab a large serving platter. Create a bed of mixed greens in the center. - Place the grilled peach halves on top of the greens. Spread them out for a nice look. - Next, add slices of fresh mozzarella around the peaches. Then scatter halved cherry tomatoes. - Tear fresh basil leaves and sprinkle them over the salad. This adds a lovely aroma. - Finally, drizzle balsamic glaze over the salad. Add salt and black pepper to taste. - For the best flavor, serve the salad right away. You can chill it a bit if you prefer. For the complete recipe, check out the [Full Recipe]. To get perfect grill marks on your peaches, heat your grill to medium-high. Brush the cut sides of each peach half with olive oil. This helps prevent sticking and adds flavor. Look for ripe peaches that yield slightly when pressed. They should be fragrant and have a bright color. Presentation matters! Try arranging your salad in a spiral pattern. You can also layer the ingredients in single servings. This makes each plate look special. Pair your salad with a crisp white wine or a light red. Both will enhance the flavors of the dish. Want to mix things up? Try using different dressings like a lemon vinaigrette or honey mustard. Fresh herbs like mint or dill can add a twist. You could also sprinkle some chili flakes for a little heat. These simple changes will keep your salad exciting. For the full recipe, check here: [Full Recipe]. {{image_4}} You can change up your Grilled Peach Caprese Salad by swapping fruits. Try using ripe nectarines or plums instead of peaches. These fruits provide a sweet touch and work well on the grill. You can also use strawberries or even grilled pineapple for a fun twist. For cheese, fresh mozzarella is the classic choice. However, you can try burrata for a creamier texture. Feta cheese adds a salty punch, while goat cheese gives a tangy flavor. Each cheese brings its own flair to the dish. To make this salad vegan, skip the cheese and use a plant-based alternative. Cashew cheese or tofu can work well. Drizzle a vegan balsamic glaze for that sweet touch. If you need a gluten-free option, this salad is naturally gluten-free. Just make sure your balsamic glaze is gluten-free as well. Enjoy fresh ingredients without any worries. For the best flavor, pick peaches in late summer. They are sweet and juicy in this season. In spring, try using asparagus or snap peas for a fresh crunch. In winter, roasted root vegetables like beets can replace fresh greens. Add some nuts for extra texture and flavor. Adapt your salad to fit the season and enjoy a fresh taste year-round. For the complete recipe of Grilled Peach Caprese Salad, check the Full Recipe. To keep your Grilled Peach Caprese Salad fresh, store it properly. First, separate the components. This way, the flavors stay bright and fresh. - Peaches: Place grilled peaches in a sealed container. Store them in the fridge for up to three days. - Salad Greens: Keep mixed greens in a dry, airtight container. This keeps them crisp and fresh. - Cheese and Tomatoes: Store mozzarella and cherry tomatoes in separate containers. This helps prevent sogginess. - Balsamic Glaze: Keep the glaze in a small jar. It can last for weeks in the fridge. You might wonder if you should reheat grilled peaches. I recommend enjoying them cold. Their flavor shines best this way. But if you prefer warm peaches, here’s how to heat them: - Microwave: Place peaches on a microwave-safe plate. Heat for about 10-20 seconds. Check them often to avoid overheating. - Stovetop: Heat a non-stick pan over low heat. Add a dash of olive oil and warm the peaches for a minute. For other salad ingredients, like mozzarella and tomatoes, it’s best to enjoy them cold too. Mixing warm and cold can lead to a fun flavor contrast in your dish. To make this dish, follow these simple steps: 1. Preheat your grill to medium-high heat. 2. Brush cut sides of halved peaches with olive oil. 3. Grill peach halves cut side down for 3-4 minutes. 4. On a platter, spread mixed greens for a base. 5. Place grilled peaches on top of the greens. 6. Add mozzarella slices and halved cherry tomatoes around the peaches. 7. Scatter torn basil leaves over the salad. 8. Drizzle balsamic glaze on top, then season with salt and pepper. 9. Serve right away or chill slightly before serving. Fresh mozzarella is the classic choice for Caprese salad. Its creamy texture balances the sweetness of grilled peaches. You can also try burrata for extra creaminess. Feta adds a tangy twist, while goat cheese can give a bold flavor. Choose based on your taste preferences to enhance your salad. You can prep parts of the salad ahead of time. Grill the peaches and store them in the fridge. Wash and dry the greens and tomatoes, keeping them fresh. Assemble everything just before serving to maintain flavor and texture. This way, your salad stays fresh and tasty. Check the [Full Recipe] for more details. This blog shared how to make a Grilled Peach Caprese Salad. You learned about choosing ripe peaches, grilling them, and assembling the salad. Tips on serving and variations helped you create your own version. Remember to store leftovers properly to keep them fresh. With these insights, you can enjoy a delicious, refreshing salad anytime. Trust that your skills will shine. Enjoy experimenting with flavors and ingredients to make it uniquely yours. Your summer gatherings will never be the same!](https://dishtreats.com/wp-content/uploads/2025/06/c765deb6-47e2-46b1-bbfc-9b058c8c2a51-768x768.webp)
![To make Baked Garlic Parmesan Zucchini Fries, you need some simple and fresh ingredients. Here’s what you’ll need: - 2 medium zucchinis (cut into fry-shaped strips) - 1 cup whole wheat breadcrumbs - 1/2 cup grated Parmesan cheese - 2 cloves garlic (finely minced) - 1 teaspoon dried oregano - 1 teaspoon garlic powder - 1/2 teaspoon salt - 1/4 teaspoon freshly ground black pepper - 2 large eggs (beaten) - Cooking spray or light drizzle of olive oil These ingredients come together to create a tasty dish that is both healthy and satisfying. The zucchini offers a great crunch, while the garlic and Parmesan provide bold flavor. Using whole wheat breadcrumbs adds a nice texture and a bit of nuttiness. If you follow the recipe closely, you will get fries that are crispy on the outside and tender on the inside. You can check the Full Recipe for detailed instructions on how to bring this dish to life. - Set the temperature to 425°F (220°C). - Prepare a baking sheet with parchment paper. First, I like to get my oven hot. Preheating to 425°F helps the fries crisp nicely. Lining the baking sheet with parchment paper makes cleanup easy and keeps the fries from sticking. - Mix breadcrumbs, Parmesan cheese, minced garlic, oregano, garlic powder, salt, and pepper. In a shallow bowl, I mix the whole wheat breadcrumbs with grated Parmesan cheese. I add minced garlic for flavor, oregano for aroma, garlic powder, salt, and pepper. Mixing these ingredients well ensures that every fry gets a tasty coating. - Dip zucchini fries in beaten eggs and coat with breadcrumb mixture. I set another bowl with beaten eggs. Taking a zucchini fry, I dip it in the eggs, letting the extra drip off. Then, I coat it in the breadcrumb mixture. I press the crumbs on to make sure they stick well. This step is key for a crispy finish. - Place coated fries on the baking sheet and spray with cooking spray. Once breaded, I lay the fries in a single layer on the baking sheet. I like to spray the tops lightly with cooking spray. This helps them brown and adds crunch. - Bake for 20-25 minutes and turn halfway for even crisping. I slide the baking sheet into the oven and set a timer for 20 minutes. Halfway through, I flip the fries. This ensures they cook evenly and get that golden brown color we love. - Cool slightly before serving and add garnishes. After baking, I let the fries cool for a few minutes. This step helps them crisp even more. I like to serve them hot, sprinkled with extra Parmesan and a small bowl of marinara sauce on the side. You can find the full recipe above for more details. To get the best crispiness, I recommend using cooking spray or a light drizzle of olive oil. This helps the fries brown and stay crunchy. Make sure not to overcrowd the baking sheet. If the fries are too close, they can steam instead of bake. For extra crunch, try broiling them for the last few minutes. Just keep an eye on them to prevent burning. Serve the zucchini fries hot and sprinkle some extra Parmesan on top. This adds flavor and makes them look great. Pair them with marinara sauce for dipping. The rich sauce complements the garlic and cheese perfectly. You could also try ranch or a spicy aioli for a twist. Removing excess moisture from zucchinis is key to crispiness. Too much water makes them soggy. To dry zucchinis, slice them and place them on paper towels. Sprinkle a little salt on top and let them sit for about 10 minutes. The salt draws out moisture. Afterward, pat them dry with more paper towels. This simple step helps you achieve that perfect crunch in your baked garlic Parmesan zucchini fries. For the full recipe, check out the details above. {{image_4}} You can make your zucchini fries even better by adding spices. Try paprika for a smoky taste. Cayenne pepper adds a nice kick, too. Just sprinkle some into the breadcrumb mix before coating the zucchini fries. This small change can make a big difference in flavor. If you want to switch up the cheese, consider using mozzarella. It melts beautifully and adds a creamy texture. You can also try vegan cheese for a plant-based option. Just make sure it melts well to keep that crispy exterior intact. You can mix your zucchini fries with other veggies for more variety. Eggplant slices work well when cut into fry shapes. Sweet potatoes are another great choice. They will add a sweet flavor and vibrant color to your plate. Feel free to experiment with whatever veggies you have on hand. For the complete recipe, check out the [Full Recipe]. To keep your zucchini fries fresh, store them in an airtight container in the refrigerator. This helps prevent them from getting soggy. They will last for about three days. Make sure to let them cool down before sealing the container. The best way to reheat zucchini fries is in the oven. Preheat your oven to 400°F (200°C). Place the fries on a baking sheet. Heat them for about 10 minutes. This method keeps them crispy. You can also use an air fryer if you have one. Set it to 350°F (175°C) and heat for about 5 minutes. If you want to store them longer, you can freeze the zucchini fries. First, let them cool completely. Next, spread them out in a single layer on a baking sheet. Freeze them for about 1-2 hours. Once frozen, transfer them to a freezer bag. This way, they won’t stick together. When ready to eat, bake them straight from the freezer. Add a few extra minutes to the cooking time for best results. Yes, you can use regular breadcrumbs. The texture will be slightly different. Whole wheat breadcrumbs add a nutty flavor and more fiber. If you prefer a lighter taste, go for regular ones. Both will still give you a crispy finish. To make these fries gluten-free, use gluten-free breadcrumbs. You can find these at most stores. Another great option is to use crushed gluten-free crackers. They add a nice crunch. Just make sure to check the labels for gluten-free assurance. Many sauces go well with zucchini fries. Popular choices include marinara, ranch, or garlic aioli. You can also try a spicy sriracha mayo for a kick. For a homemade touch, mix Greek yogurt with herbs for a fresh dip. To make these fries vegan, substitute the eggs with flax eggs. Mix 1 tablespoon of flaxseed meal with 2.5 tablespoons of water. Let it sit for a few minutes until it thickens. For cheese, you can use nutritional yeast or a store-bought vegan cheese. These swaps keep the flavor while making it plant-based. Check out the Full Recipe for detailed steps to make these tasty Baked Garlic Parmesan Zucchini Fries! This blog post has covered the tasty journey of making zucchini fries. We explored key ingredients, step-by-step instructions, and helpful tips. You learned how to get crispy fries and about delicious variations. Now, you can enjoy this snack with great flavors and textures. Try out the ideas and personalize your dish. Whether it’s for a party or a snack, zucchini fries are a fun, healthy choice. Get cooking and taste the difference!](https://dishtreats.com/wp-content/uploads/2025/06/b228a051-b543-4822-a33a-588c5a943e46-768x768.webp)