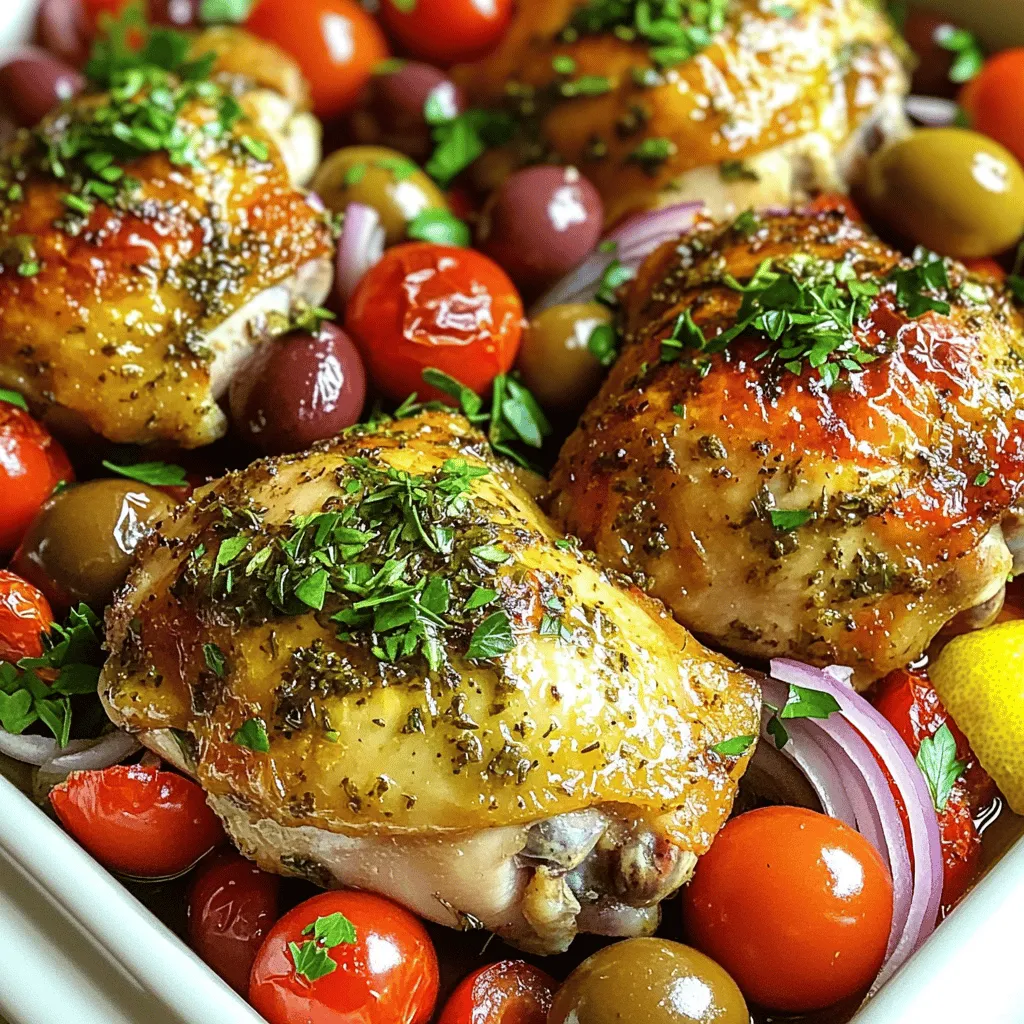
Baked Greek Chicken Flavorful and Easy Dinner Option

Looking for an easy, tasty dinner? Try my Baked Greek Chicken! This dish is packed with flavor and only takes a bit of prep time. You’ll enjoy juicy chicken thighs, fresh veggies, and zesty herbs in every bite. Whether you’re a busy parent or just short on time, this meal will impress everyone at your table. Let’s make dinner fun and delicious together!
Ingredients
List of Ingredients
- 4 boneless, skinless chicken thighs
- 3 tablespoons extra virgin olive oil
- 2 teaspoons dried oregano
- 1 teaspoon dried thyme
- 1 lemon (for zesting and juicing)
- 4 cloves garlic, finely minced
- 1 teaspoon sea salt
- ½ teaspoon freshly ground black pepper
- 1 cup cherry tomatoes, halved
- 1 medium red onion, thinly sliced
- 1 cup Kalamata olives, pitted and sliced
- Fresh parsley, finely chopped (for garnish)
To make Baked Greek Chicken, gather the ingredients first. Start with 4 boneless, skinless chicken thighs. This cut of meat stays juicy and tender when baked. You will also need 3 tablespoons of extra virgin olive oil for flavor and moisture.
Next, you will want to use dried oregano and thyme for that classic Greek taste. Zest and juice one lemon to add brightness. Four cloves of minced garlic will give a lovely aroma. Don’t forget sea salt and black pepper for seasoning.
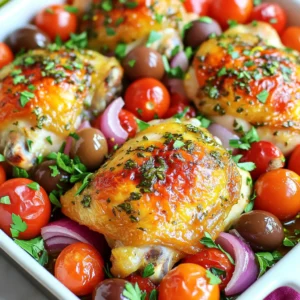
For the veggies, grab 1 cup of halved cherry tomatoes and 1 medium red onion, thinly sliced. These add color and taste. Finally, use 1 cup of pitted and sliced Kalamata olives for a salty kick. Finish with fresh parsley to garnish the dish.
These ingredients come together to create a flavorful and easy dinner option.
Step-by-Step Instructions
Preheat and Prepare
- Preheat the oven to 400°F (200°C).
- In a bowl, mix together the olive oil, oregano, thyme, lemon zest, and lemon juice. Add minced garlic, sea salt, and black pepper. Whisk until well combined.
Marinating the Chicken
- Coat the chicken thighs in the marinade, making sure every piece is covered.
- Let the chicken marinate for at least 30 minutes. For more flavor, you can refrigerate it for up to 2 hours.
Baking the Dish
- Arrange cherry tomatoes and red onion slices around the chicken in the baking dish.
- Scatter Kalamata olives over the chicken and vegetables.
- Put the baking dish in the oven and bake for 30-35 minutes. The chicken should be done when it reaches an internal temperature of 165°F (74°C) and has a golden color.
These steps will help you make a flavorful Baked Greek Chicken that pleases everyone.
Tips & Tricks
Achieving Authentic Flavor
To bring out the best in your Baked Greek Chicken, use fresh herbs. Fresh oregano and parsley add depth. You can also adjust marinating time for stronger tastes. Marinating for a few hours makes a big difference.
Cooking Techniques
Ensure even cooking by spacing the chicken and veggies in the dish. This helps everything cook nicely. Keep an eye on the internal temperature of the chicken. It should reach 165°F (74°C) for safe eating.
Presentation Tips
Serving is just as important as cooking. Use a rustic platter for a beautiful display. Drizzle with olive oil for a shiny look. Garnish with crumbled feta cheese and lemon wedges for color and flavor. This makes your dish pop and taste even better!
Variations
Flavor Twists
You can easily change this recipe to suit your taste. For a briny kick, add capers. They lend a unique salty flavor that pairs well with the chicken. If you prefer different cuts of meat, swap chicken thighs for breasts or drumsticks. This will give you a new texture and flavor profile while keeping the dish simple.
Serving Suggestions
When serving Baked Greek Chicken, consider pairing it with a fresh Greek salad. The crisp veggies and tangy dressing balance the rich flavors of the chicken. Rice pilaf also makes a great side. It absorbs the tasty juices from the chicken. For a complete meal, serve warm pita bread alongside. It’s perfect for scooping up every bit of goodness.
Dietary Adjustments
If you need a gluten-free meal, check the oil and toppings. Ensure they are free from gluten. You can also adjust for low sodium. Reduce salt and olives to make it heart-friendly. This way, you can enjoy Baked Greek Chicken without worry, while still savoring its deliciousness.
Storage Info
Storing Leftovers
Keep any leftover Baked Greek Chicken in an airtight container in the refrigerator. This helps keep it fresh. Consume the leftovers within 3-4 days for the best quality. Otherwise, the taste and texture may suffer.
Freezing Instructions
You can freeze the Baked Greek Chicken for later. Freeze it in portions for easy meal prep. This makes it simple to grab a meal when you are short on time. To enjoy your frozen chicken, thaw it in the refrigerator before reheating. This way, it stays juicy and tasty.
Reheating Tips
For the best results, reheat your chicken in the oven. This method helps keep the chicken crispy. If you need a quicker option, you can microwave it on low power. This method is convenient but may not keep the same texture.
FAQs
How long should I marinate Baked Greek Chicken?
I recommend marinating the chicken for at least 30 minutes. This time allows the flavors to soak into the meat. If you have more time, marinate it for up to 2 hours in the fridge. This longer time makes the chicken even more tasty and juicy.
Can I use bone-in chicken for this recipe?
Yes, you can use bone-in chicken pieces. Just make sure to adjust the cooking time. Bone-in chicken usually takes longer to cook. Aim for about 40 to 45 minutes in the oven. Always check the internal temperature to ensure it reaches 165°F (74°C).
What side dishes pair well with Baked Greek Chicken?
Many sides go well with Baked Greek Chicken. Here are a few ideas:
- Greek salad with cucumbers, tomatoes, and feta cheese
- Lemon rice or rice pilaf for a hearty touch
- Roasted vegetables like zucchini and bell peppers
- Warm pita bread for a nice dip in the juices
How do I know when the chicken is fully cooked?
To check if the chicken is done, use a meat thermometer. Insert it into the thickest part of the chicken. It should read 165°F (74°C). If you don’t have a thermometer, cut into the chicken. The juices should run clear, and the meat should not be pink.
This recipe for Baked Greek Chicken blends tasty ingredients and simple steps. You learned how to marinate chicken and bake it with fresh veggies. The tips on flavor and presentation help you create a dish that looks great and tastes even better.
You can adjust this meal to fit your needs. Try different chicken cuts or add your favorite sides. Storing leftovers is easy, making this dish a great choice for busy days. Enjoy your cooking adventure and impress your family with this delicious meal!
![To make this dish, you will need: - 1 lb Brussels sprouts, trimmed and halved - 3 tablespoons extra virgin olive oil - 1/4 cup pure maple syrup - 1 tablespoon balsamic vinegar - 1 teaspoon garlic powder - Salt and freshly ground black pepper to taste These ingredients come together to create a sweet and savory glaze. The maple syrup adds sweetness, while the balsamic vinegar gives tanginess. The olive oil helps with roasting, making the sprouts tender and tasty. You can add these optional ingredients for extra flavor and texture: - 1/4 cup chopped walnuts - Fresh thyme leaves for garnish Walnuts add a nice crunch, while thyme gives a fresh aroma. Both options enhance the dish without overpowering it. This dish is not just tasty; it’s also good for you. Here’s a quick look at the nutrition per serving: - Calories: About 180 - Protein: 3g - Carbohydrates: 25g - Fat: 8g - Fiber: 4g Brussels sprouts are rich in vitamins C and K. The maple syrup provides natural sugars, making this dish a healthy choice. You get great flavors and health benefits in one meal. For the complete recipe, check the Full Recipe section above! First, we need to preheat the oven to 400°F (200°C). This heat is perfect for roasting. A hot oven ensures crispy edges and tender centers for your Brussels sprouts. Next, gather your ingredients. You will need: - 1 lb Brussels sprouts, trimmed and halved - 3 tablespoons extra virgin olive oil - 1/4 cup pure maple syrup - 1 tablespoon balsamic vinegar - 1 teaspoon garlic powder - Salt and freshly ground black pepper to taste - 1/4 cup chopped walnuts (optional for crunch) - Fresh thyme leaves for garnish (optional for aroma and color) In a large bowl, mix the halved Brussels sprouts with olive oil, maple syrup, balsamic vinegar, garlic powder, salt, and pepper. Toss everything well. Make sure every sprout gets coated in the sweet and savory sauce. This step is key for flavor. Prepare your baking sheet by lining it with parchment paper. This makes cleaning easy and helps prevent sticking. Spread the Brussels sprouts in a single layer on the sheet. Give them space to roast well. Now, place the baking sheet in the hot oven. Roast the sprouts for 25 minutes. Halfway through, stir them to promote even cooking. You want them to get tender and brown. If you add walnuts, toss them on the sheet during the last 5 minutes. This will give them a nice toast and extra crunch. Once done, take the Brussels sprouts out and let them cool for a minute. Transfer them to a serving dish. For a finishing touch, sprinkle fresh thyme leaves on top. This adds a nice pop of color and aroma to your dish. Enjoy this full recipe for a delicious treat! To get that perfect glaze, start with good maple syrup. Use pure maple syrup for the best flavor. Mix it well with olive oil and balsamic vinegar; this combo really shines. Make sure to coat the Brussels sprouts evenly. This helps each piece get that sweet, sticky glaze. Toss them well in the bowl before roasting. Roasting Brussels sprouts needs some care. First, preheat your oven to 400°F (200°C). This hot oven helps them caramelize. Spread the sprouts on a baking sheet in a single layer. If they are crowded, they won't brown well. Stir them halfway through cooking to ensure even roasting. You want them golden brown and tender, about 25 minutes in the oven. When ready to serve, think about how to make them look nice. Place the roasted sprouts on a large platter. You can arrange them in a circle for a pretty look. If you added walnuts, sprinkle them on top for crunch. Fresh thyme leaves also add color and smell great. This makes the dish not just tasty but beautiful too. For the full recipe, check out the details above. {{image_4}} You can switch up the sweetener for a twist. Try honey or agave syrup. These will add their own unique flavors. You can also use coconut sugar for a richer taste. If you like a kick, add some chili flakes for heat. A dash of orange juice can also brighten up the sweetness. This recipe is already vegetarian. To make it vegan, ensure the maple syrup is pure. You can also use almond oil instead of olive oil for a different flavor. For creaminess, add a dollop of vegan sour cream on top before serving. This adds a lovely tang that pairs well with the sweetness. Seasonal swaps can make this dish even better. In spring, add fresh peas for color and sweetness. During fall, toss in some diced apples for a sweet crunch. In winter, try adding roasted chestnuts for a nutty flavor. These changes keep the dish fresh and exciting every time you make it. For the full recipe, you can refer back to the detailed instructions provided. After enjoying your maple glazed Brussels sprouts, store any leftovers in an airtight container. This keeps them fresh and prevents odors. Let them cool first before sealing. Place the container in the fridge. They stay good for about 3 to 5 days. If you want to keep them longer, consider freezing. Reheating your Brussels sprouts can be quick and easy. You can use the oven or stovetop. If you use the oven, preheat it to 350°F (175°C). Spread the sprouts on a baking sheet and heat for about 10-15 minutes. Stir halfway through to ensure even warming. If you prefer the stovetop, heat a pan over medium heat. Add a bit of olive oil and toss the sprouts until warmed through. Freezing Brussels sprouts is a smart way to save them for later. First, blanch them in boiling water for 3 minutes. Then, cool them in ice water. This keeps their bright color and flavor. Drain and dry the sprouts, then place them in a freezer bag. Remove as much air as you can before sealing. They can last up to 6 months in the freezer. When you're ready to use them, just thaw and reheat! Enjoy your deliciously roasted maple glazed Brussels sprouts from [Full Recipe] and savor every bite! Yes, you can prep Brussels sprouts in advance. Trim and halve them a day before. Store them in an airtight container in the fridge. When you're ready, mix them with the other ingredients from the Full Recipe. This helps save time and makes cooking easier. Maple glazed Brussels sprouts pair well with many dishes. Here are some great options: - Roast chicken for a savory touch. - Grilled salmon for a healthy protein. - Quinoa salad for a hearty side. - Mashed potatoes for comfort food lovers. These options balance the sweet and savory flavors of the sprouts. To make this dish vegan, swap out the maple syrup for agave nectar. This keeps the sweetness intact. You can also use vegetable oil instead of olive oil if you prefer. Follow the Full Recipe as is, making those simple swaps. Enjoy the same great taste with a vegan twist! In this blog post, we covered how to make maple glazed Brussels sprouts. We discussed the key ingredients and provided step-by-step instructions. Tips helped you achieve the perfect glaze and roasting method. You also learned about variations, storage, and common questions. Now, you have all the tools to enjoy this dish. Experiment with flavors and enjoy your cooking!](https://dishtreats.com/wp-content/uploads/2025/06/8ccc11bb-56ad-4722-8e0d-cbebb28a9ca5-768x768.webp)
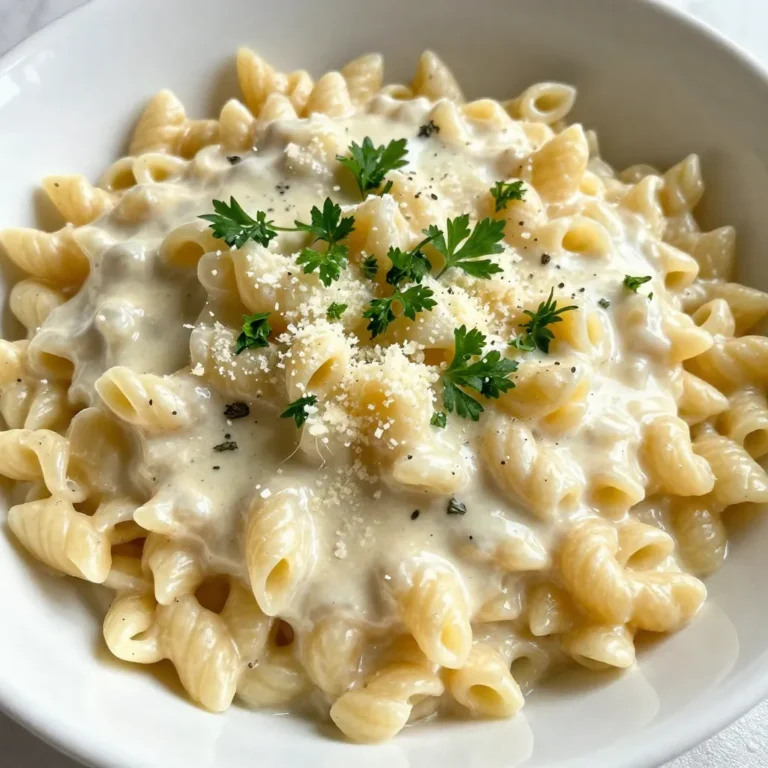
![To make Classic Chicken Marsala, you will need: - 4 boneless, skinless chicken breasts - Sea salt and freshly cracked black pepper, to taste - 1/2 cup all-purpose flour, for dredging - 4 tablespoons extra virgin olive oil - 2 tablespoons unsalted butter - 8 ounces cremini mushrooms, thinly sliced - 1 cup low-sodium chicken broth - 2 tablespoons freshly squeezed lemon juice - 1/4 cup fresh parsley, finely chopped, for garnish Using fresh ingredients makes all the difference in your dish. Fresh chicken tastes better and has better texture. Fresh mushrooms add depth and flavor. Fresh herbs, like parsley, bring vibrant notes to your plate. Fresh ingredients enhance the overall taste and make your meal more enjoyable. They can transform a simple dish into something special. If you can't find certain items, don't worry! Here are some easy swaps: - Chicken breasts: You can use chicken thighs for a richer flavor. - Cremini mushrooms: Use button mushrooms if cremini are not available. - Olive oil: Use canola or vegetable oil if you're out of olive oil. - Chicken broth: Vegetable broth works well for a lighter taste. - Lemon juice: You can use vinegar as a tangy alternative if you lack lemons. These substitutes will keep your Chicken Marsala flavorful and delicious, even with changes. 1. First, season the chicken breasts with salt and pepper. 2. Dredge each breast in flour. Shake off any extra flour. 3. Heat 2 tablespoons of olive oil in a skillet over medium heat. 4. Place the chicken in the skillet. Cook for 5-6 minutes on each side. 5. Remove the chicken from the skillet and keep it warm on a plate. 6. Add the remaining olive oil and butter to the same skillet. 7. Once the butter melts, add the sliced mushrooms. Sauté for 5 minutes. 8. Pour in the chicken broth and lemon juice. Scrape the skillet's bottom. 9. Simmer the sauce for 5 minutes until it thickens. 10. Return the chicken to the skillet. Spoon sauce over the top. 11. Simmer everything together for 2-3 minutes. 12. Finish with parsley before serving. To get the best Chicken Marsala, focus on these techniques: - Dredging: Flour helps create a crust. It locks in moisture and adds flavor. - Searing: Cooking the chicken on medium heat gives a golden crust. - Deglazing: Scraping the skillet adds depth to the sauce. - Simmering: Letting the sauce thicken enhances the flavor. Here are some tips to avoid issues while cooking: - Skipping seasoning: Always season the chicken well. It makes a big difference. - Overcrowding the skillet: Cook in batches if needed. This keeps the heat high. - Not checking doneness: Use a meat thermometer. Chicken should reach 165°F. - Rushing the sauce: Let it simmer. This builds the best flavor. For the complete cooking process, check the Full Recipe. Serve Chicken Marsala on a large plate. Spoon the rich mushroom sauce over the chicken. Pair it with creamy mashed potatoes or steamed vegetables. These sides add color and balance to the dish. I love adding a bright green salad too. It makes the meal complete and fresh. To boost flavor, season the chicken well with sea salt and pepper. Dredging it in flour gives it a nice crust. Be sure to use fresh mushrooms for the best taste. Cremini mushrooms add a deep, earthy flavor. Deglazing the skillet with chicken broth is key. It helps pick up all the tasty bits left behind. A splash of lemon juice brightens the dish. It cuts through the richness and makes every bite pop. When it comes to drinks, I suggest a dry white wine. A good Sauvignon Blanc or Chardonnay works well. These wines complement the chicken and sauce without overpowering them. If you prefer something non-alcoholic, try sparkling water with lemon. It refreshes your palate between bites. Enjoy your meal with a suitable drink for a perfect dining experience. Check out the Full Recipe for more details. {{image_4}} You can add herbs and spices to give Chicken Marsala a fun twist. Try adding fresh thyme or rosemary for a fragrant touch. Paprika can add a bit of heat and color. You can also use garlic powder or onion powder to deepen the flavor. Mix these into the flour before dredging the chicken. This small change can make a big difference in taste. If you want a vegetarian or vegan version, replace the chicken with hearty mushrooms or eggplant. Both options soak up the sauce well. Use vegetable broth instead of chicken broth for a rich flavor. You may also try tofu for a protein boost. Dredge the tofu in flour like the chicken for a satisfying crunch. You can play with the sauce to change the flavor profile. For a creamier version, add heavy cream to the broth. This will give you a rich, luscious sauce that coats the chicken well. You can also use Marsala wine for a sweeter touch. If you want a tangy flavor, use balsamic vinegar instead of lemon juice. Each of these swaps can help you create a unique dish. For the full recipe, check the [Full Recipe]. To store your Classic Chicken Marsala, let it cool first. Place the chicken and sauce in an airtight container. Make sure to separate the sauce from the chicken if you can. This helps keep the chicken moist. Place the container in the fridge. It’s best to use the leftovers within three days for the best taste. When reheating Classic Chicken Marsala, use a skillet for the best results. Warm it over medium heat. Add a splash of chicken broth or water to keep it moist. Stir gently until heated through. You can also microwave it, but be careful not to overheat. This can dry out the chicken. Classic Chicken Marsala lasts about three days in the fridge. If you want to keep it longer, freeze it. In the freezer, it will last up to three months. Just remember to store it in a freezer-safe container. To enjoy it later, thaw it in the fridge overnight before reheating. For more details on making this dish, check out the Full Recipe. Chicken Marsala is made of simple, tasty ingredients. You need chicken breasts, mushrooms, and Marsala wine. The sauce gets its flavor from chicken broth and lemon juice. You also use flour to coat the chicken. Olive oil and butter add richness. Fresh parsley gives a nice touch at the end. Yes, you can prepare Chicken Marsala ahead of time. Cook the chicken and store it in the fridge. Keep the sauce separate to avoid sogginess. When you are ready to serve, just reheat both. This keeps the chicken juicy and the sauce fresh. The best wine for Chicken Marsala is a dry Marsala wine. This wine adds depth and sweetness to the dish. If you can't find Marsala, you can use dry sherry or white wine. These alternatives work well but may change the flavor slightly. Always choose a wine you enjoy drinking! In this article, we covered the crucial ingredients for Chicken Marsala and why freshness matters. I shared step-by-step instructions to help you cook it perfectly. We explored tips for serving and pairing drinks, as well as variations for every taste. Finally, I explained how to store leftovers safely. Cooking Chicken Marsala can be easy and fun. With the right tips and knowledge, you can enjoy a delicious meal every time.](https://dishtreats.com/wp-content/uploads/2025/06/e9aedbd7-71f4-4133-b36d-4fb1a0e8152d-768x768.webp)