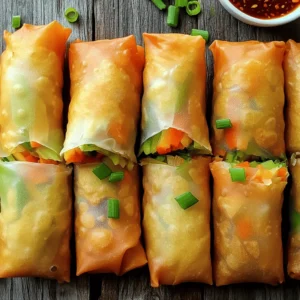
Crispy Vegetable Spring Rolls Delightful Homemade Snack

Crispy Vegetable Spring Rolls are the perfect snack for any occasion. They’re easy to make and packed with fresh veggies. In this article, I’ll share how to mix a colorful filling, roll them just right, and fry them until golden. Want to learn tips for that perfect crunch? I’ve got you covered! Get ready to impress your family and friends with this delightful homemade treat!
Ingredients
Fresh Vegetables
- 1 cup cabbage, finely shredded
- 1 medium carrot, julienned
- 1 bell pepper (any color), julienned
- 1 cup fresh bean sprouts
- 2 green onions, finely chopped
Seasonings and Oils
- 1 clove garlic, minced
- 1 teaspoon fresh ginger, grated
- 1 tablespoon soy sauce
- 1 teaspoon sesame oil
- Salt and pepper, to taste
Wrappers and Frying
- 10-12 spring roll wrappers
- Vegetable oil, for deep frying
To make crispy vegetable spring rolls, you need fresh, vibrant ingredients. Start with your vegetables. Cabbage adds crunch, while carrots and bell peppers bring color. Bean sprouts provide a nice texture, and green onions enhance the flavor.
Next, season the veggies with garlic and ginger. These two add a punch of taste. Soy sauce and sesame oil create a savory base. Salt and pepper will balance the flavors.
Now, choose your wrappers. Spring roll wrappers are thin and crisp up well when fried. You’ll also need vegetable oil for frying. Heat it to the right temperature for the best results.This simple mix of ingredients gives you a tasty snack that everyone will love!
Step-by-Step Instructions
Mixing the Filling
Combine all vegetable ingredients in a bowl.
- 1 cup cabbage, finely shredded
- 1 medium carrot, julienned
- 1 bell pepper (any color), julienned
- 1 cup fresh bean sprouts
- 2 green onions, finely chopped
- 1 clove garlic, minced
- 1 teaspoon fresh ginger, grated
First, mix the vegetables well. This helps spread the flavors evenly. Next, season with soy sauce, sesame oil, salt, and pepper. Toss all the ingredients together. You want every bite to be tasty.
Rolling the Spring Rolls
Now, let’s roll these delicious spring rolls. Take one spring roll wrapper and place it on a clean, flat surface. Make sure one corner points toward you. Spoon about 2 tablespoons of the filling onto the wrapper. Position it about 2 inches from the corner closest to you.
Start by folding the bottom corner over the filling tightly. Then, fold in the two side corners. Continue rolling it tightly away from you. Use a small amount of water to moisten the top corner of the wrapper. This helps seal the roll. Repeat this process until you finish all the wrappers and filling.
Frying the Spring Rolls
Next, heat oil in a large frying pan or deep skillet. You need enough oil to submerge the rolls. Heat the oil to about 350°F (175°C). This temperature is key for crispy spring rolls.
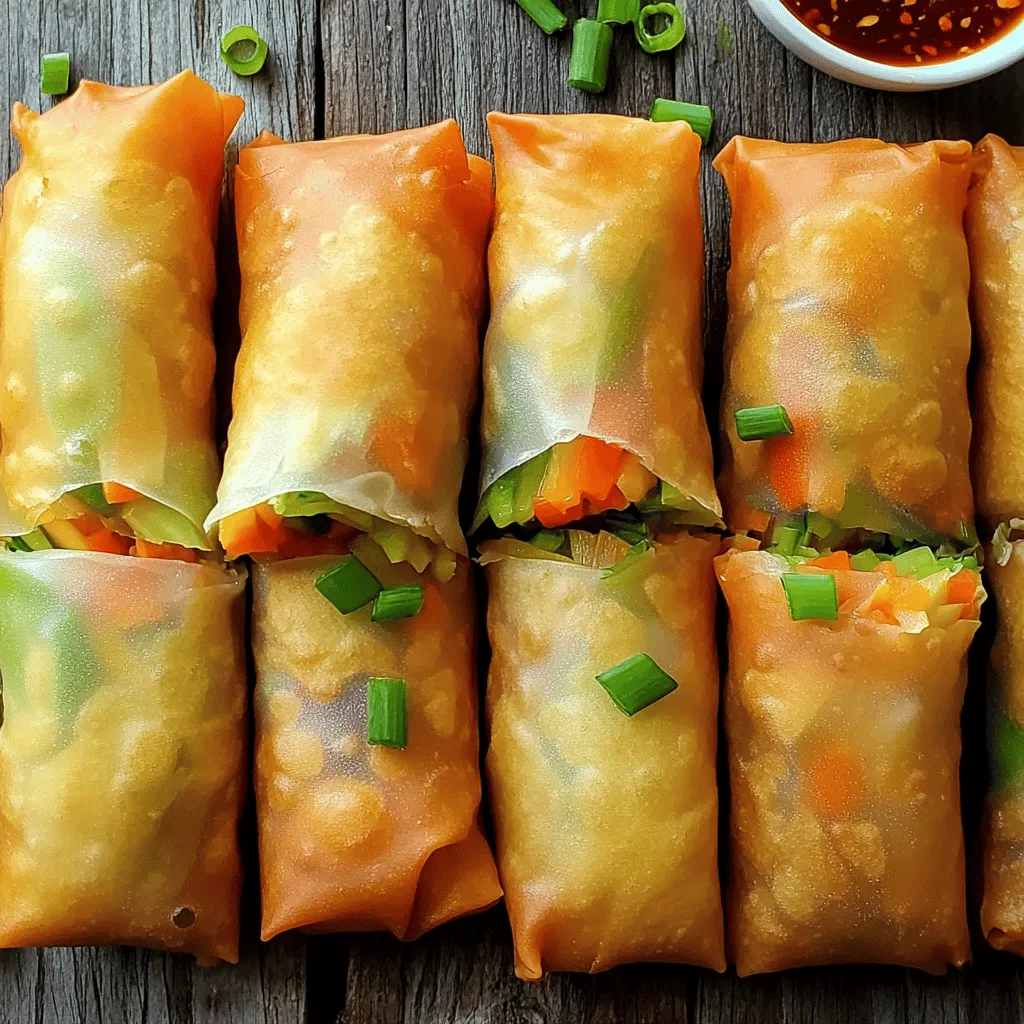
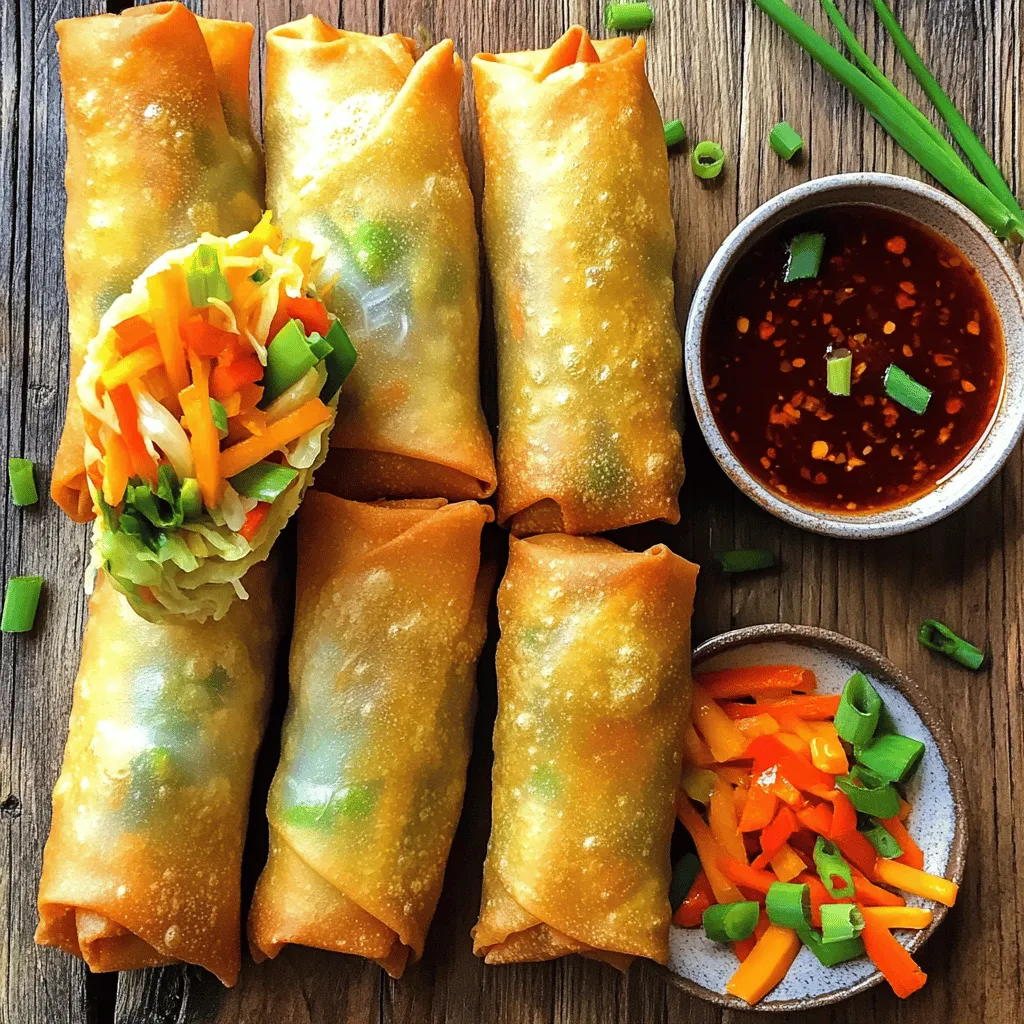
Once the oil is hot, carefully add a few spring rolls. Avoid overcrowding the pan. Fry them until golden brown and crispy, about 3-4 minutes per side. Using a slotted spoon, remove the spring rolls from the oil. Place them on a plate lined with paper towels. This helps drain excess oil. Serve the crispy vegetable spring rolls hot. Enjoy them with sweet chili sauce or soy sauce for dipping.
Tips & Tricks
Achieving Crispiness
Oil temperature is key for crispy spring rolls. Heat your oil to around 350°F (175°C). If the oil is too cool, the rolls will soak up oil and become soggy. If it’s too hot, the outside will burn before the inside cooks.
Use a deep skillet or a fryer for even cooking. Fry a few rolls at a time to avoid crowding. This keeps the oil hot and helps achieve that golden brown color we all love.
Perfecting the Roll
When rolling, don’t overfill the wrappers. About 2 tablespoons of filling works best. This helps the rolls stay tight and prevents spilling.
Seal the rolls well. After folding in the sides, moisten the top corner with water to stick. A tight seal keeps the delicious filling inside while frying.
Serving Suggestions
Serve your spring rolls with tasty dipping sauces. Sweet chili sauce or soy sauce are great choices. They add flavor and balance the crunch.
For presentation, arrange the rolls on a colorful plate. Garnish with fresh cilantro or sesame seeds. This adds a nice touch and makes the dish pop.Enjoy making these delightful snacks!

Variations
Vegan Options
You can easily make these spring rolls vegan by swapping out non-vegan items. Use soy sauce instead of fish sauce. Replace any egg wash with water or a plant-based alternative. Here are some more veggies to consider:
- Zucchini, finely grated
- Mushrooms, chopped
- Spinach or kale, chopped
These substitutions keep the taste vibrant. You can mix and match to find your favorite combo.
Gluten-Free Alternatives
For gluten-free spring rolls, look for gluten-free wrappers made from rice or tapioca. They are easy to find in most stores. When frying, watch the heat closely. If the oil is too hot, the rolls burn. If it’s too cool, they become soggy. To keep the taste and texture, use fresh veggies and avoid overcooking.
Different Fillings
Want to try different flavors? You can add cooked chicken, shrimp, or even tofu for protein. Consider fusion-inspired ideas, like adding spicy kimchi or Thai curry paste to your mix. These twists give your spring rolls a fun twist. Don’t hesitate to experiment and find your perfect filling.
Storage Info
Storing Uncooked Spring Rolls
To store uncooked spring rolls, place them in a single layer on a plate. Cover them with a damp cloth or plastic wrap. This helps keep them moist. You can store them in the fridge for up to two days. If you leave them too long, the wrappers may dry out or crack.
Storing Cooked Spring Rolls
For cooked spring rolls, the goal is to keep them crispy. Let them cool completely on a wire rack. This prevents steam from making them soggy. Store them in an airtight container in the fridge. They can last for up to three days. To reheat, place them in a hot oven at 375°F (190°C) for about 10 minutes. This keeps them crispy.
Freezing Tips
You can freeze both uncooked and cooked spring rolls. For uncooked rolls, layer them between parchment paper in a freezer-safe bag. Make sure to remove as much air as possible. They can last in the freezer for up to three months. To cook from frozen, do not thaw. Simply fry them straight from the freezer. Cook for a few extra minutes until golden brown. For cooked rolls, wrap them tightly in foil before freezing. Thaw them in the fridge overnight before reheating in the oven. Enjoy your crispy vegetable spring rolls anytime!
FAQs
How do I make spring rolls extra crispy?
To make spring rolls extra crispy, focus on oil temperature. Heat oil to 350°F (175°C) before frying. If the oil is too cool, the rolls will soak up oil and become soggy. Fry in small batches to keep the temperature steady. Cook each batch for 3-4 minutes until golden brown.
Can I bake crispy vegetable spring rolls?
Yes, you can bake spring rolls for a healthier option. Preheat your oven to 400°F (200°C). Place the rolls on a baking sheet lined with parchment paper. Brush them lightly with oil for a nice crunch. Bake for about 20-25 minutes or until golden brown, flipping halfway through.
What dipping sauces pair well with vegetable spring rolls?
Here are some great sauces to try:
- Sweet chili sauce: Sweet with a hint of spice.
- Soy sauce: Salty and umami-rich.
- Peanut sauce: Creamy with a nutty flavor.
- Hoisin sauce: Sweet and tangy, perfect for dipping.
What are some recommended brands for spring roll wrappers?
Some trusted brands include:
- Wonton Food: Available in many grocery stores.
- Dynasty: Often found in Asian markets.
- Nasoya: Known for quality vegan options.
Look for these brands in the international aisle or online.
How do I know when the spring rolls are done frying?
The spring rolls are done when they turn golden brown. They should be crispy to the touch. If you see bubbles around them in the oil, that’s a good sign they are cooking well. Use a slotted spoon to check and remove them once they reach that perfect color.
Additional Cooking Techniques
You can prepare spring rolls using different cooking methods for great results. Each method offers a unique taste and texture.
Air Frying
Air frying is a healthier choice. It uses hot air to cook the rolls and gives them a nice crunch without deep-frying. To air fry, lightly spray the spring rolls with oil. Preheat your air fryer to 375°F (190°C). Place the spring rolls in a single layer in the basket. Cook for about 12-15 minutes, flipping them halfway through. You will love the crispy results!
Pan-Frying
Pan-frying is another easy technique. Use a non-stick skillet with a small amount of oil. Heat the oil over medium heat. Place the spring rolls in the pan, ensuring they do not touch. Cook each side for about 3-4 minutes until golden brown. This method adds a nice crunch while using less oil than deep frying.
Baking
You can also bake spring rolls for a lighter option. Preheat your oven to 400°F (200°C). Arrange the rolls on a baking sheet lined with parchment paper. Brush them lightly with oil. Bake for 20-25 minutes, flipping them halfway through. This method keeps them crispy and delicious without frying.
Each technique allows you to enjoy crispy vegetable spring rolls in your own way. Choose your favorite method or try them all for variety!
You now have all the ingredients and steps to make perfect vegetable spring rolls. Remember, fresh veggies and the right oil temperature are key for crispiness. Don’t forget the fun of rolling and filling! Explore variations to suit your taste, whether vegan or meat-based.
I hope you feel ready to try this tasty dish. Enjoy creating these spring rolls; they are sure to impress!


![To make Baked Garlic Parmesan Zucchini Fries, you need some simple and fresh ingredients. Here’s what you’ll need: - 2 medium zucchinis (cut into fry-shaped strips) - 1 cup whole wheat breadcrumbs - 1/2 cup grated Parmesan cheese - 2 cloves garlic (finely minced) - 1 teaspoon dried oregano - 1 teaspoon garlic powder - 1/2 teaspoon salt - 1/4 teaspoon freshly ground black pepper - 2 large eggs (beaten) - Cooking spray or light drizzle of olive oil These ingredients come together to create a tasty dish that is both healthy and satisfying. The zucchini offers a great crunch, while the garlic and Parmesan provide bold flavor. Using whole wheat breadcrumbs adds a nice texture and a bit of nuttiness. If you follow the recipe closely, you will get fries that are crispy on the outside and tender on the inside. You can check the Full Recipe for detailed instructions on how to bring this dish to life. - Set the temperature to 425°F (220°C). - Prepare a baking sheet with parchment paper. First, I like to get my oven hot. Preheating to 425°F helps the fries crisp nicely. Lining the baking sheet with parchment paper makes cleanup easy and keeps the fries from sticking. - Mix breadcrumbs, Parmesan cheese, minced garlic, oregano, garlic powder, salt, and pepper. In a shallow bowl, I mix the whole wheat breadcrumbs with grated Parmesan cheese. I add minced garlic for flavor, oregano for aroma, garlic powder, salt, and pepper. Mixing these ingredients well ensures that every fry gets a tasty coating. - Dip zucchini fries in beaten eggs and coat with breadcrumb mixture. I set another bowl with beaten eggs. Taking a zucchini fry, I dip it in the eggs, letting the extra drip off. Then, I coat it in the breadcrumb mixture. I press the crumbs on to make sure they stick well. This step is key for a crispy finish. - Place coated fries on the baking sheet and spray with cooking spray. Once breaded, I lay the fries in a single layer on the baking sheet. I like to spray the tops lightly with cooking spray. This helps them brown and adds crunch. - Bake for 20-25 minutes and turn halfway for even crisping. I slide the baking sheet into the oven and set a timer for 20 minutes. Halfway through, I flip the fries. This ensures they cook evenly and get that golden brown color we love. - Cool slightly before serving and add garnishes. After baking, I let the fries cool for a few minutes. This step helps them crisp even more. I like to serve them hot, sprinkled with extra Parmesan and a small bowl of marinara sauce on the side. You can find the full recipe above for more details. To get the best crispiness, I recommend using cooking spray or a light drizzle of olive oil. This helps the fries brown and stay crunchy. Make sure not to overcrowd the baking sheet. If the fries are too close, they can steam instead of bake. For extra crunch, try broiling them for the last few minutes. Just keep an eye on them to prevent burning. Serve the zucchini fries hot and sprinkle some extra Parmesan on top. This adds flavor and makes them look great. Pair them with marinara sauce for dipping. The rich sauce complements the garlic and cheese perfectly. You could also try ranch or a spicy aioli for a twist. Removing excess moisture from zucchinis is key to crispiness. Too much water makes them soggy. To dry zucchinis, slice them and place them on paper towels. Sprinkle a little salt on top and let them sit for about 10 minutes. The salt draws out moisture. Afterward, pat them dry with more paper towels. This simple step helps you achieve that perfect crunch in your baked garlic Parmesan zucchini fries. For the full recipe, check out the details above. {{image_4}} You can make your zucchini fries even better by adding spices. Try paprika for a smoky taste. Cayenne pepper adds a nice kick, too. Just sprinkle some into the breadcrumb mix before coating the zucchini fries. This small change can make a big difference in flavor. If you want to switch up the cheese, consider using mozzarella. It melts beautifully and adds a creamy texture. You can also try vegan cheese for a plant-based option. Just make sure it melts well to keep that crispy exterior intact. You can mix your zucchini fries with other veggies for more variety. Eggplant slices work well when cut into fry shapes. Sweet potatoes are another great choice. They will add a sweet flavor and vibrant color to your plate. Feel free to experiment with whatever veggies you have on hand. For the complete recipe, check out the [Full Recipe]. To keep your zucchini fries fresh, store them in an airtight container in the refrigerator. This helps prevent them from getting soggy. They will last for about three days. Make sure to let them cool down before sealing the container. The best way to reheat zucchini fries is in the oven. Preheat your oven to 400°F (200°C). Place the fries on a baking sheet. Heat them for about 10 minutes. This method keeps them crispy. You can also use an air fryer if you have one. Set it to 350°F (175°C) and heat for about 5 minutes. If you want to store them longer, you can freeze the zucchini fries. First, let them cool completely. Next, spread them out in a single layer on a baking sheet. Freeze them for about 1-2 hours. Once frozen, transfer them to a freezer bag. This way, they won’t stick together. When ready to eat, bake them straight from the freezer. Add a few extra minutes to the cooking time for best results. Yes, you can use regular breadcrumbs. The texture will be slightly different. Whole wheat breadcrumbs add a nutty flavor and more fiber. If you prefer a lighter taste, go for regular ones. Both will still give you a crispy finish. To make these fries gluten-free, use gluten-free breadcrumbs. You can find these at most stores. Another great option is to use crushed gluten-free crackers. They add a nice crunch. Just make sure to check the labels for gluten-free assurance. Many sauces go well with zucchini fries. Popular choices include marinara, ranch, or garlic aioli. You can also try a spicy sriracha mayo for a kick. For a homemade touch, mix Greek yogurt with herbs for a fresh dip. To make these fries vegan, substitute the eggs with flax eggs. Mix 1 tablespoon of flaxseed meal with 2.5 tablespoons of water. Let it sit for a few minutes until it thickens. For cheese, you can use nutritional yeast or a store-bought vegan cheese. These swaps keep the flavor while making it plant-based. Check out the Full Recipe for detailed steps to make these tasty Baked Garlic Parmesan Zucchini Fries! This blog post has covered the tasty journey of making zucchini fries. We explored key ingredients, step-by-step instructions, and helpful tips. You learned how to get crispy fries and about delicious variations. Now, you can enjoy this snack with great flavors and textures. Try out the ideas and personalize your dish. Whether it’s for a party or a snack, zucchini fries are a fun, healthy choice. Get cooking and taste the difference!](https://dishtreats.com/wp-content/uploads/2025/06/b228a051-b543-4822-a33a-588c5a943e46-768x768.webp)


![- 1 lb Brussels sprouts, trimmed and halved - 3 tablespoons extra virgin olive oil - 2 tablespoons pure maple syrup - 1 tablespoon Dijon mustard - 1 teaspoon garlic powder - 1/4 cup chopped walnuts (optional for added crunch) - Fresh parsley, roughly chopped, for garnish (optional) - Salt - Freshly ground black pepper When making Maple Mustard Brussels Sprouts, the main ingredients are key to flavor. Brussels sprouts bring a nice crunch. Extra virgin olive oil adds richness, while pure maple syrup gives a sweet touch. Dijon mustard adds a tangy kick that ties it all together. You might want to add garlic powder for more flavor. If you like crunch, chopped walnuts work well. A sprinkle of fresh parsley adds color and freshness to the dish. For seasoning, salt and freshly ground black pepper enhance the taste. Be sure to adjust these to your liking. The balance of flavors makes this dish a standout! Check the [Full Recipe] for detailed steps to prepare these delightful sprouts. - Preheat your oven to 400°F (200°C). - Line a baking sheet with parchment paper. This makes cleanup easy. - In a bowl, combine olive oil, maple syrup, Dijon mustard, and garlic powder. - Season with salt and pepper. Whisk until smooth. - Add halved Brussels sprouts to the dressing. - Toss until evenly coated. Make sure every sprout gets some flavor. - Spread sprouts on the baking sheet in a single layer. - If you like, sprinkle with walnuts for crunch. - Roast for 25-30 minutes. Remember to stir halfway through for even cooking. - Check if the sprouts are fork-tender and caramelized. - Garnish with fresh parsley before serving. This adds color and freshness to your dish. For the complete recipe, check out the [Full Recipe]. To get that golden-brown color, you need to space the Brussels sprouts well on the baking sheet. If they are too close, they will steam instead of roast. Stir them halfway through cooking. This helps them cook evenly and get that nice caramelized look. You can add more flavor by mixing in balsamic vinegar for a tangy twist. This will balance the sweetness of the maple syrup. Also, try using herbs like thyme or rosemary. These herbs add a fresh taste that brightens the dish. Use a large mixing bowl when tossing your ingredients. This gives you enough space to coat the Brussels sprouts well. A high-quality baking sheet is key for even roasting. It helps them brown nicely without sticking. For the full recipe, check out the details above. {{image_4}} To make this dish vegan, swap out the Dijon mustard for a vegan option. There are many great choices available, like a chickpea or tahini-based mustard. These alternatives keep the flavor bold and rich, just like the traditional recipe. You won’t lose any taste while making it plant-based. If you need a nut-free dish, simply leave out the walnuts. The Brussels sprouts will still have a lovely texture and taste. The maple and mustard glaze adds all the flavor you want. You can enjoy this dish without any worries about allergies. For a heartier meal, consider adding protein. Roasted chickpeas or crispy tofu work great here. They pair perfectly with the sweet and tangy flavors of the Brussels sprouts. You can serve them together on the same plate for a filling and nutritious dish. This option makes it easy to create a balanced meal. For the full recipe, check out the details above! Store any leftover Maple Mustard Brussels Sprouts in an airtight container. They will stay fresh for up to 3 days. This keeps them safe and tasty for later meals. Just remember to let them cool down first before sealing them up. You can freeze roasted Brussels sprouts for up to 2 months. To do this, place them in a freezer-safe bag or container. Make sure to squeeze out as much air as possible. This helps prevent freezer burn and keeps their flavor intact. To enjoy your Brussels sprouts again, reheat them in the oven or on the stovetop. The oven gives them a nice crispy texture. If you choose the stovetop, keep the heat medium to avoid burning. Just warm them through until they are hot and ready to eat. For the full recipe, check out the [Full Recipe]. The ideal roasting time is 25-30 minutes. This time allows them to cook perfectly. You want them fork-tender and golden brown. Stir them halfway through to help them caramelize well. Yes, you can prep these sprouts a day ahead. Just mix the Brussels sprouts with the maple-mustard dressing and store them in the fridge. When you're ready to serve, simply roast them before your meal. This saves time and keeps flavors fresh. Pair them with proteins like chicken or fish. They also go great with grains like quinoa or rice. The sweet and tangy flavor of the sprouts complements many dishes well. Absolutely! Maple Mustard Brussels Sprouts store well in the fridge. You can enjoy them throughout the week. Just reheat them in the oven or on the stovetop for the best texture. For the full recipe, be sure to check the earlier sections. This blog post shared a simple and tasty recipe for Maple Mustard Brussels Sprouts. You learned about the main ingredients and optional add-ins. The step-by-step instructions ensure you roast them to perfection. I’ve also shared tips for flavor and storage, plus variations to suit your needs. These Brussels sprouts are easy to make and full of flavor. Try them with your favorite protein for a delicious meal! Enjoy experimenting with this recipe and make it your own.](https://dishtreats.com/wp-content/uploads/2025/06/4f608c6e-5907-49f6-a9cf-d865501fb0be-768x768.webp)

