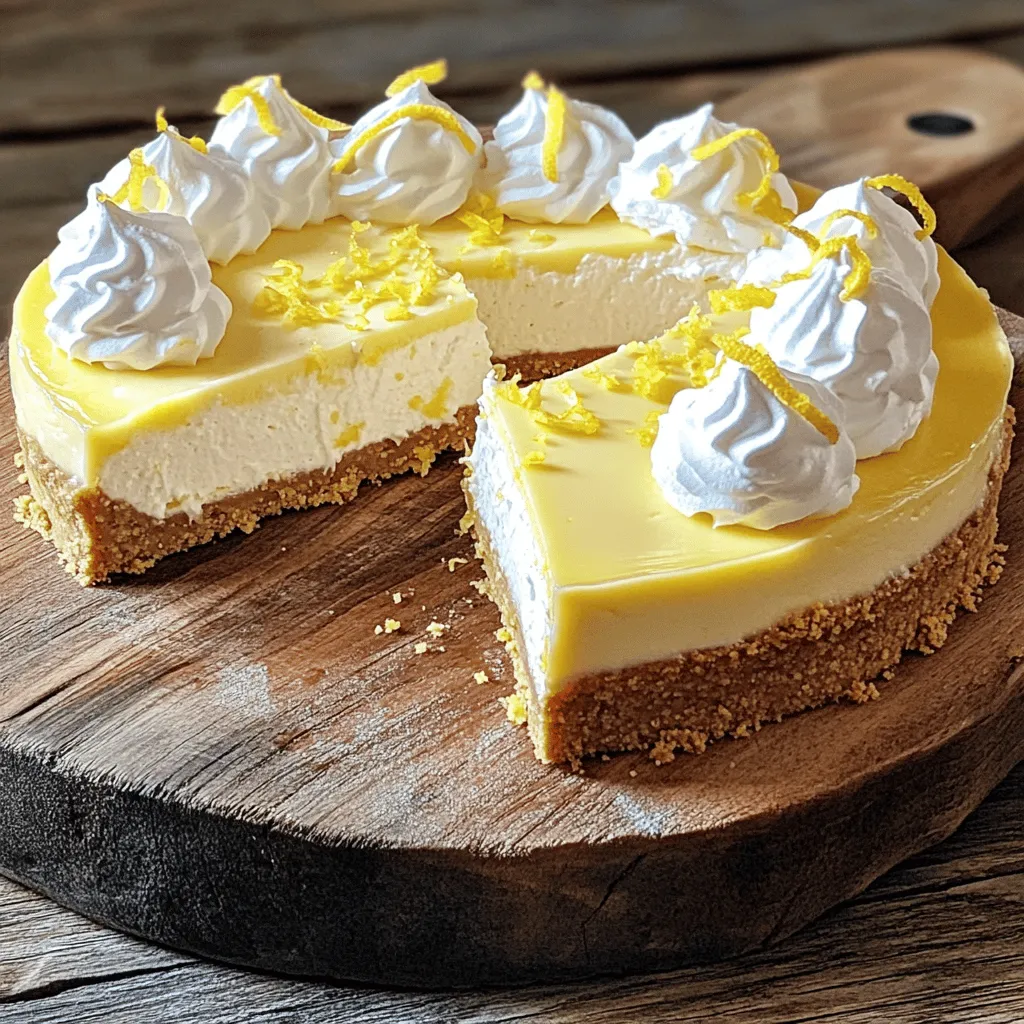
No Bake Lemon Cheesecake Delightfully Simple Treat
. Enjoy your delightful no bake lemon cheesecake! No Bake Lemon Cheesecake is simple and fun to make. We covered the ingredients, preparation, and storage tips. Remember to mix your filling gently for a light texture. Experiment with flavors or garnishes to make it your own. With this guide, you can impress your friends and family. Enjoy each slice and share this delightful dessert. It’s a tasty treat that everyone will love!](https://dishtreats.com/wp-content/uploads/2025/06/ce75718b-0697-4914-b5ee-7870880d7685.webp)
Are you ready to enjoy a burst of citrus goodness without turning on the oven? This No Bake Lemon Cheesecake is a simple, delightful treat that anyone can make. With just a handful of ingredients and easy steps, you’ll have a creamy, zesty dessert in no time. Perfect for warm days or any celebration, this cheesecake will impress your friends and family. Let’s dive into this easy recipe!
Ingredients
Core Ingredients
- 1 ½ cups graham cracker crumbs
- ½ cup unsalted butter, melted
- 2 cups cream cheese, softened to room temperature
- 1 cup powdered sugar, sifted
Flavoring Ingredients
- 1 cup heavy whipping cream, chilled
- 1/4 cup freshly squeezed lemon juice
- Zest of 2 medium lemons
- 1 teaspoon pure vanilla extract
- Pinch of fine sea salt
Step-by-Step Instructions
Preparing the Crust
First, mix the graham cracker crumbs and melted butter in a bowl. Make sure all the crumbs are coated. Next, press the crumb mixture into the bottom of a springform pan. Use your fingers or the back of a cup for even pressure. Place the pan in the fridge while you make the filling.
Making the Filling
In a large bowl, beat the cream cheese with an electric mixer until smooth. This takes about 2-3 minutes. Gradually add the sifted powdered sugar. Mix until there are no lumps. Now, add the lemon juice, zest, and vanilla. Mix on low speed until everything is well combined.
Combining the Mixtures
In a clean bowl, whip the chilled heavy cream until it forms stiff peaks. This part is key for a light texture. Carefully fold the whipped cream into the lemon mixture. Use a spatula to combine gently. You want to keep the airy texture. Pour this filling over your crust and smooth the top with a spatula.
Chilling the Cheesecake
Cover the cheesecake with plastic wrap or a lid. Refrigerate for at least 4 hours. For the best results, let it chill overnight. This helps the flavors meld together and sets the cheesecake perfectly.
When you follow these steps, you’ll create a delightful No Bake Lemon Cheesecake. Enjoy this treat with friends and family!
Tips & Tricks
Perfecting the Texture
To make a great no bake lemon cheesecake, start with room temperature cream cheese. It mixes smoothly, avoiding lumps. If your cream cheese is cold, it will be hard to blend. Set it out for about 30 minutes before you begin.
When mixing, it’s key to fold gently. Folding keeps the air in the whipped cream. This air makes your cheesecake light and fluffy. If you stir too hard, you lose that nice texture.
Serving Suggestions
For a beautiful presentation, think about garnishing. Add a dollop of whipped cream on top of each slice. Sprinkle some lemon zest for a burst of color. Fresh lemon slices can also enhance the look and taste.
Pair your cheesecake with fresh berries. Strawberries, blueberries, or raspberries work well. They add a sweet and tart flavor that complements the lemon. You can also serve it with a cup of tea or coffee for a nice touch.
Variations
Flavor Variations
You can change the flavor of this cheesecake easily. Try adding lime or orange juice for a twist. These fruits will give a different taste while keeping it fresh.
Another fun idea is to mix in berries or chocolate swirls. Blueberries or raspberries can be folded into the filling. For chocolate lovers, add melted chocolate to the mix. This will create a rich and creamy cheesecake.
Alternative Crust Options
If you want a change from the classic crust, use Oreo or vanilla wafer cookies. Crush them and mix with butter just like the graham crackers. This gives a sweet and rich flavor.
For those needing gluten-free options, almond flour or nut-based crusts can work well. Combine almond flour with melted butter to form a tasty base. This way, everyone can enjoy your cheesecake!
Storage Info
Proper Storage Techniques
To keep your No Bake Lemon Cheesecake fresh, store it in the fridge. Use an airtight container or cover it tightly with plastic wrap. This method helps to keep the flavors intact and prevents any odors from other foods in your fridge from seeping in.
To avoid soggy crusts, make sure the crust is fully chilled before adding the filling. This step helps to create a barrier. You can also place a piece of parchment paper between the crust and the filling. This keeps the crust crisp while you enjoy your cheesecake.
Freezing Instructions
If you want to freeze your cheesecake, start by letting it set completely in the fridge. Once firm, cover it tightly with plastic wrap and then with aluminum foil. This double layer protects it from freezer burn.
When you’re ready to enjoy your cheesecake again, thaw it in the fridge overnight. Avoid thawing at room temperature, as this can lead to a watery texture. Serve it chilled for the best taste.
FAQs
How long does No Bake Lemon Cheesecake last in the fridge?
No Bake Lemon Cheesecake lasts about 5 days in the fridge. Store it in an airtight container. Look for signs of spoilage, like a change in smell or texture. If it feels slimy or has an off odor, it’s best to throw it away.
Can I make No Bake Lemon Cheesecake ahead of time?
Yes, you can make this cheesecake up to 2 days in advance. This gives the flavors time to meld. Just keep it covered in the fridge until you’re ready to serve. It will taste even better after a day or two.
What can I substitute if I don’t have lemon juice?
If you lack lemon juice, use lime juice or orange juice. Both add a nice tang but will change the flavor a bit. Lime juice will give a sharper taste, while orange juice will add sweetness. Adjust the zest accordingly for balance.
How do I achieve a firmer cheesecake?
For a firmer cheesecake, use more cream cheese and less whipped cream. You can also add a tablespoon of gelatin. Dissolve it in warm water and mix it in with the cream cheese. This will help set the cheesecake better.You only need a few ingredients to create a delicious treat. Here’s a quick look at what you will need and the steps to follow:
Ingredients:
- 1 ½ cups graham cracker crumbs
- ½ cup unsalted butter, melted
- 2 cups cream cheese, softened to room temperature
- 1 cup powdered sugar, sifted
- 1 cup heavy whipping cream, chilled
- 1/4 cup freshly squeezed lemon juice
- Zest of 2 medium lemons
- 1 teaspoon pure vanilla extract
- Pinch of fine sea salt
Steps:
1. Prepare the crust: Mix graham cracker crumbs and melted butter in a bowl.
2. Press the crust: Put the mixture into a 9-inch springform pan. Firmly press it down.
3. Make the filling: Beat the softened cream cheese in a bowl until smooth.
4. Add sweetness: Mix in the sifted powdered sugar until smooth and creamy.
5. Incorporate flavors: Add lemon juice, zest, vanilla, and salt. Mix until fluffy.
6. Whip the cream: In another bowl, whip the chilled heavy cream to stiff peaks.
7. Fold together: Carefully mix the whipped cream into the lemon mixture.
8. Transfer the filling: Pour the filling over the crust and smooth the top.
9. Chill: Cover and refrigerate for at least 4 hours, or overnight for best results.
10. Serve: Remove from the pan, slice, and serve chilled.Enjoy your delightful no bake lemon cheesecake!
No Bake Lemon Cheesecake is simple and fun to make. We covered the ingredients, preparation, and storage tips. Remember to mix your filling gently for a light texture. Experiment with flavors or garnishes to make it your own. With this guide, you can impress your friends and family. Enjoy each slice and share this delightful dessert. It’s a tasty treat that everyone will love!
. Enjoy your delightful no bake lemon cheesecake! No Bake Lemon Cheesecake is simple and fun to make. We covered the ingredients, preparation, and storage tips. Remember to mix your filling gently for a light texture. Experiment with flavors or garnishes to make it your own. With this guide, you can impress your friends and family. Enjoy each slice and share this delightful dessert. It’s a tasty treat that everyone will love!](https://dishtreats.com/wp-content/uploads/2025/06/ce75718b-0697-4914-b5ee-7870880d7685-300x300.webp)
![- 3 medium zucchinis (spiralized) - 1 cup cherry tomatoes (halved) - 1/2 cup bell peppers (diced) - 1/4 cup red onion (thinly sliced) - 1 cup fresh basil leaves - 1/4 cup pine nuts (lightly toasted) - 1/2 cup grated parmesan cheese (or nutritional yeast for a vegan option) - 1/2 cup extra virgin olive oil - 2 cloves garlic (minced) - Sea salt and freshly ground black pepper (to taste) - Juice of 1 lemon I love choosing fresh ingredients for my Pesto Zoodle Salad. The zucchinis become long, curly noodles when you spiralize them. They are light and perfect for summer. Cherry tomatoes add a sweet bite. Use any color bell peppers for a pop of color. I enjoy the crunch of red onions. Fresh basil gives that classic pesto flavor. Pine nuts add a rich, nutty taste. You can swap grated parmesan cheese for nutritional yeast if you prefer a vegan option. Extra virgin olive oil makes the pesto creamy and smooth. The garlic gives a punch of flavor, while lemon juice brightens the dish. Don’t forget the sea salt and black pepper for seasoning. - Spiralizer - Food processor - Mixing bowl You will need a spiralizer to create the zoodles. A food processor helps blend the pesto quickly. A mixing bowl is essential for combining all the delicious ingredients. The caloric content per serving varies based on the ingredients used. On average, this salad packs around 200 calories per serving. The macronutrient breakdown is roughly 15g of fat, 8g of carbs, and 5g of protein. This makes it a light and healthy dish. You can find the full recipe for the Pesto Zoodle Salad above. Enjoy making this fresh and healthy meal! To make the pesto, you'll need: - 1 cup fresh basil leaves - 1/4 cup pine nuts (lightly toasted) - 1/2 cup grated parmesan cheese (or nutritional yeast) - 2 cloves garlic (minced) - 1/2 cup extra virgin olive oil - Sea salt and freshly ground black pepper - Juice of 1 lemon Start by placing the basil, pine nuts, parmesan, and garlic in a food processor. Blend them until smooth. While blending, slowly add the olive oil until the mixture is creamy. If you find it too thick, add more olive oil. Taste it, then adjust the seasoning with salt, pepper, and lemon juice. For spiralizing zucchini, use a spiralizer to create long, thin noodles called zoodles. Simply place the zucchini in the spiralizer and twist to form strands. If you don't have a spiralizer, you can use a julienne peeler or a sharp knife. Just slice the zucchini into thin strips to mimic zoodles. In a large mixing bowl, combine the zoodles, halved cherry tomatoes, diced bell peppers, and thinly sliced red onion. Pour the vibrant pesto over this mix. Carefully toss all the ingredients with tongs until the zoodles are well coated. Letting the salad rest for about 10 minutes is key. This marinating time allows all the flavors to blend nicely. It makes each bite more tasty and refreshing. Enjoy your vibrant Pesto Zoodle Salad! For the complete recipe, check the [Full Recipe]. To boost the taste of your pesto zoodle salad, add fresh herbs like parsley or mint. These herbs brighten your dish. You can also adjust the garlic and lemon. If you love garlic, add more. For a zesty kick, squeeze in more lemon juice. Soggy zoodles can ruin your salad. To avoid this, salt the zoodles first. Let them sit for a few minutes, then pat them dry. This step helps remove excess moisture. For the pesto, if it's too thick, add more olive oil. This keeps it light and creamy. For a stunning presentation, serve your salad in a large bowl. This lets the colors shine. You can garnish it with extra basil leaves and lemon zest. If you want to add protein, grilled chicken or shrimp works well. These pair nicely with the fresh flavors of the salad. Don't forget to check the [Full Recipe] for more details and tips! {{image_4}} You can switch zoodles for other veggies. Carrots and cucumbers make great alternatives. They add crunch and color, too. If you want a vegan option, skip the cheese. Use nutritional yeast instead. It gives a cheesy flavor without dairy. While pesto shines here, other dressings work well. Try a lemon vinaigrette for a bright taste. You can also use tahini or a simple olive oil and vinegar mix. Add spices like paprika or cumin to change the flavor. These can add warmth and depth. Seasonal veggies can enhance your salad. Think fresh corn, snap peas, or bell peppers. They add a burst of color and nutrition. You can also toss in fruits like diced peaches or berries. They bring sweetness to the mix, making every bite exciting. For more ideas, check the Full Recipe for inspiration! Store your Pesto Zoodle Salad in an airtight container. This keeps it fresh longer. Make sure you let it cool to room temperature before sealing. I recommend using glass containers. They do not hold odors and are easy to clean. The salad lasts in the fridge for about 3 days. After that, it may lose flavor and crispness. Signs of spoilage include a slimy texture or off smell. If you see these signs, it's best to toss it. You can enjoy this salad cold or at room temperature. If you want to warm it up, use a microwave. Heat it gently for about 30 seconds. Avoid reheating if you have added fresh veggies, as they can become mushy. A zucchini noodle salad, or zoodle salad, uses spiralized zucchinis as noodles. Zoodles are light and low in carbs. They are a great alternative to pasta. Zoodles help add more veggies to your meals while keeping the dish fresh and crunchy. Yes, you can make the pesto ahead of time. Store it in an airtight container in the fridge. It lasts about one week. You can also freeze it for up to three months. Just remember to leave some space in the container. The pesto will expand when frozen. Absolutely! This salad works well for meal prep. You can prepare the zoodles and pesto in advance. Keep them separate until you are ready to eat. This way, the zoodles stay fresh and do not get soggy. You can pack the salad in lunch boxes for easy grab-and-go meals. To make this recipe gluten-free, check all your ingredients. Ensure the pesto does not contain any gluten. Use gluten-free pasta or zoodles as a base. The other ingredients, like veggies and cheese, are naturally gluten-free. This way, you can enjoy the salad worry-free. Freezing the Pesto Zoodle Salad is not ideal. The zoodles can become mushy after freezing. However, you can freeze the pesto alone. When ready to enjoy, just thaw the pesto and mix it with fresh zoodles and veggies. This keeps your salad fresh and tasty. For the full recipe, check the main section. Pesto Zoodle Salad is a fresh, tasty dish made from zoodles, tomatoes, peppers, and pesto. You learned how to prepare the pesto and combine all the ingredients for a delightful meal. Remember to store any leftovers properly for the best taste. Try out the flavor tips and variations to make the dish your own. This recipe is not only nutritious but also easy to adapt for different diets. Enjoy exploring your cooking skills with this vibrant salad!](https://dishtreats.com/wp-content/uploads/2025/07/8637ce27-f1ae-4e5b-b0b9-802b4b26ee84-768x768.webp)


![- 1/2 cup rolled oats - 1 tablespoon cocoa powder - 1 tablespoon peanut butter - 1 cup almond milk - 1 tablespoon maple syrup - 1/2 teaspoon vanilla extract - A pinch of salt To create a bowl of chocolate peanut butter overnight oats, you need simple ingredients. Start with rolled oats; they act as the base. Cocoa powder adds rich chocolate flavor. Peanut butter gives a smooth, nutty taste. Use almond milk as a creamy liquid. Maple syrup sweetens the dish naturally. A touch of vanilla extract enhances the flavors. Finally, a pinch of salt brings everything together. - Sliced bananas - Chocolate chips - Crushed peanuts - Assorted fresh berries You can elevate your oats with fun toppings. Sliced bananas add sweetness and texture. Chocolate chips bring extra chocolate goodness. Crushed peanuts offer a nice crunch. Fresh berries brighten the dish with color and flavor. Choose your favorites or mix them up for a tasty treat. For the complete recipe, check out the [Full Recipe]. - Step 1: Combine dry ingredients in a bowl. In a medium mixing bowl, add 1/2 cup rolled oats and 1 tablespoon cocoa powder. Stir these together. This mix gives your oats a deep chocolate flavor. - Step 2: Whisk together wet ingredients separately. In another bowl, mix 1 cup almond milk, 1 tablespoon peanut butter, 1 tablespoon maple syrup, 1/2 teaspoon vanilla extract, and a pinch of salt. Make sure the peanut butter blends in well. - Step 3: Mix dry and wet ingredients thoroughly. Pour the wet mix over the dry oats. Stir with a spoon until every oat is coated. This step ensures creamy and rich oats. - Step 4: Transfer mixture to a jar or container. Carefully spoon the mixed oats into a clean jar. Choose a jar with a lid for best results. - Step 5: Seal and refrigerate overnight. Close the lid tightly. Place the jar in the fridge. Let it chill overnight or for at least 4 hours. The oats will soak up the flavors and soften. - Step 6: Stir before serving. When you’re ready to eat, take the jar out of the fridge. Stir the oats well. If they seem thick, add a little more milk to loosen them up. - Step 7: Add your choice of toppings. Top your oats with sliced bananas, chocolate chips, crushed peanuts, or fresh berries. These toppings add fun flavors and textures to your dish. Enjoy your creamy, chocolatey breakfast! For the full recipe, check out the complete guide. - For creamier oats, use whole milk or a milk alternative. - Allow oats to soak longer for a softer texture. Using whole milk adds richness. If you prefer a lighter option, almond or oat milk works well too. The key is to find what you love. Soaking longer lets the oats absorb more liquid. This makes them softer and more enjoyable to eat. - Try different nut butters like almond or cashew. - Experiment with sweeteners like agave or stevia. Feel free to swap peanut butter with almond or cashew butter for new flavors. Each nut butter brings its own taste. Use different sweeteners to find your perfect balance. Agave has a light flavor, while stevia is sugar-free. - Serve in a clear jar for visual appeal. - Drizzle extra peanut butter on top. Serving in a clear jar lets everyone see those delicious layers. It makes your dish look fancy! A drizzle of peanut butter on top adds a nice touch. It makes it more inviting and tasty. For an added twist, include colorful toppings like fresh berries or chocolate chips. Enjoy crafting your perfect chocolate peanut butter overnight oats! For the complete recipe, check the Full Recipe section. {{image_4}} You can switch up your chocolate peanut butter overnight oats with fun flavors. - Chocolate Banana Overnight Oats: Mash a ripe banana into the mix. The banana adds natural sweetness and a creamy texture. - Mocha Peanut Butter Overnight Oats: Add a teaspoon of instant coffee or espresso powder. This gives your oats a rich coffee flavor. Got dietary needs? No problem! You can easily modify this recipe. - Gluten-free option: Use certified gluten-free oats. This way, everyone can enjoy a tasty breakfast. - Vegan alternative: Swap regular milk for almond milk or oat milk. Use maple syrup or agave for sweetness. Change your oats with the seasons for exciting new tastes. - Adding pumpkin spice for fall: Mix in a teaspoon of pumpkin spice. This brings warmth and a cozy flavor to your oats. - Incorporating fresh berries in summer: Toss in some strawberries or blueberries. Fresh fruit brightens up your oats and adds nutrients. These variations keep your breakfast fun and exciting! You can find the full recipe here to make your own delicious creation. To keep your chocolate peanut butter overnight oats fresh, use an airtight container. This helps prevent moisture and odors from mixing in. Store the container in the refrigerator. Your oats will stay good for up to 5 days. This means you can make a batch and enjoy it throughout the week. Can you freeze overnight oats? Yes, you can freeze them! Freezing is a great way to save extra servings. Just make sure to use a freezer-safe container. How to thaw overnight oats for future use: To thaw, move the container to the fridge the night before you want to eat them. This will help them thaw slowly and evenly. You can also use the microwave if you’re in a hurry. Just heat it in short bursts, stirring in between. Best methods to reheat if desired: If you prefer warm oats, reheat them in the microwave. Place your oats in a microwave-safe bowl and cover it. Heat for 30 seconds, then stir. Repeat until warm enough. You can also reheat on the stove. Just add a splash of milk to a saucepan and warm it over low heat, stirring often. Enjoy your delicious oats however you like! What is the texture of overnight oats supposed to be? Overnight oats should be creamy and thick. They absorb the liquid overnight. This makes them soft but not mushy. You want a nice balance. If they seem too watery, add less milk next time. Can I use steel-cut oats instead of rolled oats? Yes, but steel-cut oats will need more time to soak. They take longer to soften. I recommend soaking them overnight to get a good texture. You may need to adjust the liquid and soaking time. How can I make my overnight oats thicker or creamier? To make your oats thicker, use less milk. You can also add chia seeds. They help absorb liquid and add fiber. Another tip is to let them sit longer in the fridge. Are overnight oats healthy? Yes, overnight oats are very healthy. They offer fiber and protein. This can help keep you full. They also provide vitamins and minerals. Plus, they are low in sugar if you control the toppings. What are the nutritional benefits of using peanut butter? Peanut butter adds healthy fats and protein. It helps keep your energy up. It also has vitamins like E and B. Just make sure to choose a natural peanut butter with no added sugar. What to pair with chocolate peanut butter overnight oats? You can pair them with fresh fruit. Bananas and berries taste great. Nuts or seeds also add a nice crunch. For extra sweetness, consider a drizzle of honey or maple syrup. Can overnight oats be eaten warm? Yes, you can eat them warm if you like. Just heat them gently in the microwave. Add a splash of milk to keep them creamy. Enjoy your warm treat any time of the day! You can create tasty and healthy overnight oats with simple ingredients. We discussed the main ingredients, preparation steps, and optional toppings. You learned tips for customization, serving, and storing your oats. Remember, you can adjust flavors and textures to suit your taste. Try different ingredients and enjoy your meals. Keep experimenting with toppings and variations. This way, overnight oats will always feel new and exciting. Enjoy every delicious bite and make it your own!](https://dishtreats.com/wp-content/uploads/2025/07/90d151b9-6d0c-4c1c-ba31-37512e57091e-768x768.webp)