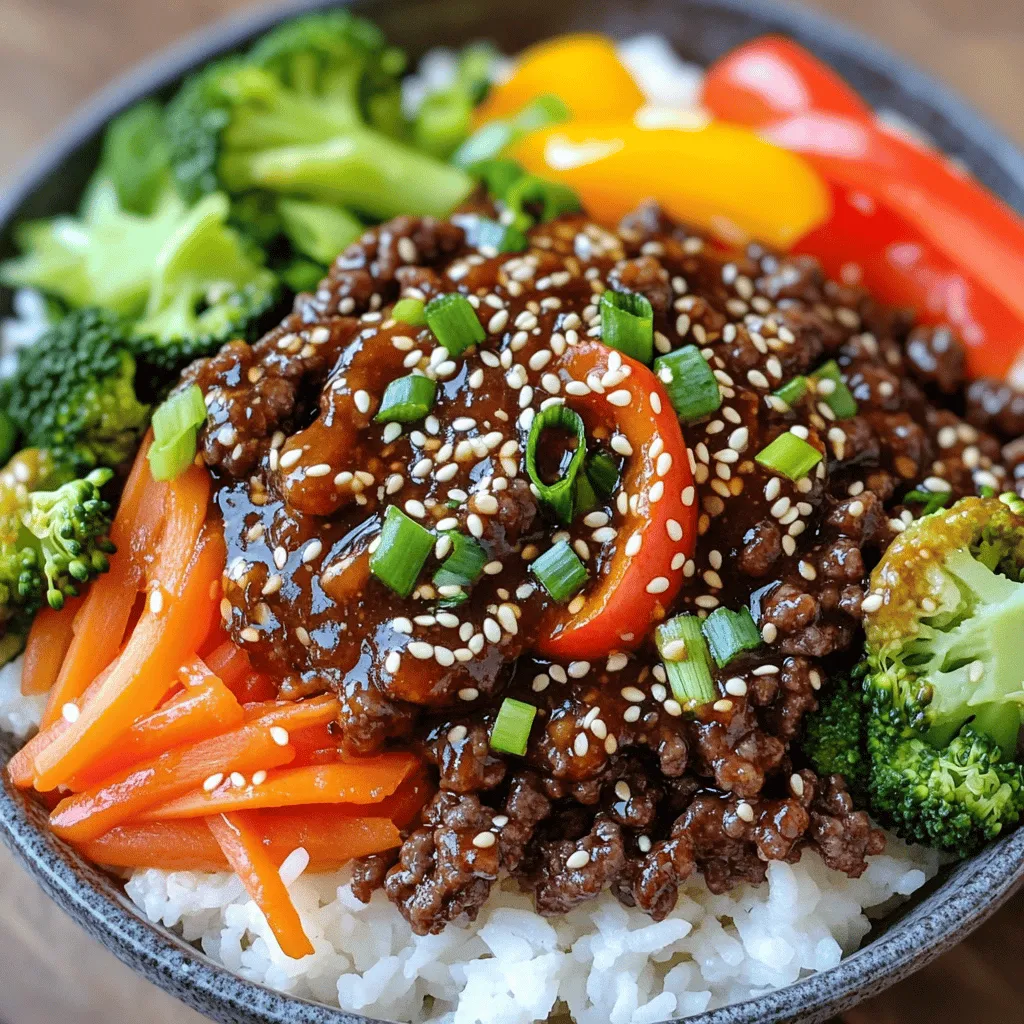
Spicy Korean Beef Bowls Flavorful Quick Weeknight Meal

Looking for a quick and tasty weeknight dinner? Try my Spicy Korean Beef Bowls! This dish is packed with flavor and takes just 35 minutes to make. With juicy ground beef, fresh veggies, and a spicy sauce, it’s a complete meal your family will love. Plus, you can customize it to your taste. Let’s dive into the simple steps and ingredients to create this delicious meal at home!
Ingredients
Main Ingredients
- 1 lb ground beef (or ground turkey for leaner option)
- 1 tablespoon vegetable oil
- 3 cloves garlic, minced
- 1 inch piece ginger, finely grated
- 1 tablespoon gochujang (Korean chili paste)
Vegetables and Garnishes
- 1 medium carrot, julienned
- 1 cup broccoli florets
- 1 bell pepper, sliced into thin strips
- 2 green onions, chopped (white and green parts divided)
- 1 tablespoon sesame seeds (for garnish)
Sauce Ingredients
- 1 tablespoon soy sauce
- 1 tablespoon sesame oil
- 1 tablespoon packed brown sugar
- Option for cooked rice of choice (white, brown, or cauliflower) for serving
In this recipe, the main ingredients create a rich base for the beef bowls. Ground beef adds depth, while garlic and ginger deliver bold flavors. Gochujang gives that perfect spicy kick.
For vegetables, choose colorful options like carrots and bell peppers. They not only add crunch but also enhance the bowl’s visual appeal. Broccoli brings nutrition and pairs well with the beef.
The sauce combines soy sauce, sesame oil, and brown sugar. This mix balances salty, nutty, and sweet flavors. You can serve it over any rice you like.
This dish is quick to make and packed with taste. Perfect for busy weeknights!
Step-by-Step Instructions
Heat and Sauté Aromatics
Heat the vegetable oil in a large skillet over medium-high heat. Add minced garlic and grated ginger. Sauté these until they smell fragrant. This step brings out their natural flavors.
Brown the Meat
Next, cook the ground beef in the skillet. Break it into smaller pieces while it cooks. This process takes about 5 to 7 minutes. If there is excess fat, drain it for a leaner dish.
Prepare the Sauce
Now, stir in the gochujang, soy sauce, sesame oil, and brown sugar. Mix everything well to coat the beef with the sauce. This will give the meat its spicy and savory kick.
Add Vegetables
Add the julienned carrot, broccoli florets, and sliced bell pepper to the skillet. Mix them in gently. Cover the skillet and cook for 3 to 4 minutes. This helps the vegetables become tender but still crunchy.
Final Touches
Remove the skillet from heat. Fold in the chopped green onions, saving some green tops for later. To serve, spoon the spicy beef mixture over your choice of cooked rice. Sprinkle sesame seeds on top and add the remaining green onions for color and flavor.
Tips & Tricks
Cooking Tips
- Use a non-stick skillet. This helps prevent sticking and makes cooking easier.
- Adjust the gochujang amount. This lets you control the spice level to match your taste.
Serving Suggestions
- Choose vibrant dishes. Colorful plates make the meal more appealing.
- Serve lime wedges on the side. A squeeze of lime adds a fresh zest to the dish.
Meal Prep & Serving Advice
- Prepare your ingredients in advance. This makes cooking go much faster on busy nights.
- Store leftover beef mixture separately from the rice. This keeps the rice from getting mushy.
Variations
Ingredient Substitutions
You can swap ground beef for ground turkey. This makes the dish leaner. For a vegetarian option, use crumbled tofu or any plant-based meat. You can also add different veggies. Zucchini, snow peas, or bell peppers work great. These changes keep the dish fresh and fun.
Flavor Enhancements
To add more zing, try a splash of rice vinegar. This will brighten the flavors. You can also play with spices. Cumin or paprika can give you new tastes. Adjust these to fit your palate. Each touch makes the dish uniquely yours.
Serving Variations
For a low-carb meal, make lettuce wraps. This is a fun way to eat and adds crunch. You can also serve your bowls with kimchi or pickled veggies on the side. These sides add an extra kick. They balance the spicy beef perfectly.
Storage Info
Leftover Storage
Store any leftovers in an airtight container in the refrigerator. They will stay fresh for up to 3 days. This keeps the flavors intact and prevents spoilage.
Freezing Instructions
If you want to save some for later, freeze the beef mixture in a freezer-safe container. It can last for up to 3 months. Label your container with the date for easy tracking.
Reheating Methods
To reheat, the skillet works best. Heat it over medium heat and stir the beef mixture until warm. If you need a quick option, use the microwave. Just remember to stir occasionally to heat evenly.
FAQs
How do I make Spicy Korean Beef Bowls spicy?
To add more heat, increase the gochujang. You can also chop up some chili peppers and mix them in. This will boost the spice level nicely. The right heat makes the dish exciting and flavorful.
Can I use a different protein?
Yes! You can swap ground beef for chicken, pork, or tofu. Each option brings its own taste and texture. Changing proteins helps keep meals fun and varied. Feel free to experiment with what you like best.
What can I serve with Spicy Korean Beef Bowls?
You can serve these bowls with steamed rice, quinoa, or even a fresh salad. Each side adds a different touch and can make the meal lighter or heartier. Choose what fits your mood or diet best.
Is there a vegetarian version of this recipe?
Absolutely! You can replace ground beef with crumbled tofu or a plant-based meat alternative. This makes the dish friendly for vegetarians while keeping the flavor rich and satisfying.
How long does it take to make Spicy Korean Beef Bowls?
It takes about 10 minutes to prep and 25 minutes to cook. This makes it a quick weeknight meal. With just a bit of time, you can enjoy a delicious and filling dish.
This blog covered the key ingredients and steps to make Spicy Korean Beef Bowls. We explored aromatics, meat, vegetables, and a zesty sauce. Cooking tips and storage options helped you plan better. You can easily customize this dish to fit your taste.
These bowls are quick, fun, and full of flavor. Whether you enjoy cooking or are short on time, this recipe delivers. Enjoy your meal and make it your own!

![To create your Chocolate Almond Butter Shake, gather these ingredients: - Perfectly ripe banana - Creamy almond butter - Unsweetened cocoa powder - Honey or maple syrup - Almond milk (or preferred milk variety) - Pure vanilla extract - Flaky sea salt - Ice cubes (optional) Each ingredient plays a key role in making your shake smooth and tasty. The banana gives a natural sweetness and creaminess. Almond butter adds healthy fats and a nutty flavor that blends perfectly with cocoa. Unsweetened cocoa powder provides rich chocolate taste without added sugars. Honey or maple syrup can sweeten your shake just right. Using almond milk keeps the shake light and dairy-free. Pure vanilla extract enhances the overall flavor, while flaky sea salt balances the sweetness. Ice cubes are optional but help create a thicker shake if that’s your preference. For the full recipe, follow the steps provided in the instructions section. Enjoy crafting your delicious shake! - Peel and slice the banana: Start by peeling your ripe banana. Slice it into smaller pieces. This helps it blend easier. - Add ingredients to the blender: Toss the banana slices into the blender. Now add the almond butter, cocoa powder, honey or maple syrup, almond milk, vanilla extract, and a pinch of sea salt. - Incorporate ice cubes if desired: If you want a thicker shake, add the ice cubes. This gives your shake a nice chill. - Blend until smooth: Blend all the ingredients on high speed. Keep blending until everything is smooth and creamy. - Adjust sweetness as needed: Taste your shake. If you want it sweeter, add more honey or maple syrup. Blend again if you add more. - Pour and garnish: Once your shake is perfect, pour it into a tall glass. You can garnish it with cocoa powder or whole almonds for a nice touch. For the full recipe, check the details above. Enjoy! - Choosing the right banana: Use a perfectly ripe banana. It should be yellow with some brown spots. This banana adds the best sweetness and creaminess to your shake. - Perfecting the blend time: Blend for about 30 seconds. This time helps mix all ingredients well. Stop blending once the shake is smooth with no lumps. - Adding optional ingredients for health benefits: You can add a handful of spinach for extra nutrients. Chia seeds or protein powder also boost your shake’s nutrition. - Alternative natural sweeteners: You can swap honey for maple syrup or agave nectar. Each option adds unique flavors. - Tips for reducing sweetness: Use less sweetener to start. You can always add more later. This way, you control the taste better. - Garnishing options: Top your shake with a sprinkle of cocoa powder. Whole almonds or a drizzle of almond butter also look great. - Serve in unique glassware: Try using mason jars or tall glasses. Fun glassware makes your shake more inviting! For the full experience, check out the [Full Recipe]. {{image_4}} You can switch up your nut butter for a new taste. Try peanut butter if you want a classic flavor. Cashew butter gives a creamy touch too. For the milk, almond milk is great, but soy or oat milk works well too. If you want more protein, add some Greek yogurt. Want greens? Throw in a handful of spinach. You won’t taste it, but you'll get extra nutrition. Spices add depth to your shake. A dash of cinnamon or nutmeg makes it warm and cozy. You can also toss in fruits for a twist. Berries or a scoop of avocado adds creaminess and flavor. Each small change can make your shake feel fresh and exciting. Want to make it vegan? Just use maple syrup instead of honey. For gluten-free, this shake is already safe. If you're watching carbs, skip the honey or use a low-carb sweetener. You can enjoy this shake while sticking to your diet plan. For the full recipe, check out the details above. After making your Chocolate Almond Butter Shake, you might have some leftovers. To keep it fresh, pour it into an airtight container. Store the shake in the fridge. It will stay good for about 1 to 2 days. Before drinking, shake or stir it well. This helps mix any separation. If you want to prepare your shake in advance, freezing is a great choice. Pour the shake into ice cube trays or freezer-safe bags. Freeze it for up to a month. When you’re ready to enjoy it, blend the frozen cubes with a little almond milk. This creates a delicious, chilled treat. The shelf life of your shake depends on how you store it. In the fridge, it lasts about 1 to 2 days. If you freeze it, you can keep it for up to a month. Look for signs of spoilage. If the shake smells sour or has a strange color, it’s time to toss it. Always trust your senses. Enjoy your shake at its best! To make a chocolate almond butter shake, gather your ingredients first. You need a ripe banana, creamy almond butter, cocoa powder, honey or maple syrup, almond milk, vanilla extract, and a pinch of sea salt. Start by peeling and slicing the banana. Then, put all ingredients in a blender. Blend until smooth and creamy. Adjust the sweetness if needed. Pour it into a glass and enjoy! Yes, you can substitute almond milk with other types of milk! Options include cow's milk, soy milk, or oat milk. Each type will change the taste slightly. Choose what you like best or what you have on hand. Almond butter offers many health benefits. It contains healthy fats, protein, and fiber. These nutrients can help you feel full and satisfied. Almond butter also has vitamin E, which helps skin health. It may support heart health and provide energy too! Yes, you can make the shake ahead of time. Store it in the fridge for up to 24 hours. If you want to keep it fresh, use an airtight container. Shake it well before drinking to mix everything again. Absolutely! You can use other sweeteners, like agave syrup or stevia. Adjust the amount based on your taste. Each sweetener has a different flavor, so choose one you enjoy! Check out the Full Recipe for more ideas. This blog shared a simple recipe for a delicious chocolate almond butter shake. You learned about the key ingredients, from ripe bananas to creamy almond butter. I also provided tips for the best blending and sweetening options. You can make it your own with various flavors and dietary changes. Remember to store it right for maximum freshness. Enjoy your shake! It’s easy to make, tasty, and can fit any diet. Have fun creating your perfect blend!](https://dishtreats.com/wp-content/uploads/2025/06/abab5c41-bf75-4334-8678-77245c216c9f-768x768.webp)


![To make a healthy sweet potato hash, you need these ingredients: - 2 large sweet potatoes, peeled and cut into small cubes - 1 red bell pepper, cut into small cubes - 1 green bell pepper, cut into small cubes - 1 small red onion, finely diced - 3 cloves of garlic, minced - 1 teaspoon smoked paprika - 1 teaspoon ground cumin - ½ teaspoon cayenne pepper (optional, for a spicy kick) - 2 tablespoons olive oil - Sea salt and freshly cracked black pepper, to taste - 4 large eggs (optional, for topping) - Fresh cilantro or parsley, finely chopped (for garnish) These ingredients work well together. Sweet potatoes bring a natural sweetness. Bell peppers add crunch and color. Onions and garlic give a lovely aroma and flavor. Spices like smoked paprika and cumin make this dish really pop. If you want extra protein, you can add eggs on top. Fresh herbs add a nice touch at the end. For the full recipe, you can check the detailed instructions I provided earlier. 1. First, heat 2 tablespoons of olive oil in a large skillet over medium heat. Wait until it shimmers, which means it’s ready. 2. Next, add 2 large sweet potatoes, cut into small cubes. Spread them out in a single layer. Let them cook for about 5 minutes without stirring. This helps them get crispy. 3. After 5 minutes, stir the sweet potatoes. Cook until they are soft and golden, about another 10 minutes. 1. Now, it’s time to add flavor! Stir in 1 small red onion, finely diced. Keep cooking for about 3-4 minutes until the onion is soft and clear. 2. Then, mix in 3 cloves of minced garlic, 1 red bell pepper, and 1 green bell pepper, both cut into small cubes. 3. Add spices: 1 teaspoon smoked paprika, 1 teaspoon ground cumin, and ½ teaspoon cayenne pepper if you want heat. Stir well and let it cook for 5-7 minutes. The peppers should be tender, and the sweet potatoes should be fork-tender. Season with sea salt and black pepper to taste. 1. If you want to add eggs, create 4 small wells in the hash mixture. Crack an egg into each well. 2. Cover the skillet with a lid and cook for about 5 minutes. This cooks the eggs to your liking. For runny yolks, 5 minutes is perfect. This vibrant sweet potato hash is not just easy to make; it’s also packed with flavor. For the full recipe, refer to the earlier sections. To get the best sweet potato hash, focus on the cooking process. Start with small cubes of sweet potato. This helps them cook faster and evenly. Cook them in a hot skillet so they get crispy. I recommend using a cast-iron skillet. It holds heat well and gives a nice sear to your veggies. Spices can really boost the flavor. I love using smoked paprika and cumin. These spices add warmth and depth. If you like heat, add cayenne pepper too. You can adjust the spice levels based on your taste. Start with a small amount and add more if needed. Serving matters! For a pretty look, use shallow bowls. Place the hash in the center, and if you added eggs, make sure they sit on top. This highlights them nicely. A sprinkle of fresh herbs like cilantro or parsley adds color. A slice of creamy avocado on the side makes it even better. For the complete recipe, check out the [Full Recipe]. {{image_4}} Sweet potatoes are packed with nutrients. They are high in vitamins A and C. These vitamins help keep your skin healthy and boost your immune system. One medium sweet potato gives you over 400% of your daily vitamin A needs. This vitamin is great for your eyes and skin. Sweet potatoes also contain fiber. Fiber helps your digestion and keeps you feeling full. By adding sweet potatoes to your breakfast, you get a tasty way to start your day. You include a healthy veggie that fills you with energy. To make this sweet potato hash a balanced meal, add proteins and healthy fats. Protein keeps you strong and satisfied. You can top your hash with eggs for extra protein. Eggs also add a creamy texture. If you want healthy fats, consider adding avocado. This will give your dish a smooth, rich flavor. You can also use nuts or seeds for crunch. Integrating this hash into your diet is easy. It suits different meals, not just breakfast. Serve it for lunch or dinner too. This flexibility makes it a great choice for any day. Enjoy this delicious dish while knowing you are eating well. Check out the Full Recipe for more details! You can change the flavors in your sweet potato hash easily. Adding different vegetables makes it fun. Try adding zucchini or spinach for a fresh twist. Both add great taste and color. You can also use Italian herbs for a different flavor profile. Oregano and basil can enhance your dish. Don't be afraid to mix and match! Adding protein to your hash makes it more filling. You can use chicken or turkey for a hearty meal. Just cook the meat first, then add it to the hash. If you prefer a vegetarian option, tofu or beans work well. Tofu can soak up the flavors of the spices. Beans like black or kidney add fiber and protein. You can serve sweet potato hash in many ways. For breakfast, serve it with eggs on top. The runny yolks add creaminess to each bite. If you're having brunch, add a side salad for balance. You can also create a savory sweet potato bowl. Just layer the hash with your favorite toppings. Think avocado, salsa, or even a dollop of yogurt. Each of these changes keeps your meal exciting! For the full recipe, check out the detailed guide. You can store sweet potato hash in the fridge for up to four days. Make sure to place it in an airtight container. When you’re ready to eat, reheat it on the stove or in the microwave. For the best taste, add a splash of olive oil when reheating. This helps keep the hash moist and tasty. Yes, you can easily make this recipe vegan. Instead of eggs, you can use tofu or chickpea flour. Just scramble the tofu or mix chickpea flour with water to create a batter. You can also replace olive oil with avocado oil or coconut oil. This keeps the flavors rich while making it plant-based. Absolutely! Sweet potato hash is perfect for meal prep. You can cook a big batch and store it in the fridge. Divide it into portions for the week. Just reheat what you need each day. You can also add different proteins or veggies for variety throughout the week. To reheat the hash, use a skillet over medium heat. This helps keep its texture nice. Stir occasionally to ensure even heating. If using a microwave, heat it in short bursts of 30 seconds. Stir in between to avoid hot spots. This way, your hash stays tasty and not mushy. Yes, cheese can add great flavor! Try sharp cheddar or feta for a nice twist. You can sprinkle it on top while the hash is still hot. This lets the cheese melt nicely. If you prefer a creamier texture, consider adding cream cheese or goat cheese. This blog post covered a tasty sweet potato hash recipe from start to finish. We explored essential ingredients, cooking steps, and tips to enhance flavor. You also learned about nutritional benefits and variations to customize your dish. In the end, this recipe is not just easy to make; it’s also a great way to start your day. Try it and enjoy the burst of flavors and textures. You can make it your own with simple adjustments or serve it as is. Your breakfast just got better!](https://dishtreats.com/wp-content/uploads/2025/06/2729619c-b847-4f07-91dc-14d4acdaca85-768x768.webp)