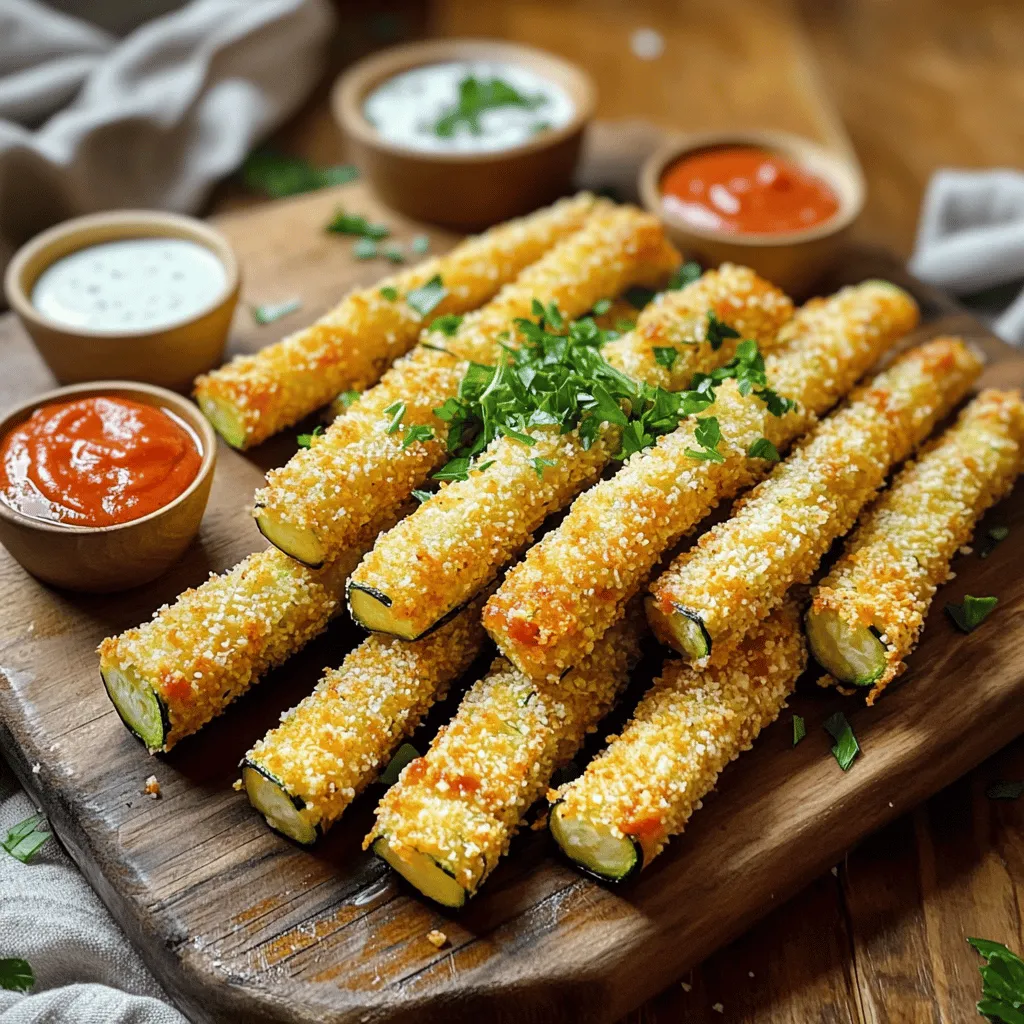
Crispy Zucchini Sticks Simple and Tasty Snack

Do you crave a crunchy, tasty snack? Look no further! Crispy zucchini sticks are simple to make and perfect for any occasion. With just a few basic ingredients, including fresh zucchini and flavorful seasonings, you can whip up this delightful treat. I’ll walk you through each step, so you can impress friends and family with your cooking skills. Let’s dive into this delicious recipe and get that crunch you’ll love!
Ingredients
Main Ingredients Required
- 2 medium zucchinis, cut into sticks (about 4 inches long)
- 1 cup all-purpose flour
- 2 large eggs, beaten until smooth
- 1 cup breadcrumbs (panko recommended for extra crunch)
Seasoning Details
- 1 teaspoon garlic powder
- 1 teaspoon onion powder
- 1 teaspoon Italian seasoning
- ½ teaspoon smoked paprika (for a hint of smokiness)
Additional Ingredients
- Olive oil spray (or alternative vegetable oil if frying)
- Salt and freshly cracked pepper to taste
To make crispy zucchini sticks, start with fresh zucchini. The key is to cut them into sticks for even cooking. Flour helps the egg stick, and eggs bind the breadcrumbs well. I use panko breadcrumbs for extra crunch. Seasonings bring flavor. Garlic powder adds warmth, while onion powder gives depth. Italian seasoning and smoked paprika add a nice twist.
When you season your zucchini sticks, don’t skip the salt and pepper. They enhance the taste. Lightly spraying with olive oil helps them crisp up in the oven.
Step-by-Step Instructions
Preparation Steps
1. First, preheat your oven to 425°F (220°C). This makes sure the oven is hot enough to crisp the zucchini sticks.
2. Next, line a baking sheet with parchment paper. This helps with cleanup and keeps the sticks from sticking.
3. In a shallow dish, mix together the flour, garlic powder, onion powder, Italian seasoning, smoked paprika, salt, and pepper. Stir well to blend the flavors evenly.
Coating Process
1. Take a zucchini stick and dredge it in the flour mix first. Make sure it is fully coated, then shake off any extra flour.
2. Next, dip the floured zucchini stick into the beaten eggs. Let any excess egg drip off.
3. Finally, roll the zucchini stick in the breadcrumbs. Press gently to help the breadcrumbs stick well. This step is key to achieving a crispy texture!
Baking Tips
1. Arrange the breaded zucchini sticks on the baking sheet in a single layer. Make sure they are not touching to allow air to circulate.
2. If you want extra crunch, lightly spray the tops with olive oil.
3. Place the baking sheet in the oven and bake for 20-25 minutes. Flip the zucchini sticks halfway through cooking. This helps them become golden brown and crispy all over.
Enjoy your crispy zucchini sticks with your favorite dipping sauces!
Tips & Tricks
Achieving Perfect Crispiness
To get that delightful crunch, use panko breadcrumbs. They are lighter and crispier than regular breadcrumbs. This difference gives your zucchini sticks a nice texture. When you bake or fry, they become golden and crunchy.
Spraying oil helps too. A light coat on top adds even more crunch. If you skip the oil, your sticks might not crisp up well. A quick spray before baking makes a big difference.
Serving Suggestions
Dipping sauces can elevate your crispy zucchini sticks. Marinara sauce is a classic choice. It adds a sweet and tangy flavor. Ranch dressing gives a creamy touch. Greek yogurt dip brings a fresh taste.
For a pretty presentation, use a colorful platter. Arrange the zucchini sticks in a fan shape. Add small bowls of sauces around them. A sprinkle of fresh parsley adds a nice touch.
Cooking Methods
You can bake or fry your zucchini sticks. Baking is healthier and easy. Frying gives an extra crispy finish. If you choose to bake, adjust the time. Thicker sticks may need a few more minutes.
When cutting zucchini, make them uniform. This helps them cook evenly. Aim for about 4 inches long and ½ inch thick. You want them all to be just right.
Variations
Flavor Variations
You can make crispy zucchini sticks even tastier. Try adding cheese for a rich flavor. Grated Parmesan works well. Just sprinkle it on the breadcrumbs before baking.
If you like heat, spice it up! Add chili powder to the flour mix. This gives your zucchini sticks a nice kick. You can adjust the amount based on your taste.
Diet-Friendly Alternatives
For a gluten-free version, switch to almond flour. It gives a nice nutty flavor. Use it in place of all-purpose flour. Your sticks will still be crispy and delicious.
If you’re vegan, you can replace eggs with flax eggs. Mix one tablespoon of ground flaxseed with three tablespoons of water. Let it sit for a few minutes to thicken. This works great for coating your zucchini sticks.
Seasonal Variations
Feel free to get creative with seasonal veggies. Carrots, sweet potatoes, or even eggplant can join the zucchini. Just cut them into similar-sized sticks for even cooking.
Also, adjust spices based on the season. In fall, add a pinch of cinnamon or nutmeg. In summer, fresh herbs like basil or dill can brighten your dish. Enjoy experimenting!
Storage Info
Storing Leftovers
To keep your crispy zucchini sticks fresh, place them in an airtight container. Make sure they cool completely before sealing. This prevents moisture build-up, which can make them soggy. Store the container in the fridge for up to three days. To keep zucchini sticks crispy, you can layer paper towels between the sticks in the container. This helps absorb any excess moisture.
Reheating Tips
When it’s time to enjoy your leftovers, you have a few good options. For the stovetop, heat a non-stick pan over medium heat. Add a tiny bit of oil and cook the zucchini sticks for about 3-4 minutes, turning them until they’re warm and crispy again. If you prefer using the oven, preheat it to 400°F (200°C). Place the sticks on a baking sheet and bake for 10-12 minutes. The air fryer is another great choice. Heat it to 350°F (175°C) and cook for about 5-7 minutes. This method keeps them crispy. Always avoid using the microwave, as it will make them soggy.
Freezing Recommendations
If you want to save zucchini sticks for later, freezing is a good option. First, cool them completely. Then, place the sticks in a single layer on a baking sheet and freeze for about an hour. Once frozen, transfer them to a freezer bag. Remove as much air as possible before sealing. You can freeze them for up to three months. When ready to eat, defrost overnight in the fridge. Then reheat in the oven, stovetop, or air fryer for the best results.
FAQs
Common Questions
Can I make crispy zucchini sticks in advance?
Yes, you can prep them ahead of time. Cut the zucchini sticks and coat them as usual. Place them on a baking sheet. Cover with plastic wrap and store in the fridge for up to 24 hours. When you’re ready, just bake them straight from the fridge. This saves time and still gives you that crispy texture.
What is the best way to cut zucchini for sticks?
To cut zucchini for sticks, first wash and dry the zucchini. Cut off both ends. Slice it in half lengthwise. Now, cut each half into long sticks. Aim for about 4 inches long and ½ inch wide. This size helps them cook evenly and stay crispy.
Ingredient Substitutions
Can I use other vegetables instead of zucchini?
Absolutely! You can use eggplant, carrots, or even sweet potatoes. Just remember that cooking times may vary. Each veggie has its own water content, so adjust the baking time to get that perfect crisp.
Which type of breadcrumbs is best?
Panko breadcrumbs are my top choice. They give a great crunch. Regular breadcrumbs work too, but they won’t be as crispy. For a gluten-free option, try almond flour or gluten-free breadcrumbs.
Cooking Techniques
How do I make these zucchini sticks more flavorful?
Add extra spices to the coating mix. Try cayenne for heat or parmesan cheese for richness. You can also marinate the zucchini in olive oil and spices for a few hours before coating. This infuses more flavor into each bite.
Can these be air-fried instead of baked?
Yes, air-frying works great! Set your air fryer to 400°F (200°C). Cook the zucchini sticks for about 10-15 minutes. Be sure to shake the basket halfway to ensure even cooking. You’ll enjoy that crispy texture with less oil!
In this post, we explored how to make crispy zucchini sticks. We covered the main ingredients, seasoning, and step-by-step instructions. You learned tips for perfect crispiness and tasty variations. Remember to store them correctly for the best flavor and texture later. Whether for a snack or party, these zucchini sticks can impress anyone. Enjoy experimenting with flavors and cooking methods. They are easy to make and fun to share. With these tips, you will make zucchini sticks that everyone loves. Happy cooking!


. It will guide you through each step with details and tips. Enjoy cooking! In summary, we explored how to make delicious Roasted Garlic Parmesan Brussels Sprouts. I shared a full list of ingredients and options for substitutions. Fresh ingredients elevate taste and nutrition. You learned step-by-step instructions for perfect roasting, along with tips for flavor and presentation. Variations and storage tips help you customize and save leftovers. Remember to check FAQs for any lingering questions. Enjoy this simple yet tasty dish at your next meal!](https://dishtreats.com/wp-content/uploads/2025/08/f224f6d0-5adb-4fa1-b176-de066c43a5f2-3-768x768.webp)