Easy Greek Pasta Salad Fresh and Flavorful Dish
![- 8 oz rotini or fusilli pasta - 1 cup cherry tomatoes, halved - 1 cucumber, diced - 1 cup Kalamata olives, pitted and halved - 1/2 red onion, finely chopped - 1 bell pepper, diced - 1 cup feta cheese, crumbled - 1/4 cup fresh parsley, chopped - 1/4 cup extra virgin olive oil - 3 tablespoons red wine vinegar - 1 teaspoon dried oregano - Salt and pepper, to taste - Substitute red wine vinegar with apple cider vinegar - Add other vegetables like bell peppers or spinach This salad bursts with color and flavor. The main ingredients bring freshness. Each bite is full of crunch and zest. The pasta holds the dressing well, creating a tasty mix. The dressing is simple but packs a punch. Extra virgin olive oil adds richness. Red wine vinegar gives a tangy taste. Dried oregano adds a hint of earthiness. Salt and pepper enhance all the flavors. Want to mix it up? Try adding apple cider vinegar instead of red wine vinegar. You can also throw in extra veggies like spinach. This salad is flexible and lets your creativity shine. For the full recipe, check out the Zesty Greek Pasta Salad with Feta & Olives. To start, bring salted water to a rolling boil. Add 8 ounces of rotini or fusilli pasta. Cook for 8-10 minutes until al dente. Once cooked, drain the pasta in a colander. Rinse it under cold water to stop the cooking. Set the drained pasta aside for later. While your pasta cooks, wash and chop your vegetables. Use 1 cup of cherry tomatoes, 1 cucumber, 1/2 red onion, and 1 bell pepper. Dice these into bite-sized pieces. Also, chop 1/4 cup of fresh parsley. Once chopped, place all the vegetables into a large mixing bowl. This creates a colorful and fresh base for your salad. Now it’s time to mix things! Add the cooled pasta and 1 cup of Kalamata olives to the bowl of vegetables. This combination adds a nice salty flavor. In a separate bowl, prepare the dressing. Mix together 1/4 cup of olive oil, 3 tablespoons of red wine vinegar, and 1 teaspoon of dried oregano. Add salt and pepper to taste. Whisk until well combined. Drizzle the dressing over the pasta and vegetable mixture. Gently fold in 1 cup of crumbled feta cheese. Make sure all the ingredients are evenly coated with the dressing. This step is key for great flavor in every bite. Cover the salad with plastic wrap or a lid. Place it in the refrigerator for 30 minutes. This chilling time helps the flavors meld together. You can serve your pasta salad cold or at room temperature. For the full recipe, check out the details above. Serve your Greek pasta salad in a vibrant bowl for visual appeal. A colorful dish draws people in. You can also use individual plates for a fresh look. Garnish each serving with extra feta and parsley. This adds a pop of color and flavor. Let your salad chill longer in the fridge. This helps the flavors blend and deepen. If you love herbs, try adding basil or dill. Fresh herbs boost the taste and aroma. Prep your ingredients in advance. Chop vegetables and cook the pasta ahead of time. This makes assembly quick and easy. When storing leftovers, use an airtight container. It keeps the salad fresh and tasty for days. For the best flavor, consume within three to five days. {{image_4}} There are many fun ways to switch up your Easy Greek Pasta Salad. Try a Mediterranean twist for a new taste. Here are some ideas: - Add sun-dried tomatoes for a sweet, tangy flavor. - Toss in artichoke hearts for extra texture. - For protein, add grilled chicken or chickpeas. Both options make it filling. If you need to change the recipe for your diet, here are some tips: - Use gluten-free pasta to make it gluten-free. - For a vegan option, skip the feta cheese or try a vegan substitute. Enjoy seasonal ingredients by mixing in fresh veggies: - In summer, add zucchini for a crunchy touch. - Use roasted vegetables for deeper flavors. Roasting brings out their natural sweetness. These variations keep your Easy Greek Pasta Salad fresh and exciting! Check out the [Full Recipe] for the base you can customize. To keep your Easy Greek Pasta Salad fresh, place it in an airtight container. You can store it in the refrigerator for about 3-5 days. This salad tastes best when you enjoy it fresh. I do not recommend freezing this salad. Freezing can change its texture, making it less enjoyable. If you prepare a large batch, store the dressing separately. This keeps the flavors bright and fresh. This pasta salad is best served cold. However, you can also enjoy it at room temperature. Before serving, gently toss the salad. This helps mix the flavors evenly throughout. For the full recipe, check back to the beginning. Yes, it can be prepared a day in advance for flavor enhancement. This allows all the tastes to blend and become more rich. Just keep it in the fridge until you are ready to serve. You can use vegan feta or other cheese alternatives. This makes the dish suitable for various diets. You might want to try a creamy cheese for a nice texture. Yes, it’s perfect for picnics and potlucks if kept properly chilled. The fresh ingredients hold up well. Just pack it in a cooler or insulated bag to keep it fresh. Consider adding grilled chicken, shrimp, or canned chickpeas. These options make the salad more filling. They also add great taste and texture to the mix. This salad combines fresh pasta with vibrant vegetables, feta, and a simple dressing. Using easy steps, you can create a delightful dish that's perfect for any gathering. Remember, you can adjust flavors and ingredients to fit your taste. Meal prep helps save time, and eating fresh is best. Enjoy your colorful pasta salad, whether at a picnic or a family dinner!](https://dishtreats.com/wp-content/uploads/2025/06/42921458-26d8-4100-967d-b17bfbbdb796.webp)
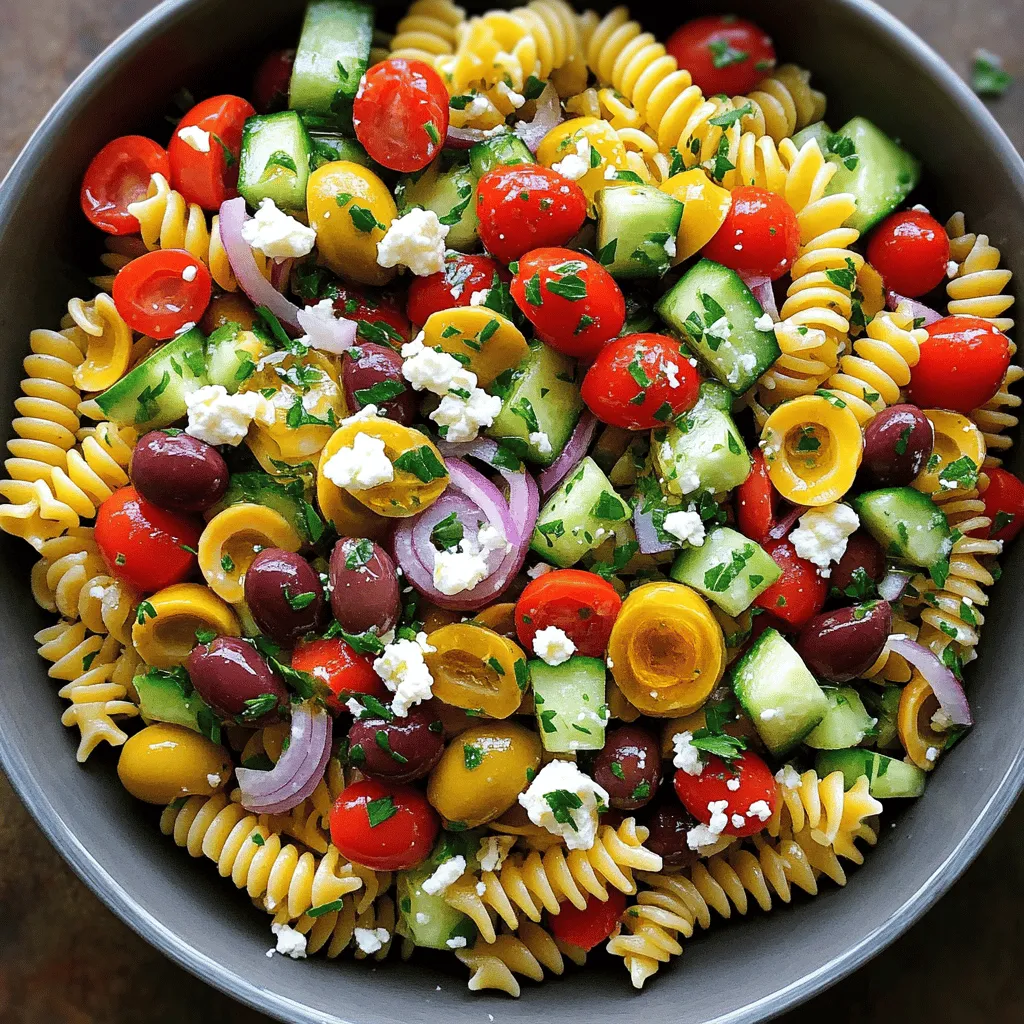
Looking for a fresh and tasty dish that’s quick to make? Try this Easy Greek Pasta Salad! With vibrant ingredients like rotini pasta, cherry tomatoes, and feta cheese, this recipe is colorful and satisfying. You can whip it up in no time, perfect for lunch or dinner. Ready to dive into a flavorful bowl of goodness? Let’s get started on this easy, delicious journey!
Ingredients
Main Ingredients
- 8 oz rotini or fusilli pasta
- 1 cup cherry tomatoes, halved
- 1 cucumber, diced
- 1 cup Kalamata olives, pitted and halved
- 1/2 red onion, finely chopped
- 1 bell pepper, diced
- 1 cup feta cheese, crumbled
- 1/4 cup fresh parsley, chopped
Dressing Ingredients
- 1/4 cup extra virgin olive oil
- 3 tablespoons red wine vinegar
- 1 teaspoon dried oregano
- Salt and pepper, to taste
Optional Ingredients
- Substitute red wine vinegar with apple cider vinegar
- Add other vegetables like bell peppers or spinach
This salad bursts with color and flavor. The main ingredients bring freshness. Each bite is full of crunch and zest. The pasta holds the dressing well, creating a tasty mix.
The dressing is simple but packs a punch. Extra virgin olive oil adds richness. Red wine vinegar gives a tangy taste. Dried oregano adds a hint of earthiness. Salt and pepper enhance all the flavors.
Want to mix it up? Try adding apple cider vinegar instead of red wine vinegar. You can also throw in extra veggies like spinach. This salad is flexible and lets your creativity shine.
Step-by-Step Instructions
Cooking the Pasta
To start, bring salted water to a rolling boil. Add 8 ounces of rotini or fusilli pasta. Cook for 8-10 minutes until al dente. Once cooked, drain the pasta in a colander. Rinse it under cold water to stop the cooking. Set the drained pasta aside for later.
Preparing the Vegetables
While your pasta cooks, wash and chop your vegetables. Use 1 cup of cherry tomatoes, 1 cucumber, 1/2 red onion, and 1 bell pepper. Dice these into bite-sized pieces. Also, chop 1/4 cup of fresh parsley. Once chopped, place all the vegetables into a large mixing bowl. This creates a colorful and fresh base for your salad.
Combining Ingredients
Now it’s time to mix things! Add the cooled pasta and 1 cup of Kalamata olives to the bowl of vegetables. This combination adds a nice salty flavor. In a separate bowl, prepare the dressing. Mix together 1/4 cup of olive oil, 3 tablespoons of red wine vinegar, and 1 teaspoon of dried oregano. Add salt and pepper to taste. Whisk until well combined.
Tossing the Salad
Drizzle the dressing over the pasta and vegetable mixture. Gently fold in 1 cup of crumbled feta cheese. Make sure all the ingredients are evenly coated with the dressing. This step is key for great flavor in every bite.
Chilling the Salad
Cover the salad with plastic wrap or a lid. Place it in the refrigerator for 30 minutes. This chilling time helps the flavors meld together. You can serve your pasta salad cold or at room temperature.
Tips & Tricks
Presentation Ideas
Serve your Greek pasta salad in a vibrant bowl for visual appeal. A colorful dish draws people in. You can also use individual plates for a fresh look. Garnish each serving with extra feta and parsley. This adds a pop of color and flavor.
Flavor Enhancements
Let your salad chill longer in the fridge. This helps the flavors blend and deepen. If you love herbs, try adding basil or dill. Fresh herbs boost the taste and aroma.
Meal Prep Advice
Prep your ingredients in advance. Chop vegetables and cook the pasta ahead of time. This makes assembly quick and easy. When storing leftovers, use an airtight container. It keeps the salad fresh and tasty for days. For the best flavor, consume within three to five days.
Variations
There are many fun ways to switch up your Easy Greek Pasta Salad. Try a Mediterranean twist for a new taste. Here are some ideas:
Mediterranean Twist
- Add sun-dried tomatoes for a sweet, tangy flavor.
- Toss in artichoke hearts for extra texture.
- For protein, add grilled chicken or chickpeas. Both options make it filling.
Dietary Adjustments
If you need to change the recipe for your diet, here are some tips:
- Use gluten-free pasta to make it gluten-free.
- For a vegan option, skip the feta cheese or try a vegan substitute.
Seasonal Additions
Enjoy seasonal ingredients by mixing in fresh veggies:
- In summer, add zucchini for a crunchy touch.
- Use roasted vegetables for deeper flavors. Roasting brings out their natural sweetness.
These variations keep your Easy Greek Pasta Salad fresh and exciting!
Storage Info
Short-Term Storage
To keep your Easy Greek Pasta Salad fresh, place it in an airtight container. You can store it in the refrigerator for about 3-5 days. This salad tastes best when you enjoy it fresh.
Freezing Recommendations
I do not recommend freezing this salad. Freezing can change its texture, making it less enjoyable. If you prepare a large batch, store the dressing separately. This keeps the flavors bright and fresh.
Reheating Tips
This pasta salad is best served cold. However, you can also enjoy it at room temperature. Before serving, gently toss the salad. This helps mix the flavors evenly throughout.
FAQs
Can I make this salad ahead of time?
Yes, it can be prepared a day in advance for flavor enhancement. This allows all the tastes to blend and become more rich. Just keep it in the fridge until you are ready to serve.
What can I use instead of feta cheese?
You can use vegan feta or other cheese alternatives. This makes the dish suitable for various diets. You might want to try a creamy cheese for a nice texture.
Is it suitable for outdoor events?
Yes, it’s perfect for picnics and potlucks if kept properly chilled. The fresh ingredients hold up well. Just pack it in a cooler or insulated bag to keep it fresh.
How can I add protein to this salad?
Consider adding grilled chicken, shrimp, or canned chickpeas. These options make the salad more filling. They also add great taste and texture to the mix.
This salad combines fresh pasta with vibrant vegetables, feta, and a simple dressing. Using easy steps, you can create a delightful dish that’s perfect for any gathering. Remember, you can adjust flavors and ingredients to fit your taste. Meal prep helps save time, and eating fresh is best. Enjoy your colorful pasta salad, whether at a picnic or a family dinner!
![- 8 oz rotini or fusilli pasta - 1 cup cherry tomatoes, halved - 1 cucumber, diced - 1 cup Kalamata olives, pitted and halved - 1/2 red onion, finely chopped - 1 bell pepper, diced - 1 cup feta cheese, crumbled - 1/4 cup fresh parsley, chopped - 1/4 cup extra virgin olive oil - 3 tablespoons red wine vinegar - 1 teaspoon dried oregano - Salt and pepper, to taste - Substitute red wine vinegar with apple cider vinegar - Add other vegetables like bell peppers or spinach This salad bursts with color and flavor. The main ingredients bring freshness. Each bite is full of crunch and zest. The pasta holds the dressing well, creating a tasty mix. The dressing is simple but packs a punch. Extra virgin olive oil adds richness. Red wine vinegar gives a tangy taste. Dried oregano adds a hint of earthiness. Salt and pepper enhance all the flavors. Want to mix it up? Try adding apple cider vinegar instead of red wine vinegar. You can also throw in extra veggies like spinach. This salad is flexible and lets your creativity shine. For the full recipe, check out the Zesty Greek Pasta Salad with Feta & Olives. To start, bring salted water to a rolling boil. Add 8 ounces of rotini or fusilli pasta. Cook for 8-10 minutes until al dente. Once cooked, drain the pasta in a colander. Rinse it under cold water to stop the cooking. Set the drained pasta aside for later. While your pasta cooks, wash and chop your vegetables. Use 1 cup of cherry tomatoes, 1 cucumber, 1/2 red onion, and 1 bell pepper. Dice these into bite-sized pieces. Also, chop 1/4 cup of fresh parsley. Once chopped, place all the vegetables into a large mixing bowl. This creates a colorful and fresh base for your salad. Now it’s time to mix things! Add the cooled pasta and 1 cup of Kalamata olives to the bowl of vegetables. This combination adds a nice salty flavor. In a separate bowl, prepare the dressing. Mix together 1/4 cup of olive oil, 3 tablespoons of red wine vinegar, and 1 teaspoon of dried oregano. Add salt and pepper to taste. Whisk until well combined. Drizzle the dressing over the pasta and vegetable mixture. Gently fold in 1 cup of crumbled feta cheese. Make sure all the ingredients are evenly coated with the dressing. This step is key for great flavor in every bite. Cover the salad with plastic wrap or a lid. Place it in the refrigerator for 30 minutes. This chilling time helps the flavors meld together. You can serve your pasta salad cold or at room temperature. For the full recipe, check out the details above. Serve your Greek pasta salad in a vibrant bowl for visual appeal. A colorful dish draws people in. You can also use individual plates for a fresh look. Garnish each serving with extra feta and parsley. This adds a pop of color and flavor. Let your salad chill longer in the fridge. This helps the flavors blend and deepen. If you love herbs, try adding basil or dill. Fresh herbs boost the taste and aroma. Prep your ingredients in advance. Chop vegetables and cook the pasta ahead of time. This makes assembly quick and easy. When storing leftovers, use an airtight container. It keeps the salad fresh and tasty for days. For the best flavor, consume within three to five days. {{image_4}} There are many fun ways to switch up your Easy Greek Pasta Salad. Try a Mediterranean twist for a new taste. Here are some ideas: - Add sun-dried tomatoes for a sweet, tangy flavor. - Toss in artichoke hearts for extra texture. - For protein, add grilled chicken or chickpeas. Both options make it filling. If you need to change the recipe for your diet, here are some tips: - Use gluten-free pasta to make it gluten-free. - For a vegan option, skip the feta cheese or try a vegan substitute. Enjoy seasonal ingredients by mixing in fresh veggies: - In summer, add zucchini for a crunchy touch. - Use roasted vegetables for deeper flavors. Roasting brings out their natural sweetness. These variations keep your Easy Greek Pasta Salad fresh and exciting! Check out the [Full Recipe] for the base you can customize. To keep your Easy Greek Pasta Salad fresh, place it in an airtight container. You can store it in the refrigerator for about 3-5 days. This salad tastes best when you enjoy it fresh. I do not recommend freezing this salad. Freezing can change its texture, making it less enjoyable. If you prepare a large batch, store the dressing separately. This keeps the flavors bright and fresh. This pasta salad is best served cold. However, you can also enjoy it at room temperature. Before serving, gently toss the salad. This helps mix the flavors evenly throughout. For the full recipe, check back to the beginning. Yes, it can be prepared a day in advance for flavor enhancement. This allows all the tastes to blend and become more rich. Just keep it in the fridge until you are ready to serve. You can use vegan feta or other cheese alternatives. This makes the dish suitable for various diets. You might want to try a creamy cheese for a nice texture. Yes, it’s perfect for picnics and potlucks if kept properly chilled. The fresh ingredients hold up well. Just pack it in a cooler or insulated bag to keep it fresh. Consider adding grilled chicken, shrimp, or canned chickpeas. These options make the salad more filling. They also add great taste and texture to the mix. This salad combines fresh pasta with vibrant vegetables, feta, and a simple dressing. Using easy steps, you can create a delightful dish that's perfect for any gathering. Remember, you can adjust flavors and ingredients to fit your taste. Meal prep helps save time, and eating fresh is best. Enjoy your colorful pasta salad, whether at a picnic or a family dinner!](https://dishtreats.com/wp-content/uploads/2025/06/42921458-26d8-4100-967d-b17bfbbdb796-300x300.webp)

. To make your soup even tastier, think about adding spices. A pinch of smoked paprika gives a nice depth. You can also try a dash of red pepper flakes for some heat. Fresh herbs like thyme or dill can brighten the flavors. To get the best creaminess, use full-fat coconut milk. It adds a rich texture. If you prefer cashew cream, blend soaked cashews with water until smooth. This makes a wonderful base too. If you want a thicker soup, let it simmer longer. This lets more water evaporate. You can also blend in some cooked potatoes for extra creaminess. To make it more nutritious, add veggies like carrots or spinach. Just chop them small and add them early in the cooking process. They will soften and blend well with the soup. You can also stir in cooked lentils for added protein and texture. {{image_4}} You can change the type of tomatoes you use. Fresh tomatoes add brightness. Canned tomatoes provide convenience and consistent flavor. Both work well in this soup. Choose what suits your taste and time best. For cream alternatives, coconut milk is my favorite. It gives a smooth and rich flavor. You can also use cashew cream or almond milk for a lighter option. Each choice offers a unique taste. Want to add protein? Beans or lentils are great options. They boost nutrition and make the soup heartier. Try adding white beans for a creamy texture or lentils for a bit of bite. You can mix and match until you find your favorite blend. Pair this soup with a side salad or sandwich. A fresh green salad balances the rich soup. A grilled cheese sandwich adds comfort and crunch. Both choices enhance your meal experience. For a fun twist, serve the soup in bread bowls. You can hollow out a crusty loaf and fill it. This adds a delicious element to your meal. Top the soup with fresh basil or a drizzle of olive oil for extra flair. These simple touches make the dish special. I encourage you to explore these ideas to create your own version of Vegan Creamy Tomato Soup. Check out the Full Recipe for all the details to get started! To keep your Vegan Creamy Tomato Soup fresh, store it in airtight containers. This helps prevent spoilage. Make sure the soup cools down before sealing the container. You can keep it in the fridge for up to five days. If you want to save it longer, consider freezing it. Pour the cooled soup into freezer-safe bags or containers. Leave some space at the top, as the soup will expand when frozen. This soup can last for up to three months in the freezer. When you want to enjoy your soup again, reheating it properly is key. The best method is to use the stovetop. Pour the soup into a pot and heat it over low to medium heat. Stir it often to keep it from sticking. This way, you keep the flavor and creaminess intact. If you prefer to use a microwave, pour the soup into a microwave-safe bowl. Heat it in short bursts, stirring in between, to ensure even warming. Be careful not to overheat, as this can change the texture. How to make Vegan Creamy Tomato Soup spicier? You can add red pepper flakes or a pinch of cayenne. Start with a small amount. Taste the soup after mixing. This way, you can control the heat. Another option is to add diced jalapeños. These will give your soup a nice kick! Can I substitute coconut milk with another plant-based milk? Yes, you can use almond milk, soy milk, or oat milk. Just ensure it is unsweetened. Coconut milk adds creaminess, but other milks work too. Each will change the flavor slightly, but they will still taste great. How long does the soup last in the fridge? The soup lasts about 3 to 5 days in the fridge. Store it in an airtight container. Always check for any changes in smell or color before eating. What is the best method to puree the soup? An immersion blender works best for pureeing. It keeps the soup in the pot, and it’s easy to use. If you don’t have one, use a regular blender. Just blend in small batches to avoid spills. Can I use fresh tomatoes instead of canned for this recipe? Yes, fresh tomatoes can be used! You will need about 2 pounds of ripe tomatoes. Blanch them first to remove the skins. This adds a fresh flavor to your soup. What garnishes pair well with Vegan Creamy Tomato Soup? Fresh basil leaves are a great choice. They add color and flavor. You can also drizzle some extra coconut milk on top. Croutons or a sprinkle of nutritional yeast also work well! This blog post covers how to make Vegan Creamy Tomato Soup. We broke down the needed ingredients, their nutritional value, and suggested substitutes. I provided step-by-step instructions for preparation and cooking. Tips for flavor, thickness adjustments, and variations helped enhance your soup. You'll find storage and reheating info to keep your leftovers fresh. With these insights, you can enjoy a delicious, creamy soup that's easy to make, healthy, and versatile. Get creative and have fun experimenting!](https://dishtreats.com/wp-content/uploads/2025/06/e1561612-3c52-470f-b0a5-4bd51ef2e908-768x768.webp)