
Lemon Garlic Roasted Broccoli Crispy and Flavorful Dish
Craving a side dish that’s both crispy and packed with flavor? Look no further than Lemon Garlic Roasted Broccoli! This easy recipe transforms ordinary broccoli into a bright, zesty delight that can steal the show at any meal. I’ll guide you through simple steps, helpful tips, and tasty variations to elevate your vegetable game. Let’s dive in and create a dish everyone will love!
Ingredients
Complete list of ingredients
To make Lemon Garlic Roasted Broccoli, gather these items:
- 1 large head of broccoli, trimmed and cut into bite-sized florets
- 4 cloves of garlic, finely minced
- 3 tablespoons extra virgin olive oil
- 1 lemon, juiced and zested
- 1 teaspoon crushed red pepper flakes
- Sea salt and freshly cracked black pepper, to taste
- 2 tablespoons freshly grated Parmesan cheese (optional but recommended)
- Fresh parsley, finely chopped for garnish
Ingredient substitutions and alternatives
If you don’t have certain ingredients, here are some swaps:
- You can use any oil, like avocado oil, if you lack olive oil.
- For garlic powder, use 1 teaspoon instead of fresh garlic.
- If you want a milder taste, skip the red pepper flakes.
- Nutritional yeast can replace Parmesan for a vegan option.
Fresh vs. frozen broccoli
Fresh broccoli gives the best flavor and texture. It roasts to a nice crisp. Frozen broccoli works in a pinch, but it can be softer. If using frozen, thaw it and drain excess water before roasting. This helps keep the broccoli from becoming soggy. Choosing fresh broccoli will make your dish shine.
Step-by-Step Instructions
Detailed preparation steps for perfect roasting
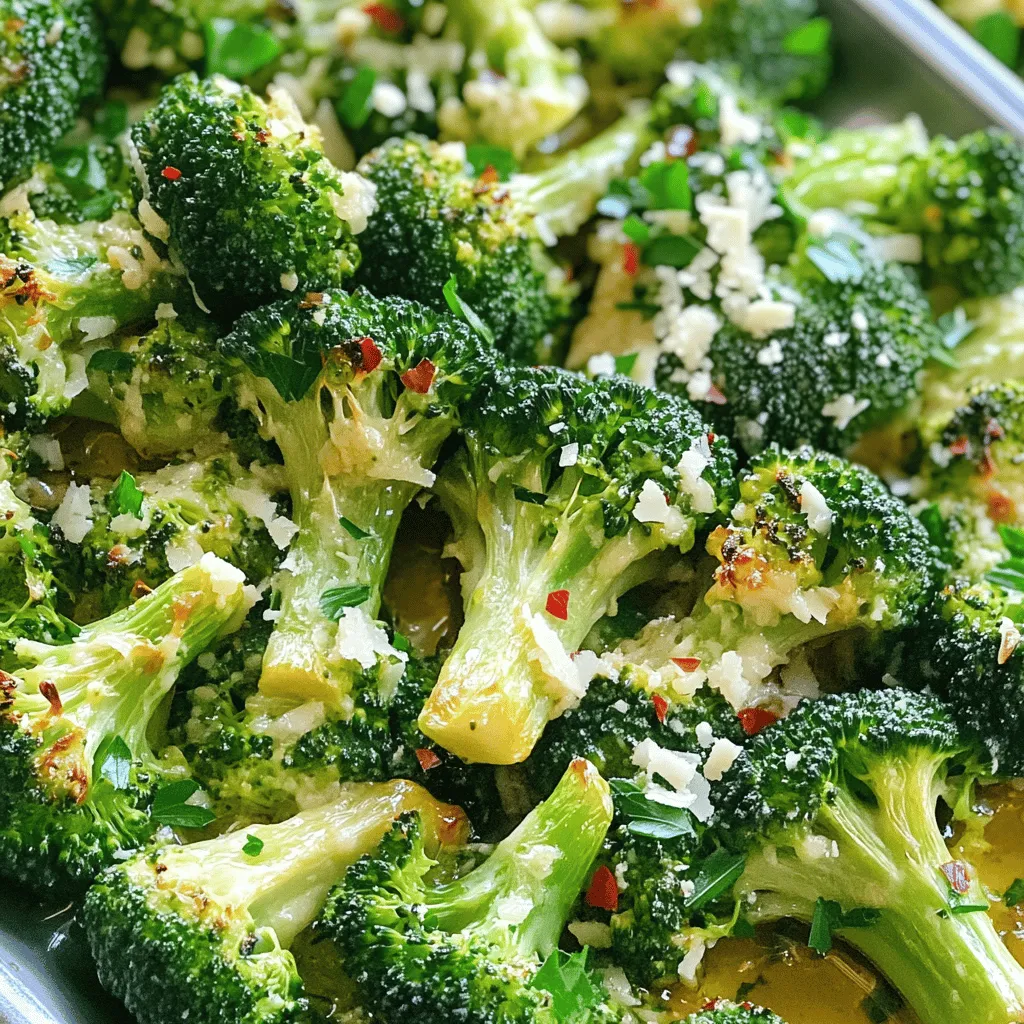
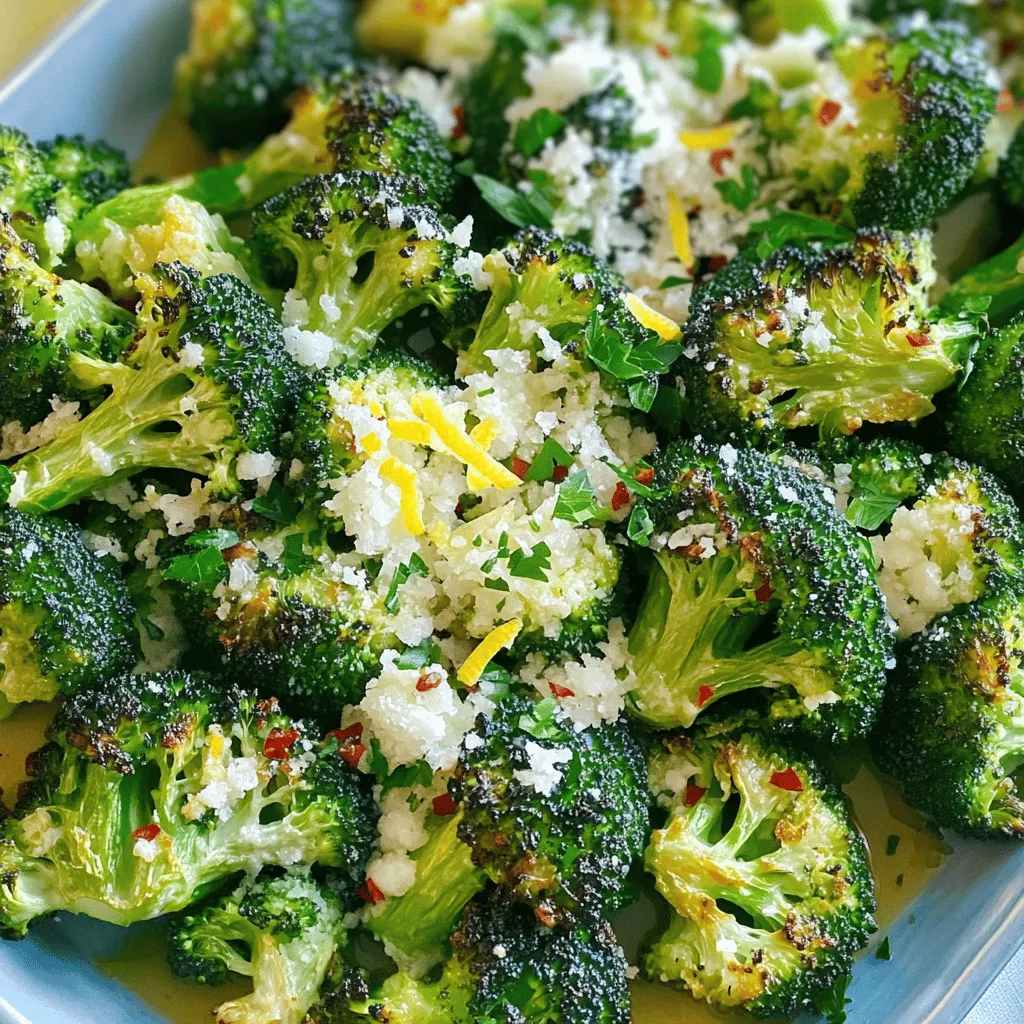
To make Lemon Garlic Roasted Broccoli, start by preheating your oven to 425°F (220°C). This high heat helps the broccoli turn crispy. Next, take a large head of broccoli and trim it. Cut the broccoli into bite-sized florets. This size helps them cook evenly.
In a big bowl, mix the broccoli florets with 4 cloves of finely minced garlic. The garlic adds a strong flavor that pairs well with the broccoli. Now, drizzle 3 tablespoons of extra virgin olive oil over the mix. This oil helps the broccoli brown and get crispy.
Add the juice and zest of 1 lemon. The lemon brightens the dish and adds a fresh taste. Then, sprinkle in 1 teaspoon of crushed red pepper flakes for a bit of heat. Season with sea salt and black pepper to taste. Toss everything together well, making sure each piece is coated.
Spread the broccoli mixture onto a baking sheet. Lay the florets in a single layer. This helps them roast evenly and get that nice crunch. Place the baking sheet in the oven and roast for 15-20 minutes.
Tips for seasoning and flavor enhancement
For extra flavor, try adding Parmesan cheese. If you want to use it, add 2 tablespoons of freshly grated cheese during the last 2-3 minutes of roasting. This creates a rich, cheesy layer on top of the broccoli.
You can also change up the seasonings. Try adding garlic powder or onion powder for more depth. Fresh herbs like thyme or rosemary can add a lovely aroma. Just sprinkle them on before roasting.
Visual cues for doneness and texture
Watch the broccoli closely towards the end of roasting. You want it to be tender but still crisp. The edges should turn golden brown. This color means the sugars in the broccoli are caramelizing, making it taste sweet.
When done, the broccoli should feel soft when you poke it with a fork. If it looks bright green and has crispy edges, it’s ready! Remove it from the oven and let it cool slightly. Serve it warm for the best flavor.
Tips & Tricks
How to achieve crispy edges
To get those crispy edges on your broccoli, start by using high heat. Preheat your oven to 425°F (220°C). This temperature helps caramelize the natural sugars in the broccoli. Make sure to cut the florets into similar sizes. This step ensures even cooking. Spread the broccoli out in a single layer on your baking sheet. If the florets are too close, they will steam instead of roast.
Best practices for mixing and tossing ingredients
When mixing, use a large bowl. This gives you room to toss without making a mess. Add the minced garlic and olive oil first; they coat the broccoli best this way. Squeeze in fresh lemon juice for that zesty flavor. After adding spices, use your hands or a spatula to mix gently. You want every floret to be well-coated without breaking them apart. This method helps the flavors stick and ensures a tasty bite every time.
Choosing the right baking sheet for optimal roasting
Pick a sturdy, rimmed baking sheet for roasting. A heavy sheet will help the heat circulate better. Avoid non-stick sheets, as they can trap moisture. Instead, use a metal or aluminum sheet. If you have a lined sheet, use parchment paper. This helps with easy cleanup and adds to the crispiness. Remember to avoid overcrowding. If needed, roast in batches to achieve that perfect golden-brown finish.
Variations
Adding different vegetables to the mix
You can mix in other veggies for a fun twist. Try adding bell peppers for sweetness or carrots for crunch. Cauliflower works well too. Cut them to the same size as the broccoli. This way, they all roast evenly. Each vegetable brings its own taste and texture. You can create a colorful and tasty medley that everyone will love.
Incorporating additional spices or herbs
Spices and herbs can elevate your dish. For a warm kick, add smoked paprika. If you love fresh flavors, try thyme or oregano. You can even toss in some cumin for an earthy note. Just remember to balance the spices with the lemon and garlic. This will keep the dish bright and flavorful. Experiment and find your favorite mix!
Variants for dietary preferences (vegan, gluten-free)
Making this dish for different diets is easy. It’s already vegan and gluten-free! To keep it vegan, skip the Parmesan cheese or use a plant-based alternative. You can also enhance the flavor with nutritional yeast. This gives a cheesy taste without dairy. Enjoy this versatile dish, no matter your dietary needs.
Storage Info
How to store leftovers properly
To keep your leftover Lemon Garlic Roasted Broccoli fresh, place it in an airtight container. Let it cool first to prevent steam. Store it in the fridge for up to 3 days. If you want to keep it longer, freezing is a great option.
Reheating methods for maintaining flavor and texture
When you’re ready to enjoy your leftovers, reheating them properly is key. The best way is to use the oven. Preheat your oven to 350°F (175°C). Place the broccoli on a baking sheet and heat for about 10 minutes. This method helps keep the broccoli crispy. You can also use a microwave, but it may make the broccoli soft. If you use the microwave, heat it in short bursts, stirring in between.
Freezing tips for longer shelf life
If you want to freeze your broccoli, first blanch it. Boil water and add the broccoli for 2-3 minutes. Then, quickly place it in ice water to stop cooking. Drain and dry it well. Pack the broccoli in freezer bags, removing as much air as possible. It can last up to 3 months in the freezer. When ready to use, just roast it directly from frozen. This will keep its flavor and texture intact.
FAQs
How to make Lemon Garlic Roasted Broccoli more flavorful?
To boost the flavor of Lemon Garlic Roasted Broccoli, try adding more spices. You can mix in smoked paprika or cumin for an extra kick. Fresh herbs like thyme or rosemary work well too. A splash of balsamic vinegar can add depth and sweetness. You can also marinate the broccoli in the olive oil and lemon juice for 30 minutes before roasting. This gives the flavors time to blend and soak into the broccoli.
Can I make this dish ahead of time?
Yes, you can make this dish ahead of time! You can prep the broccoli and season it a day before. Just store it in the fridge in an airtight container. When you’re ready, roast it straight from the fridge. This saves time on busy days and helps the flavors meld together.
What dishes pair well with Lemon Garlic Roasted Broccoli?
Lemon Garlic Roasted Broccoli pairs great with grilled chicken or fish. It also goes well with pasta dishes, especially those with cream or lemon sauces. Try serving it alongside quinoa or rice for a complete meal. This dish complements any hearty protein, making it a versatile side.
In this article, we covered key ingredients for Lemon Garlic Roasted Broccoli, plus great substitutes. You learned step-by-step prep and how to roast to perfection. I shared tips for crispy edges and the best baking sheet choices. Variations offer options for every diet. Finally, we discussed storage and reheating methods to keep your dish fresh.
Enjoy creating this tasty dish! It’s simple to make and sure to please.

![To make delicious roasted red pepper hummus, gather these key ingredients: - 1 cup canned chickpeas, drained and thoroughly rinsed - 1 large roasted red pepper (store-bought jarred or homemade) - 2 tablespoons tahini - 2 tablespoons extra virgin olive oil, plus more for drizzling - 2 tablespoons freshly squeezed lemon juice - 1 clove of garlic, finely minced - 1/2 teaspoon ground cumin - Salt, to taste These ingredients create a smooth and creamy dip. Each one plays a vital role. Chickpeas give it body. Roasted red pepper adds sweetness and depth. Tahini brings a nutty flavor, while olive oil adds richness. Lemon juice gives it brightness and balance. Garlic adds a punch, and cumin adds warmth. To make your hummus even better, you can add some garnishes: - Fresh parsley, finely chopped (for garnish, optional) - Paprika, for garnish (optional) These garnishes not only look nice but also enhance the taste. Fresh parsley adds a pop of color and freshness. Paprika gives a hint of smokiness and warmth. You can use these garnishes to personalize your hummus. For the full recipe, check the detailed instructions that guide you through preparation and blending for a perfect dip. Roasting Techniques (Oven & Grill) You can roast red peppers in two main ways. The oven is great for a consistent roast. Start by preheating your oven to 450°F (230°C). Place whole red peppers on a lined baking sheet. Roast them for 20-25 minutes. Turn them every few minutes until the skin is blistered and charred. If you prefer grilling, place the peppers directly on the grill. Turn them often until they are blackened all around. How to Steam and Peel After roasting, steaming helps peel the skin. Place the hot peppers in a heatproof bowl. Cover it tightly with plastic wrap for about 10 minutes. This traps steam, loosening the skin. Once cool enough to handle, peel off the blackened skin. Remove the seeds, and set the peppers aside. Food Processor Tips Using a food processor makes blending easy. Start with the chickpeas and roasted red pepper in the bowl. Add tahini, olive oil, lemon juice, minced garlic, and ground cumin. Blend on low speed first. Gradually increase to high until smooth. Achieving Creamy Consistency To get a creamy texture, you may need to add water. If the hummus is thick, add one tablespoon at a time while blending. Keep processing until it reaches your desired consistency. Importance of Seasoning Seasoning makes a big difference in taste. After blending, taste your hummus. Add salt slowly, mixing well after each addition. This helps to enhance the overall flavor. Customizing Thickness If you want a thinner hummus, keep adding water. Blend in small amounts until you reach the right thickness. Remember, you can always add more, but you can't take it out! - Experimenting with Spices: You can add spices to boost flavor. Try smoked paprika for a smoky taste. Or add a pinch of cayenne pepper for some heat. Each spice adds a unique twist to your hummus. - Using Fresh Ingredients: Fresh ingredients make a big difference. Fresh garlic brings a sharp bite. Choose ripe lemons for the best juice. They add zest and brightness to the dish. - Store-Bought Ingredient Options: If you're short on time, use store-bought roasted red peppers. They save you the hassle of roasting at home. Check the jar for quality; it should have no added sugars. - Quick Prep Hacks: Use canned chickpeas to save time. They are ready to go. Rinse them well to remove excess sodium. This step helps keep your hummus light and tasty. - Best Pairings for Hummus: Roasted red pepper hummus pairs well with fresh veggies. Carrot sticks, cucumber slices, and bell peppers create a colorful plate. You can also serve it with pita chips or crackers. - Creative Serving Ideas: For a fun twist, serve hummus in cute bowls. Drizzle olive oil on top for a glossy finish. Add a sprinkle of paprika and fresh parsley for color. It looks great and tastes even better. For the full recipe, check out the [Full Recipe]. {{image_4}} To make your hummus spicy, add fresh jalapeños or crushed red pepper flakes. Start with a small amount. Blend everything well and taste. Adjust the heat to your liking. For a balanced flavor, add a bit of honey or maple syrup. This sweetness can tone down the heat and enhance the taste. Fresh herbs give hummus a bright twist. Try adding basil, cilantro, or dill. Just chop them finely before blending. These herbs pair well with roasted red pepper. They add freshness and depth. You can also mix in some sun-dried tomatoes for a Mediterranean vibe. It brings a rich flavor that complements the hummus nicely. Want to make your hummus even healthier? Add superfoods like spinach or kale. They blend in well and boost nutrients. If you have dietary needs, this hummus is easy to adjust. It's naturally vegan and gluten-free. You can enjoy it without worry. Check the full recipe for more tips on adding these healthy ingredients. To keep your roasted red pepper hummus fresh, use an airtight container. Glass containers work best to avoid any odors. If you do not have glass, BPA-free plastic containers are also a good choice. This way, your hummus stays tasty and does not absorb other flavors in the fridge. Homemade hummus lasts up to one week in the fridge. Make sure to check for any signs of spoilage before eating. If it looks or smells off, it is best to toss it. You can freeze hummus for longer storage. First, place the hummus in a freezer-safe container. Leave some space at the top for expansion as it freezes. You can also use ice cube trays for smaller portions. To thaw, place the frozen hummus in the fridge overnight. This will help keep its texture smooth. If it seems a bit thick after thawing, simply add a splash of water and stir well. Enjoy your hummus in wraps, sandwiches, or with fresh veggies. - Start by gathering your ingredients. - Roast the red pepper and cool it. - Blend chickpeas, roasted pepper, tahini, olive oil, lemon juice, garlic, and cumin. - Add water for the right texture. - Season with salt and blend again. - Serve it with a drizzle of olive oil. Making roasted red pepper hummus is simple. You can easily prepare it at home. Follow the quick steps above, and you have a fresh dip ready in about 35 minutes. For the full recipe, check out the detailed instructions provided earlier. - Fresh veggie sticks (carrots, cucumbers, bell peppers) - Warm pita bread or pita chips - Crackers or breadsticks - Grilled meats or seafood - Salads as a dressing Roasted red pepper hummus is versatile. It pairs well with many foods. Fresh veggies make a crunchy, healthy option. You can also enjoy it with pita bread for a classic taste. - Local grocery stores often carry it. - Check health food stores for unique brands. - Look in the deli section for fresh options. - Popular brands include Tribe, Sabra, and Hope. If you prefer buying hummus, many stores have pre-made options. Check your local store's shelves or the deli section for fresh varieties. Each brand may offer a unique taste, so explore a few! - High in protein from chickpeas. - Contains healthy fats from olive oil and tahini. - Rich in vitamins from red peppers and garlic. - Low in saturated fat and cholesterol-free. Roasted red pepper hummus is a healthy snack. It offers many nutritional benefits. The chickpeas give protein, while olive oil adds healthy fats. This dip is not just tasty; it's good for you too! Roasted red pepper hummus is easy to make and packed with flavor. We discussed key ingredients like chickpeas, roasted red peppers, and tahini. You learned step-by-step how to prepare and blend, plus tips to enhance taste and texture. Explore variations by adding spices or herbs to fit your taste. Don't forget how to store your hummus for freshness. I hope this guide inspires you to create your own hummus and enjoy it!](https://dishtreats.com/wp-content/uploads/2025/07/4eff3fe8-7a50-4e3c-86ee-c946a92fe799-768x768.webp)


![- 2 cups canned chickpeas - Fresh herbs: parsley and cilantro - Key spices: cumin and coriander To make crispy baked falafel, start with the main ingredients. The base is 2 cups of canned chickpeas. They give falafel a wonderful texture. Fresh herbs like parsley and cilantro add bright flavors. Using both gives a fresh taste. Spices are key too. Ground cumin and coriander bring warmth and depth. They create a balance that makes falafel special. - Aromatics: onion and garlic - Binding ingredients: tahini and breadcrumbs - Optional: olive oil for drizzling Next, we have additional ingredients. Aromatics like onion and garlic make the falafel smell great. They add a savory note that enhances the dish. Binding ingredients are also important. Tahini helps hold everything together. Breadcrumbs add crunch and structure. If you want a golden and crispy finish, drizzle olive oil on top. It helps the falafel bake evenly and get that perfect crunch. For the full recipe, check out the detailed instructions provided. 1. Preheat your oven to 400°F (200°C). 2. Line a baking sheet with parchment paper. This helps prevent sticking and ensures even cooking. 3. In a food processor, add the drained chickpeas, chopped onion, minced garlic, parsley, cilantro, cumin, coriander, baking powder, salt, black pepper, lemon juice, and tahini. 4. Pulse the mixture. You want it well combined but still chunky, like a paste. 1. Transfer the mixture to a mixing bowl. 2. Fold in the breadcrumbs. If it feels wet, add more breadcrumbs until it holds together. 3. Use your hands to shape the mixture into small balls or patties, about the size of golf balls. 4. Place them evenly on the prepared baking sheet. 1. Drizzle a good amount of olive oil over the falafel balls. This helps them get crispy. 2. Bake in the oven for about 20 minutes. Flip them halfway through for even browning. 3. Look for a golden brown color and a crispy outside. 4. Let the falafel cool for a few minutes before serving. This enhances their flavor and texture. For the full recipe, check the detailed instructions provided earlier. To make your falafel crispy, olive oil plays a key role. It adds flavor and helps create a golden crust. I suggest drizzling olive oil on top of your falafel before baking. This not only enhances the taste but also promotes even cooking. Baking techniques matter too. Preheat your oven to 400°F (200°C) for the best results. Use parchment paper on your baking sheet to prevent sticking. This will help the falafel stay intact and crisp up nicely. Adjusting the breadcrumbs is also important. If your mixture feels too wet, add more breadcrumbs until it holds together. If you want extra crunch, consider using panko breadcrumbs. They give a delightful texture that enhances the overall experience. For a beautiful presentation, arrange your crispy baked falafel on a colorful platter. Pair it with a creamy tahini sauce and a fresh cucumber-tomato salad. This adds both flavor and visual appeal. You might also want to serve it with warm pita bread. Add a side of hummus or tzatziki for a fun dip. These flavors complement the falafel well and make for a tasty meal. One common mistake is not achieving the right consistency. If your falafel falls apart during baking, it may be too wet. Always ensure your mixture holds together well. Adjust breadcrumbs as needed to fix this. Another mistake is overcrowding the baking sheet. Give each falafel space to bake evenly. This helps them crisp up nicely. Flip them halfway through baking for even browning. Finally, don’t skip the cooling step. Let the falafel cool for a few minutes after baking. This enhances their flavor and texture, making your dish even more delightful. For the full recipe, you can refer to the detailed guide above. {{image_4}} You can make falafel even more exciting by adding spices. Try mixing in smoked paprika for a warm, smoky flavor. If you want a brighter taste, add some zest from a lemon. You might also enjoy using fresh herbs like mint or dill for a fresh twist. Each region has its own spin, so feel free to experiment! For those who need gluten-free options, you can swap breadcrumbs with ground oats or almond flour. Both work well and keep the falafel together. If you want to make it vegan, just skip the tahini or use sunflower seed butter instead. This way, everyone can enjoy these tasty bites! While baking gives falafel a nice crunch, you can try air frying them for a quicker option. Air-frying uses less oil and cooks them evenly. You can also pan-fry them in a little oil for golden-brown goodness. Just make sure to keep an eye on them so they don’t burn. For the full recipe, check out the detailed steps above to make your crispy baked falafel! To store leftover falafel, place them in an airtight container. This helps keep them fresh. If you have sauce, store it separately. Leftover falafel stays tasty for about three to four days in the fridge. For freezing, let the falafel cool completely first. Then, space them on a baking sheet and freeze until solid. Once frozen, transfer them to a freezer bag. This way, they won’t stick together. To reheat, bake them directly from the freezer. Heat at 375°F (190°C) for about 15-20 minutes until warm and crispy. In the fridge, your leftover falafel will last about three to four days. If frozen, they can last up to three months. Just remember to seal them well to avoid freezer burn. Enjoy your crispy baked falafel whenever you want with these easy storage tips. For the full recipe, check back to create these delicious bites! Crispy baked falafel pairs well with many sides. You can serve it with: - Hummus for a creamy dip - Tahini sauce for added flavor - Tzatziki sauce for a cool touch - Fresh salads like cucumber-tomato salad - Pita bread for a classic wrap These options enhance the meal and add fresh tastes. To achieve extra crispy falafel, follow these tips: - Use panko breadcrumbs instead of regular ones. They add more crunch. - Drizzle olive oil generously over the falafel before baking. This helps with browning. - Bake at 400°F (200°C) for the best crispiness. Flip them halfway for even cooking. These small changes can make a big difference in texture. Yes, you can use dried chickpeas! Here’s how: - Soak 1 cup of dried chickpeas overnight in water. This softens them. - Drain and rinse the chickpeas before using them in the recipe. - Cook them in boiling water for about 1 hour until tender. Using dried chickpeas gives a fresher taste but takes more time. For the complete details on making crispy baked falafel, check out the [Full Recipe]. Baked falafel is easy and fun to make. By using canned chickpeas, fresh herbs, and key spices like cumin, you create a tasty dish. Follow the steps for perfect shapes, timing, and crunch. Remember to use olive oil and adjust breadcrumbs for crispiness. Play with flavors and storage tips to maximize your enjoyment. With this guide, you can make falafel that delights and satisfies. Now, you're ready to impress friends and family with your delicious creation!](https://dishtreats.com/wp-content/uploads/2025/06/049364cc-9d10-4f08-b8d2-88a9c6614eda-768x768.webp)