
Creamy Corn Chowder Simple and Satisfying Recipe

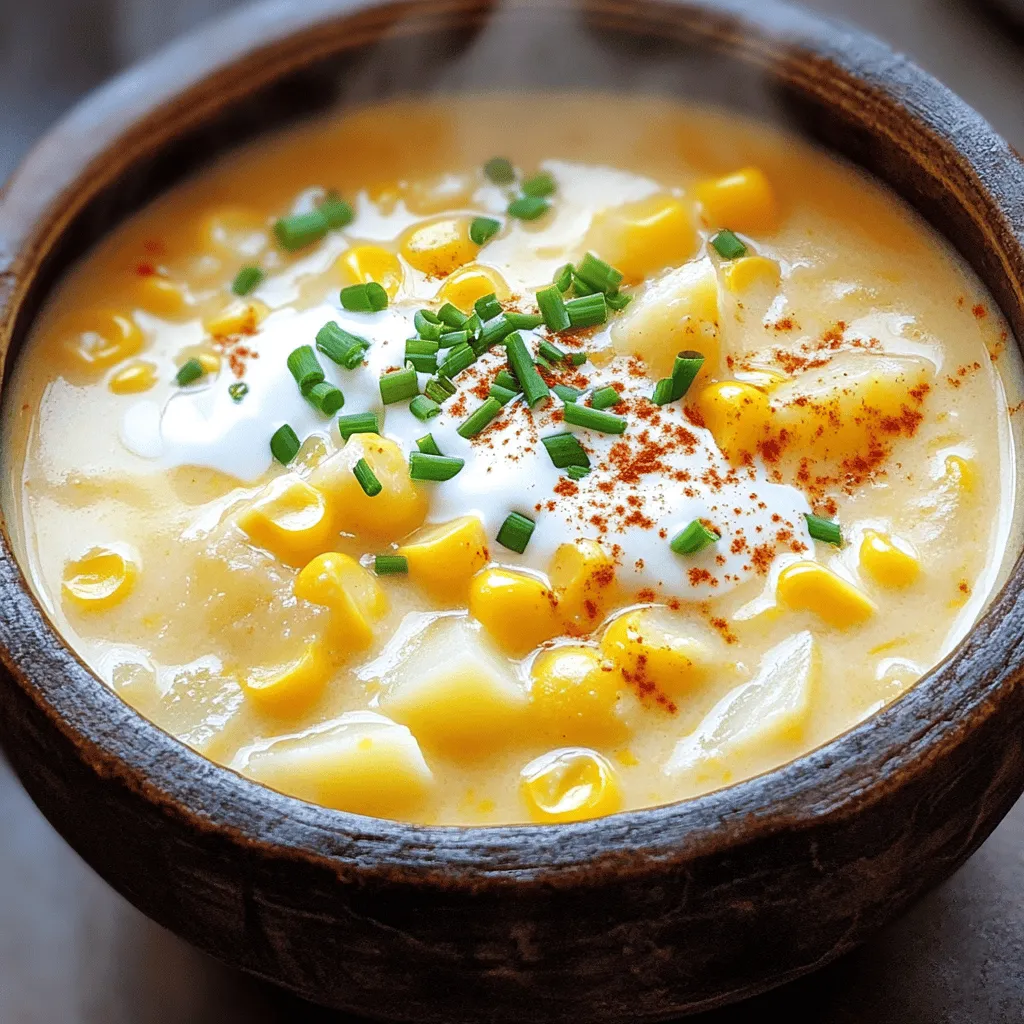
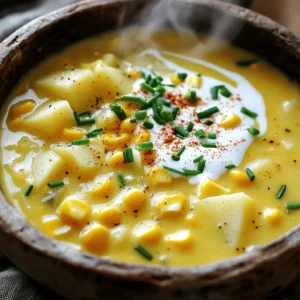
If you’re craving a warm, tasty meal, look no further than my creamy corn chowder. This simple recipe blends fresh corn and rich flavors for comfort in every bite. Whether you’re using leftover corn or fresh ears, you’ll love how easy it is. Join me as we explore the best ingredients, tips for perfect texture, and delicious variations. Get ready to impress your family with this satisfying dish!
Ingredients
Main Ingredients for Creamy Corn Chowder
To make creamy corn chowder, you need a few key ingredients. Here’s what you’ll need:
- 4 cups fresh corn kernels (or 3 cups frozen corn if fresh isn’t available)
- 1 medium onion, finely diced
- 2 cloves garlic, minced
- 2 medium potatoes, peeled and cut into small cubes
- 3 cups vegetable broth
- 1 cup heavy cream (substitute with coconut milk for a lighter alternative)
- 2 tablespoons olive oil
- 1 teaspoon smoked paprika
- Salt and freshly cracked black pepper, to taste
- Fresh chives, chopped for garnish
These ingredients come together to create a warm and comforting dish that’s perfect for any meal.
Optional Herbs and Seasonings
You can play with the flavors by adding some herbs and seasonings. Here are some great options:
- Thyme adds a nice earthy flavor.
- Bay leaves can deepen the taste.
- A pinch of cayenne pepper gives a spicy kick.
- Fresh parsley offers a bright, fresh note.
Feel free to mix and match according to your taste.
Suggested Substitutes for a Custom Recipe
If you want to change things up, there are easy substitutes you can use:
- Use chicken broth instead of vegetable broth for more depth.
- Swap potatoes with sweet potatoes for a sweeter chowder.
- Coconut cream can replace heavy cream for a dairy-free option.
- If you don’t have corn, try using diced carrots or peas.
These substitutes help you make the chowder your own while keeping it delicious.
Step-by-Step Instructions
Preparation Steps Overview
First, gather all your ingredients. You need corn, onion, garlic, potatoes, vegetable broth, cream, olive oil, smoked paprika, salt, and pepper. This setup makes your cooking time smooth and easy.
Detailed Cooking Method
1. Heat olive oil in a big pot over medium heat.
2. Add diced onion. Sauté for 4-5 minutes until soft and clear.
3. Stir in minced garlic. Cook for 1-2 minutes, letting the aroma fill the air.
4. Add diced potatoes and corn. Mix well to combine all ingredients.
5. Pour in vegetable broth. Bring it to a boil, then reduce to a simmer.
6. Cook for about 15 minutes. Check that the potatoes are tender when poked with a fork.
7. Use an immersion blender to puree part of the soup. This gives it a creamy touch while keeping some chunks. If you lack an immersion blender, blend half in a regular blender and return it to the pot.
8. Stir in heavy cream and smoked paprika. Let it simmer for 5 more minutes.
9. Taste the chowder. Add salt and pepper to your liking.
10. Serve hot in bowls, garnished with chopped chives for a fresh look.
How to Blend for the Perfect Texture
The key is to blend only part of the chowder. This keeps some pieces of corn and potato. If you want a creamier soup, blend more. Just make sure to leave some texture for the best experience.
Tips & Tricks
Secrets to the Best Creamy Corn Chowder
To make the best creamy corn chowder, use fresh corn when possible. Fresh corn adds sweetness and flavor. If you can’t find fresh corn, frozen corn works well. You can also mix in some smoked paprika for a nice depth. It adds a warm, smoky flavor that complements the corn. Remember to taste as you go. Adjust seasoning with salt and pepper to bring out the flavors.
Common Mistakes to Avoid
One common mistake is overcooking the potatoes. They should be tender but not mushy. If they fall apart, your chowder may not have the right texture. Another mistake is not blending enough. A good balance of smooth and chunky is key for a satisfying chowder. Lastly, avoid adding cream too early. This can curdle the cream and ruin the chowder.
Time-Saving Techniques
To save time, prep all your ingredients before you start cooking. Chop the onion, garlic, and potatoes ahead of time. This helps the cooking process flow smoothly. You can also use a food processor for quick chopping. If you’re short on time, consider using a pre-made vegetable broth. It cuts down on prep time and still gives great flavor. Lastly, using an immersion blender allows you to blend directly in the pot, saving on cleanup.
Variations
Vegan Creamy Corn Chowder Recipe
You can easily make a vegan version of this chowder. Simply swap the heavy cream for coconut milk. This change keeps the soup rich and creamy. You will also use vegetable broth as your base. The other ingredients remain the same. This version is full of flavor and is plant-based.
Gluten-Free Options
If you need a gluten-free chowder, feel free to enjoy this recipe as is. All the ingredients listed are naturally gluten-free. Just check the labels on your vegetable broth and spices. Some brands may add gluten. With careful selection, you can enjoy a delicious gluten-free creamy corn chowder.
Flavor Enhancements and Add-Ins
Looking to jazz up your chowder? Consider adding these ingredients:
- Fresh herbs: Try thyme or basil for added aroma.
- Spices: A pinch of cayenne or chili powder can spice things up.
- Vegetables: Bell peppers or carrots can add color and flavor.
- Proteins: For a heartier dish, add cooked bacon or shredded chicken.
These enhancements let you create a chowder that suits your taste. Play around with different combinations to find what you love best.
Storage Info
How to Store Leftover Creamy Corn Chowder
To store leftover creamy corn chowder, let it cool first. Once it cools, pour it into an airtight container. Seal it tightly to keep out air. Place it in the fridge. It will stay fresh for about 3 to 4 days. When you are ready to eat, just take it out and heat it up.
Freezing Tips for Long-Term Storage
You can freeze creamy corn chowder for longer storage. Use a freezer-safe container or a heavy-duty freezer bag. Leave some space at the top because it may expand. Label it with the date. The chowder can last in the freezer for up to 3 months. When you want to eat it again, just thaw it in the fridge overnight.
Reheating Instructions for Best Results
Reheat creamy corn chowder on the stove for the best taste. Pour it into a pot over low heat. Stir it often to avoid sticking. You might need to add a splash of broth or cream to bring back its creamy texture. If you use a microwave, heat it in short bursts. Stir in between to ensure even heating. Enjoy your delicious chowder!
FAQs
How to make creamy corn chowder thicker?
To thicken your creamy corn chowder, you have a few options. You can add more potatoes, as they will break down and create a nice creamy texture. Another choice is to blend a portion of the soup, which helps thicken it without losing flavor. Lastly, you can mix in a cornstarch slurry. Just combine equal parts cornstarch and cold water, stir it into the chowder, and let it simmer until it thickens.
Can I use canned corn instead of fresh?
Yes, you can use canned corn if fresh corn is not on hand. Canned corn is convenient and still tasty. Just make sure to drain it well before adding it to your chowder. This will help keep the soup from getting too watery. The flavor may be slightly different, but it will still be yummy.
What to serve with creamy corn chowder?
Creamy corn chowder pairs well with many sides. I love to serve it with crusty bread for dipping. A fresh green salad also adds a nice crunch and balances the chowder’s creaminess. For a heartier meal, consider grilled cheese sandwiches or a simple quesadilla. These options will make your meal feel complete and satisfying.Check it out for more tips!
This article covered how to make creamy corn chowder from scratch. You learned about key ingredients, easy steps, and tips for success. We discussed variations to fit your diet and how to store leftovers for later use. Remember, you can customize this chowder to match your taste. I hope you feel ready to try this comforting recipe in your kitchen. Enjoy making it and share your own spin with friends!

![- 4 boneless, skinless chicken thighs - 1 cup teriyaki sauce - 1/2 fresh pineapple, sliced into 1/2-inch rings - 2 tablespoons soy sauce - 1 tablespoon brown sugar - 1 teaspoon freshly grated ginger - 2 cloves garlic, finely minced - 1 tablespoon sesame oil - 1 tablespoon rice vinegar - 2 green onions, finely chopped - Sesame seeds Gathering the right ingredients is key for Grilled Pineapple Teriyaki Chicken. Start with fresh chicken thighs. They stay juicy and tender when grilled. You can use store-bought or homemade teriyaki sauce. I often prefer making my own, as it gives a fresh taste. Next, you want ripe pineapple. Choose one that feels heavy and smells sweet. The sweetness will balance the salty teriyaki sauce. For the marinade, you need a few simple items. Soy sauce adds saltiness, while brown sugar gives a nice caramel note. Ginger and garlic bring warmth and depth. Sesame oil adds a nutty flavor, and rice vinegar gives a bit of tang. Finally, for garnishing, chop green onions for color and freshness. A sprinkle of sesame seeds adds a nice crunch. These ingredients come together to create a vibrant, tasty dish. For the full recipe, check the provided link. First, gather your ingredients for the marinade. In a bowl, mix teriyaki sauce, soy sauce, brown sugar, grated ginger, minced garlic, sesame oil, and rice vinegar. Whisk these together until smooth. Add the chicken thighs and coat them well with the marinade. Cover the bowl with plastic wrap and put it in the fridge. Let the chicken marinate for at least 30 minutes. For more flavor, let it marinate for up to 2 hours. While the chicken marinates, preheat your grill to medium-high heat. If you’re using charcoal, wait for the coals to glow red. This will ensure even grilling and great flavor in your chicken. Now it's time to grill the pineapple. Take your pineapple rings and brush both sides with teriyaki sauce. Once the grill is hot, place the pineapple on it. Grill for about 3-4 minutes on each side. You want to see nice grill marks and a caramelized look. When done, set the grilled pineapple aside on a plate. Next, take the chicken thighs out of the fridge. Let any extra marinade drip off. Place the chicken on the hot grill. Cook for about 5-7 minutes per side. Aim for an internal temperature of 165°F (75°C). In the last few minutes, brush on more marinade for added flavor. When the chicken is cooked, take it off the grill. Let it rest for a few minutes. This helps keep the juices inside. To serve, place a grilled pineapple ring on each plate. Top it with a grilled chicken thigh. For a beautiful touch, sprinkle chopped green onions and sesame seeds on top. Enjoy your meal! For the full recipe, check out [Full Recipe]. For juicy chicken, preheat your grill to medium-high heat. This temperature helps create a nice sear on the chicken. A hot grill also locks in moisture, making the meat tender. If using charcoal, wait until the coals glow red and spread evenly for the best result. The marinade is key to great flavor. I suggest marinating the chicken for at least 30 minutes. This time allows the flavors to soak in. For an even richer taste, let it marinate for up to 2 hours. Just remember, don’t go over 2 hours, or the chicken might turn mushy. When picking a pineapple, look for one that feels heavy for its size. The skin should be golden and slightly soft at the base. A ripe pineapple smells sweet at the bottom. Avoid ones that are too green or have brown spots. A good pineapple adds the perfect touch to your grilled chicken. For more details and to try the dish, check out the Full Recipe. {{image_4}} You can easily swap chicken for other proteins. Try pork tenderloin or shrimp for a tasty twist. Tofu is a great choice for a vegetarian option. Just make sure to press the tofu to remove extra moisture. This helps it absorb the marinade better. No matter what protein you choose, aim for similar cooking times for best results. Want to kick up the flavor? Add red pepper flakes for heat or lime juice for zest. You can also mix in a dash of sesame seeds or a splash of orange juice for sweetness. Experimenting with spices like smoked paprika or five-spice powder can add depth. This way, you can create a unique flavor profile each time. Pair your grilled pineapple teriyaki chicken with steamed rice or a fresh salad. Jasmine rice complements the dish's sweetness well. For salads, consider a mix of greens with a light vinaigrette. You can also serve it with grilled vegetables for added color and nutrition. These options enhance your meal and make it more satisfying. For the full recipe, check out the details above. Store your Grilled Pineapple Teriyaki Chicken in an airtight container. This keeps it fresh and prevents odors from mixing. The chicken and pineapple can last in the fridge for about 3 to 4 days. Always let the chicken cool down before sealing it. This helps avoid condensation inside the container. To freeze your grilled chicken and pineapple, first, let them cool completely. Wrap each piece tightly in plastic wrap. Then place them in a freezer bag or a container. This keeps air out and prevents freezer burn. You can freeze it for up to 3 months. Label the bags with the date for easy tracking. To reheat your chicken, use the oven or stovetop. Preheat your oven to 350°F (175°C). Place the chicken in a baking dish and add a splash of water or broth. Cover it with foil. Heat for about 15-20 minutes until warm. For stovetop, use a skillet over medium heat. Add a bit of oil and warm the chicken gently. Avoid high heat to keep it juicy. You can make teriyaki sauce easily at home. Here’s how: - 1 cup soy sauce - 1/2 cup brown sugar - 1/4 cup rice vinegar - 2 tablespoons sesame oil - 1 teaspoon grated ginger - 2 cloves minced garlic Combine all these ingredients in a saucepan. Heat over medium until the sugar dissolves. Stir it well, and let it simmer for a few minutes. Your homemade teriyaki sauce is ready to use! Yes, you can use chicken breasts. They are leaner but may dry out faster than thighs. To prevent this, marinate them longer. Chicken thighs stay juicy and tender. If you prefer breasts, just keep an eye on cooking time. Many sides pair well with this dish. Here are some ideas: - Steamed jasmine rice - Grilled vegetables - Asian slaw - Quinoa salad These sides will complement the sweet and savory flavors of the chicken. Marinate the chicken for at least 30 minutes. For the best flavor, aim for 2 hours. The longer it sits, the more flavor it absorbs. Just don’t marinate too long, or the texture may change. Yes, you can grill indoors! Use a grill pan on your stovetop. Another option is to use a broiler in your oven. Both methods will give you a nice char and keep the flavor intact. This blog post covered how to make Grilled Pineapple Teriyaki Chicken. We explored key ingredients, marinade tips, and grilling steps. I shared variations and storage info to help you enjoy this dish longer. Always remember to adjust the marinade and experiment with flavors. Whether serving to friends or family, this dish is sure to impress. With these tips, you'll cook with confidence and skill. Enjoy the process and the delicious outcome!](https://dishtreats.com/wp-content/uploads/2025/06/0924d723-9b8a-4a49-9695-7d965ac302d4-768x768.webp)
![- 8 oz spaghetti or fettuccine pasta - 2 boneless, skinless chicken breasts - 1 cup basil pesto (homemade or store-bought) - 1/2 cup heavy cream - 1/4 cup cherry tomatoes, halved - 1/4 cup freshly grated Parmesan cheese - Fresh basil leaves for garnish - Salt and freshly ground black pepper, to taste - 2 tablespoons extra virgin olive oil Gather these ingredients before you start cooking. The pasta and chicken form the base of your dish. The creamy pesto sauce adds rich flavor. The cherry tomatoes bring a burst of freshness. The Parmesan cheese tops it off with a salty kick. Fresh basil leaves make it look gorgeous. Using fresh ingredients makes a big difference. If you have the time, try making your own pesto. It’s simple and tastes amazing. You can adjust the flavors to your liking. You can also swap the pasta type if you want. Just keep in mind that different shapes may change how the sauce clings to the pasta. For the chicken, you want it juicy and tender. The seasoning is key here. Use good quality olive oil, salt, and pepper. This will help keep the flavor bright and fresh. Once you have everything, you’ll be ready to make a delicious meal. If you want the full recipe, check out the complete guide for step-by-step instructions. Start by boiling a large pot of water. Add a good amount of salt to the water. This will help flavor the pasta. Once the water is boiling, add your spaghetti or fettuccine. Cook it until it is al dente, which means it should be firm to the bite. This usually takes around 8-10 minutes. When done, drain the pasta. Make sure to save about 1/2 cup of the pasta water for later. While the pasta cooks, get ready to season the chicken. Sprinkle salt and pepper on both sides of the chicken breasts. Heat 2 tablespoons of olive oil in a large skillet over medium heat. When the oil is hot, add the chicken. Cook each side for about 6-7 minutes. You want the chicken to turn a nice golden brown. Check that the juices run clear when you cut into it. Once cooked, take the chicken out of the skillet and let it rest for a few minutes. Then, slice it into thin strips. In the same skillet, lower the heat to medium-low. Add your basil pesto to the pan and stir it. You want to warm it through but not burn it. After about a minute, slowly pour in 1/2 cup of heavy cream. Stir it all together until it is well mixed and heated, which should take about 2-3 minutes. Now, add the cooked pasta to the skillet with your creamy pesto sauce. Toss the pasta gently to make sure it gets coated evenly. If the sauce looks too thick, add a little of the reserved pasta water. This will help you reach your desired creamy consistency. To finish, fold in the halved cherry tomatoes and the sliced chicken. Stir everything together for another 2 minutes. This will warm the chicken and tomatoes through. Finally, sprinkle freshly grated Parmesan cheese on top. Toss it lightly to mix. For a bright touch, garnish with fresh basil leaves before serving. For a full recipe, check out the details above! You can use homemade or store-bought pesto for this dish. Homemade pesto gives you full control over flavors, but store-bought saves time. If you want a stronger basil taste, simply add more fresh basil leaves to your mix. For a milder flavor, blend in more nuts or cheese. This helps balance the taste to your liking. To keep your chicken juicy, avoid overcooking it. Cook chicken breasts in a hot skillet for 6-7 minutes on each side. The internal temperature should reach 165°F. Rest the chicken for a few minutes before slicing. This helps the juices stay inside. You can make your sauce thicker or lighter based on your taste. For a richer sauce, use more heavy cream. If you want a lighter option, try half-and-half or low-fat milk. Adding a splash of pasta water helps adjust the sauce's thickness too. This way, you can achieve the perfect creamy texture for your chicken pesto pasta. For the Full Recipe, check out the detailed instructions to create this delightful dish! {{image_4}} Adding vegetables to your Chicken Pesto Pasta makes it even better. It boosts flavor and nutrition. Seasonal veggies like spinach or bell peppers work great. Spinach adds a nice green color. Bell peppers give a sweet crunch. You can toss them in during the last few minutes of cooking. This way, they stay bright and fresh. If you need gluten-free pasta, you have choices! You can use rice pasta or chickpea pasta. These options taste great and cook well. Just follow the package instructions. Cooking times may differ, so keep an eye on them. You want your pasta to be tender but not mushy. Not in the mood for chicken? Try shrimp or tofu instead! Shrimp cooks fast and adds a nice twist. Just sauté them until they turn pink. Tofu is a fantastic plant-based option. Make sure to press it first to remove extra water. Adjust cooking times based on what you choose. This keeps your dish delicious and exciting. For the full recipe, check out the [Full Recipe]. Store any leftovers in the fridge. Use a tight-sealing container to keep your chicken pesto pasta fresh. Glass containers work well, as do plastic ones. Make sure to let it cool down before putting it away. It stays good in the fridge for up to three days. To freeze your chicken pesto pasta, pack it in an airtight container or freezer bag. Remove as much air as possible. This helps prevent freezer burn. You can freeze it for up to three months. Just label the bag with the date so you remember when you froze it. When reheating, use the microwave or stovetop. If using the microwave, heat in short bursts. Stir between each burst to ensure even warming. On the stovetop, add a splash of water or cream to keep it moist. This helps keep the creaminess intact. Enjoy your meal again as if it were fresh! To make chicken pesto pasta from scratch, follow these basic steps: 1. Cook the pasta. Boil water in a large pot, add salt, and cook your choice of spaghetti or fettuccine until al dente. 2. Prepare the chicken. Season boneless chicken breasts with salt and pepper. Sear them in olive oil until golden brown. 3. Make the sauce. In the same skillet, mix basil pesto with heavy cream until warm and creamy. 4. Combine. Toss the cooked pasta with the sauce and sliced chicken. Adjust the sauce with reserved pasta water if needed. 5. Serve. Garnish with cherry tomatoes, Parmesan cheese, and fresh basil. You can find the full recipe above for a detailed guide. Yes, you can make chicken pesto pasta ahead of time. Here are some tips: - Cooked pasta and sauce. Prepare the chicken and sauce, then store them separately from the pasta. This keeps them fresh. - Refrigerate. Store in airtight containers in the fridge for up to three days. - Freeze. For longer storage, freeze the chicken and sauce. Use within two months for best flavor. - Reheat. When ready, reheat the chicken and sauce. Cook the pasta fresh to keep it al dente. Chicken pesto pasta pairs well with various side dishes. Consider these suggestions: - Garlic bread. A warm, crispy slice complements the creamy pasta. - Salad. A light green salad with a tangy vinaigrette balances the richness of the dish. - Roasted vegetables. Seasonal veggies add color and nutrients to the meal. Chicken pesto pasta can be a healthy option. Here’s why: - Protein. Chicken provides lean protein, which is vital for muscle health. - Basil and olive oil. These ingredients are rich in antioxidants and healthy fats. - Pasta. Whole-grain pasta offers fiber, which aids digestion. - Portion control. Adjust the serving size to fit your dietary needs. Absolutely! You can use various pasta types. Here are some alternatives: - Whole wheat pasta. Adds extra fiber and nutrients. - Gluten-free pasta. Great for those with gluten sensitivities. - Zoodles. Spiralized zucchini for a low-carb option. - Penne or rigatoni. These shapes hold the sauce well, providing a satisfying bite. In this post, I covered how to make a delicious chicken pesto pasta. We discussed the main ingredients and their roles, along with simple steps for cooking. I also shared tips for perfecting your dish and exciting variations to try. In closing, this recipe is easy and flexible, letting you customize flavors. Whether you choose to add veggies or change proteins, your meal will impress. Enjoy this tasty dish and make it your own!](https://dishtreats.com/wp-content/uploads/2025/06/ae0d281d-adb6-406a-8a42-58bd8911a0b3-768x768.webp)
![For a tasty chicken burrito bowl, you need fresh and simple ingredients. Here’s what you’ll gather: - 2 cups of fluffy cooked brown rice - 1 lb diced chicken breast, preferably organic - 1 tablespoon high-quality olive oil - 1 teaspoon chili powder - 1 teaspoon ground cumin - 1/2 teaspoon garlic powder - 1/2 teaspoon onion powder - Salt and freshly cracked black pepper, to taste - 1 can of black beans, rinsed thoroughly and drained - 1 cup sweet corn (fresh, canned, or frozen) - 1 cup cherry tomatoes, lovingly halved - 1 ripe avocado, diced into bite-sized pieces - 1/2 cup shredded cheese (cheddar or a delightful Mexican blend) - 1/4 cup fresh cilantro, chopped finely - Lime wedges, for serving Each ingredient adds flavor and texture. The brown rice gives a hearty base. The chicken, seasoned with chili and cumin, adds warmth. Black beans and corn bring sweetness. Fresh tomatoes and avocado add color and freshness. Finally, cheese and cilantro give a lovely finish. This mix makes every bite a delight. For the full recipe, check out the [Full Recipe]. 1. Heat olive oil in a large skillet over medium heat. Let it shimmer a bit. 2. Add diced chicken to the skillet. Sprinkle with chili powder, cumin, garlic powder, onion powder, salt, and pepper. 3. Sauté the chicken for about 5-7 minutes. Stir it often. Ensure it is fully cooked and golden. The chicken should not be pink inside. 1. Cook the brown rice according to the package instructions. Make sure it is fluffy and tender. 2. In serving bowls, layer the rice first. Then add black beans, sweet corn, and the seasoned chicken. 3. Top each bowl with halved cherry tomatoes, diced avocado, and shredded cheese. 1. Finish each bowl with fresh cilantro and a squeeze of lime juice. This adds a bright flavor. 2. Serve the bowls right away. Include lime wedges on the side for a refreshing touch. For detailed cooking steps, check the Full Recipe. Enjoy making these easy chicken burrito bowls! To ensure your chicken is cooked through, start by cutting it into small pieces. This helps the chicken cook evenly and faster. Use a meat thermometer to check if it’s at 165°F. If you don’t have one, cut a piece open. It should be white inside, not pink. For optimal rice cooking, I recommend using a rice cooker if you have one. It makes perfect rice every time. If not, follow the package instructions carefully. Use the right water ratio for fluffy rice. Let it sit covered for a few minutes after cooking to steam. To enhance flavor, try adding a pinch of smoked paprika or cayenne pepper for heat. These spices add depth to the dish. You can also mix in fresh lime juice or diced jalapeño for a fresh kick. For serving suggestions, consider adding a dollop of sour cream or Greek yogurt. These add creaminess and balance the spices. You could also top with salsa or pico de gallo for a fresh twist. Presentation is key for restaurant-style bowls. Use deep, colorful bowls to make the dish pop. Layer the ingredients in a way that shows off their colors. Start with rice, then beans, followed by chicken, and finally the colorful toppings. For garnishing, sprinkle fresh cilantro on top for a burst of green. Add a lime wedge on the side for a splash of color and zest. You can also use a sprinkle of cheese as a finishing touch for added visual appeal. For the full recipe, check out the detailed instructions above. {{image_4}} You can change up your chicken burrito bowls with different proteins. Try tofu for a plant-based meal. Ground beef or turkey also works well if you want something heartier. Switching beans can add unique flavors too. Instead of black beans, use pinto or kidney beans. You might even try lentils for a twist. For cheese, feel free to swap cheddar for Monterey Jack or queso fresco. Each choice gives a new taste. You can make your burrito bowls sing with flavors. For a Southwestern-style bowl, add a smoky spice like chipotle. You can also use fresh cilantro and lime for a bright touch. If you prefer traditional Mexican flavors, go for a mix of cumin and coriander. For the heat lovers, add jalapeños or a dash of hot sauce. This brings a lively kick to your meal. If you need gluten-free options, use brown rice and check labels on beans and spices. Most ingredients in this recipe are gluten-free, making it easy to enjoy. For vegan adaptations, replace chicken with tofu or tempeh. Use nutritional yeast instead of cheese for a cheesy flavor without dairy. You can still enjoy a tasty burrito bowl while meeting your dietary needs. Try out these variations and create a meal that suits your taste. For detailed steps, check the Full Recipe. To keep your chicken burrito bowls fresh, use airtight containers. Glass or BPA-free plastic works best. Store them in the fridge for up to three days. Always let your food cool before sealing it up. This helps prevent moisture buildup and keeps it tasty. When it's time to eat, heat your bowls gently. The microwave is quick and easy. Use a microwave-safe dish and cover it with a damp paper towel. This keeps food moist. You can also use a skillet on low heat for better texture. Make sure to heat until it's steaming hot to ensure safety. For busy days, prep your ingredients in advance. Cook the rice and chicken ahead of time. You can store them separately. This way, you can mix and match when you're ready to eat. Batch cooking works great, too. Cook a double batch of chicken and rice. You can use them for different meals throughout the week. You can prep these burrito bowls for the week easily. Start by cooking your chicken and rice as per the recipe. After cooking, let everything cool. Store each ingredient in separate containers. This keeps them fresh longer. - Chicken: Store in an airtight container. - Rice: Keep in a fridge-safe container. - Beans and Veggies: Rinse and store properly to avoid spoilage. When ready to eat, just assemble the bowls. This method saves time on busy days. You can also mix and match ingredients based on your mood! Yes, you can freeze chicken burrito bowls. To freeze, let the cooked ingredients cool to room temperature. Then, place them in freezer-safe containers. Label the containers with the date for easy reference. - Freezing: Layer the chicken, rice, and beans. - Reheating: Thaw in the fridge overnight before reheating. Reheat in a microwave or on the stove until hot. This way, you have a tasty meal ready in no time! Adding toppings makes your burrito bowls even better. Here are some popular choices: - Sour Cream: Adds creaminess and tang. - Pico de Gallo: Fresh and zesty. - Jalapeños: For a spicy kick. - Olives: Salty and savory. - Hot Sauce: For extra heat. These toppings take your bowls to the next level. You can even try new combinations to find your favorites! This article covered how to make delicious chicken burrito bowls. You learned about essential ingredients, cooking steps, and helpful tips. I shared variations to fit different diets and how to store leftovers safely. These bowls are easy to customize and perfect for any meal. With fresh flavors and simple prep, you can enjoy a tasty dish any time. Now, gather your ingredients and start crafting your own wholesome burrito bowls!](https://dishtreats.com/wp-content/uploads/2025/07/006ace9b-198d-45c7-b7d7-425f7861f9a7-768x768.webp)