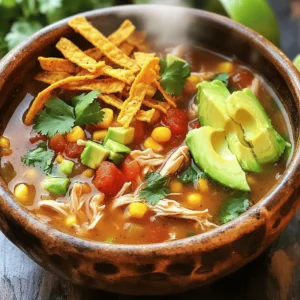
Easy Chicken Tortilla Soup Flavorful and Quick Dish
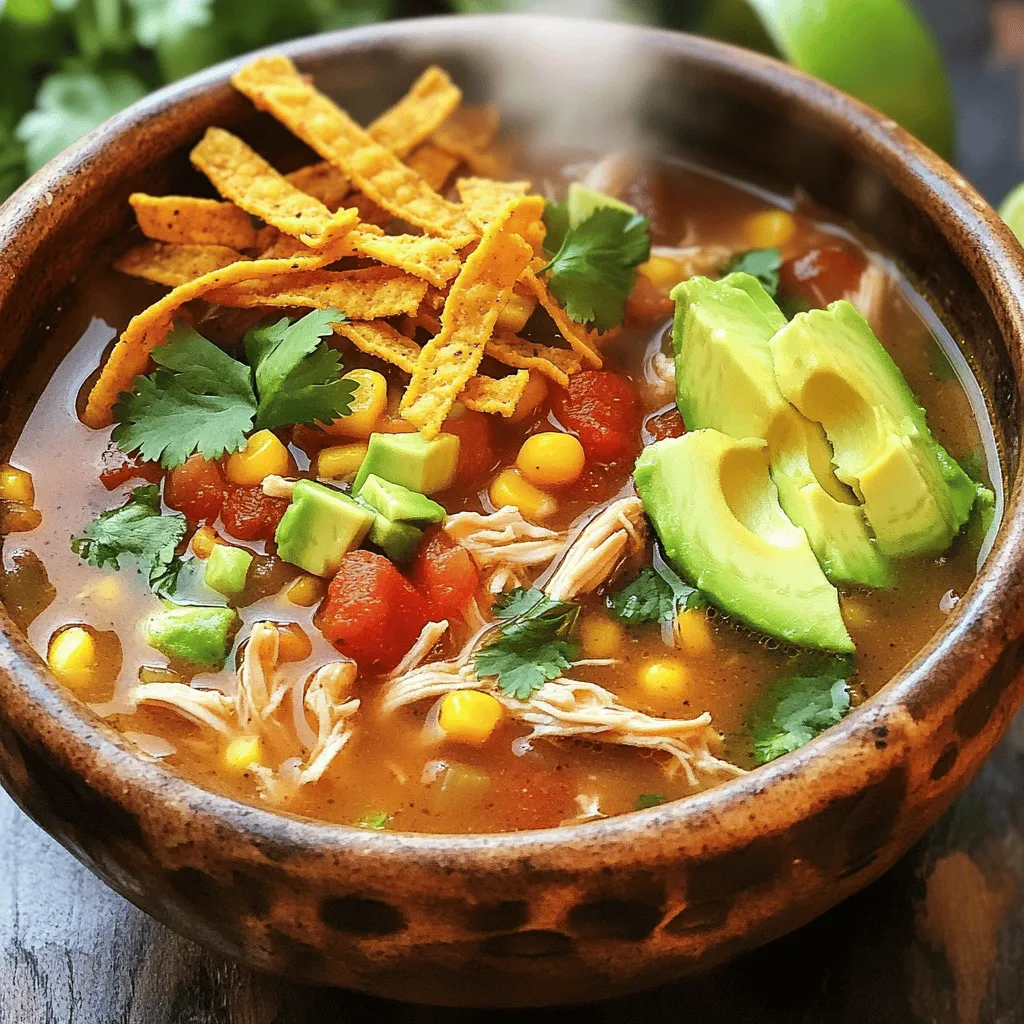
Looking for a warm, quick meal that’s full of flavor? You’ve come to the right place! My Easy Chicken Tortilla Soup is simple to make and packs a punch with delicious tastes. Whether you’re cooking for one or a crowd, this dish is sure to please. Let’s dive into the ingredients and steps to create your new favorite soup!
Ingredients
Essential Ingredients for Easy Chicken Tortilla Soup
For a tasty bowl of chicken tortilla soup, you need these key ingredients:
- 2 cups cooked chicken, shredded
- 1 medium onion, finely chopped
- 2 cloves garlic, minced
- 1 can (14 oz) diced tomatoes with green chilies
- 4 cups chicken broth
- 1 can (15 oz) black beans, thoroughly rinsed and drained
- 1 cup corn (frozen or canned)
- 1 teaspoon ground cumin
- 1 teaspoon chili powder
- Salt and freshly ground black pepper to taste
- 1 tablespoon olive oil
These ingredients blend well for a quick and flavorful dish. The broth forms a rich base, while the chicken adds protein. The spices bring warmth and depth, making each bite special.
Optional Garnishes
Garnishes can elevate your soup. Here are some great options:
- Tortilla strips
- Fresh cilantro, finely chopped
- Sliced avocado
- Lime wedges
Use these to add freshness and color. They also give a nice crunch and contrast to the warm soup.
Substitutions and Variations for Ingredients
You can change some ingredients if you want. Here are some ideas:
- Use turkey instead of chicken for a different flavor.
- Try vegetable broth to make it vegetarian.
- Swap black beans for pinto beans or kidney beans.
- Use fresh corn instead of canned for a sweeter taste.
These swaps keep the soup exciting and let you use what you have at home.
Step-by-Step Instructions
Detailed Cooking Instructions
1. Heat the olive oil in a large pot over medium heat.
2. Add the chopped onion and sauté for about 5 minutes. The onion should be translucent.
3. Stir in the minced garlic for 1 minute. This will make the garlic fragrant.
4. Pour in the diced tomatoes, chicken broth, black beans, corn, cumin, and chili powder.
5. Stir all the ingredients well to combine.
6. Increase the heat to bring the soup to a gentle simmer.
7. Add the shredded chicken, then season with salt and pepper to taste.
8. Lower the heat and let the soup simmer for 15-20 minutes. This melds the flavors.
9. While the soup simmers, cut the tortillas into thin strips.
10. Spread the strips on a baking sheet and bake at 375°F for 10-12 minutes.
11. Taste the soup and adjust seasonings as needed.
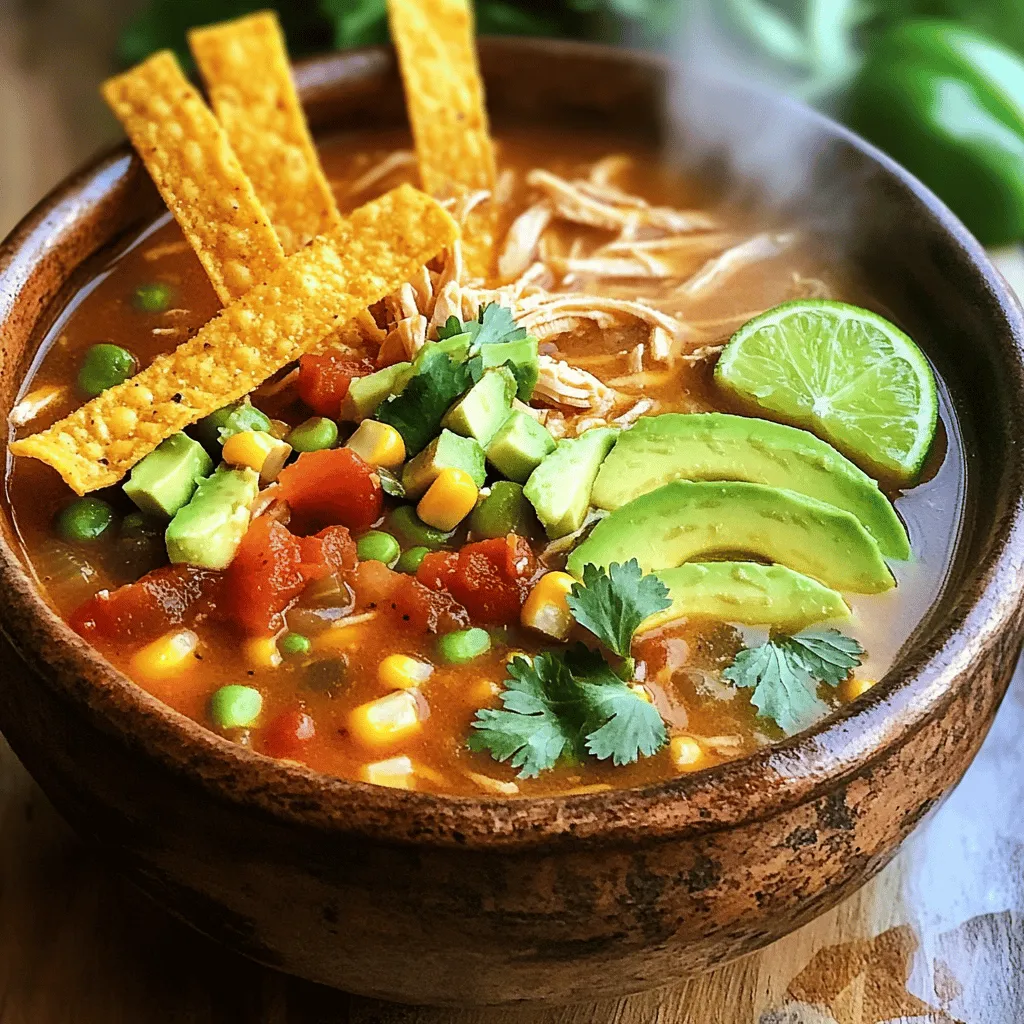
12. Ladle the hot soup into bowls and garnish with tortilla strips, cilantro, and avocado.
13. Serve with lime wedges for a zesty kick.
Tips for Timing and Efficiency
- Gather all your ingredients before starting. This saves time.
- Use pre-cooked chicken to cut down on prep time.
- Prepare the garnishes while the soup simmers. This keeps things moving fast.
- Bake the tortilla strips while the soup cooks. Dual tasks save time.
Key Cooking Techniques to Enhance Flavor
- Sautéing the onion and garlic first brings out their natural sweetness.
- Simmering the soup allows flavors to blend well.
- Using fresh herbs like cilantro brightens the dish.
- Serving with lime adds a fresh pop of flavor.
Experiment with these steps to make your Easy Chicken Tortilla Soup even better.Enjoy creating a comforting bowl of soup!
Tips & Tricks
How to Perfect Your Chicken Tortilla Soup
To make your chicken tortilla soup truly shine, focus on the broth. Use a quality chicken broth. This adds depth to your dish. Also, let your soup simmer long enough. This melds the flavors beautifully. Taste as you go. This way, you can adjust the salt and spices. Fresh lime juice brings out the flavors. A squeeze just before serving makes a big difference.
Common Mistakes to Avoid
One common mistake is adding too many ingredients at once. Each item needs its moment to shine. Add the chicken last, so it stays tender. Also, don’t skip the tortilla strips. They add a delightful crunch. Remember to bake them until crispy. If they are soft, the soup will lack texture.
Best Practices for Serving and Enjoying
Serve your soup in colorful bowls. A visual feast makes it more enjoyable. Layer the garnishes, too. Start with the soup, then add tortilla strips, cilantro, and avocado. This not only looks nice but also enhances each bite. Encourage guests to squeeze lime over their soup. This adds brightness and freshness.
Variations
Vegetarian or Vegan Options
You can easily switch this dish to fit a vegetarian or vegan diet. Instead of chicken, use chickpeas or lentils. These add protein and a nice texture. Swap chicken broth with vegetable broth for a rich base. Add more veggies like zucchini or bell peppers to boost flavor and nutrition. You can also include tofu for a hearty bite. This way, you keep the soup filling and delicious.
Spicy Twist Ideas
If you crave heat, try adding jalapeños or serrano peppers. Chop them finely and stir them in with the onions. For a smokier flavor, use chipotle peppers in adobo sauce. Just a little bit goes a long way! To enhance the spice, sprinkle in some cayenne pepper or hot sauce before serving. These twists will make your soup a fiery treat.
Ingredient Swaps for Different Flavors
Feel free to change ingredients based on your tastes! Instead of black beans, try pinto beans or kidney beans. You could also use fresh corn if it’s in season. If you love a tangy touch, toss in diced green apples or pineapple. They add a sweet contrast to the savory broth. These swaps make each bowl unique and exciting.
Storage Info
How to Properly Store Leftover Soup
To keep your chicken tortilla soup fresh, let it cool first. Once cool, transfer the soup to an airtight container. You can store it in the fridge for up to three days. If you want to keep it longer, consider freezing it. Just make sure to leave some space in the container for expansion.
Reheating Instructions for Best Results
When you’re ready to enjoy your leftover soup, reheat it on the stove. Pour the soup into a pot and warm it over medium heat. Stir it often to avoid burning. Heat until it bubbles gently. You can also microwave it, but stir halfway to heat evenly. Add a splash of broth or water if it seems thick.
Freezing Chicken Tortilla Soup: Tips and Tricks
Freezing is a great way to store your chicken tortilla soup. Use freezer-safe containers or bags. Split the soup into smaller portions for easy thawing. Label each container with the date. When you’re ready to use it, thaw the soup in the fridge overnight. Reheat it on the stove for the best taste. Always check for flavor and seasoning and adjust if needed.
FAQs
What can I serve with Chicken Tortilla Soup?
You can serve Chicken Tortilla Soup with several tasty sides. I love pairing it with warm cornbread or crunchy tortilla chips. A fresh salad with lime dressing adds a nice touch, too. You can also serve it with guacamole and salsa for extra flavor.
Can I make this soup ahead of time?
Yes, you can make Chicken Tortilla Soup ahead of time. This soup tastes great when made a day before. Just store it in the fridge after it cools. When you’re ready to eat, heat it on the stove until warm.
How long does Chicken Tortilla Soup last in the fridge?
Chicken Tortilla Soup lasts about 3 to 4 days in the fridge. Make sure to store it in an airtight container. To keep it fresh, avoid letting it sit out for too long.
Is this recipe gluten-free?
Yes, this recipe can be gluten-free. Just use gluten-free tortilla strips. Check the labels on canned ingredients, like broth and beans, to ensure they are gluten-free.
How can I make Chicken Tortilla Soup spicier?
To spice up your Chicken Tortilla Soup, add more chili powder or diced jalapeños. You can also stir in hot sauce for an extra kick. For a smoky flavor, try adding chipotle peppers.
You learned about the key ingredients, cooking steps, and tips for chicken tortilla soup. Variations for diet needs and storage tips were also covered. Keep experimenting with flavors and garnishes. Making it your own will bring joy. Remember, avoid common mistakes for the best results. Enjoy sharing this soup with friends and family. It’s a simple dish that brings warmth and flavor to any table. Try new ideas and have fun with it!

![- 2 cups cooked chicken, shredded - 4 cups mixed salad greens - 1 cup cherry tomatoes - 1 cup corn - 1 ripe avocado - 1/2 cup red onion - 1 cup shredded cheddar cheese - 1/2 cup ranch dressing - BBQ sauce - Salt and freshly ground black pepper - Crispy tortilla strips, fresh cilantro leaves When making BBQ Ranch Chicken Salad, start with fresh, quality ingredients. The chicken brings protein and heartiness. I love using shredded chicken that is moist and flavorful. Mixed salad greens add crunch and color. You can choose your favorites like romaine, arugula, or baby spinach. Cherry tomatoes bring sweetness. Always cut them in half to make them easy to eat. Corn adds a pop of sweetness too, and you can use canned or fresh. I prefer fresh corn when it’s in season for the best taste. The avocado adds creaminess. A ripe avocado makes the salad smooth and rich. Red onion gives a nice bite. Keep it thinly sliced so it does not overpower. Shredded cheddar cheese adds a delightful sharpness, making each bite even tastier. The ranch dressing is creamy and tangy, tying everything together. Pair it with BBQ sauce for a smoky flavor boost. This combo is truly delicious. For seasoning, use salt and freshly ground black pepper. These simple touches really enhance the flavors. Lastly, crispy tortilla strips add a fun crunch. Fresh cilantro leaves not only look great but also add a fresh taste. You can find the full recipe [Full Recipe]. Enjoy mixing these ingredients for a vibrant, tasty salad! - Combine shredded chicken with BBQ sauce. - Use a large bowl for easy mixing. - Season with salt and black pepper to taste. - Mix until the chicken is fully coated. This step is key. The BBQ sauce gives the chicken a sweet and smoky flavor. It makes the salad pop with taste. - Create the salad base with mixed greens. - Spread the greens evenly in a large bowl. - Layer fresh ingredients: tomatoes, corn, avocado, and onion. - Arrange each ingredient for a colorful look. The vibrant colors make the salad appealing. Each bite brings a different taste, making it fun to eat! - Top with BBQ chicken and cheddar cheese. - Spoon the chicken evenly over the fresh veggies. - Drizzle with ranch dressing, adjusting to your liking. - Toss gently with clean hands or tongs to mix. This salad is now ready to impress! The creamy ranch dressing and savory chicken blend perfectly. Check the [Full Recipe] for more tips! To make your BBQ Ranch Chicken Salad shine, adjust the ranch dressing to your taste. If you love creamy flavors, add more dressing. For a lighter touch, use less. This lets you control how rich the salad feels. Make sure all ingredients mix well. This way, each bite has a bit of everything. An even spread of chicken, veggies, and cheese creates balance. For a lovely presentation, serve the salad in individual bowls or on a large platter. This makes it easy for everyone to take their share. Add some cilantro leaves and crispy tortilla strips on top. These toppings not only look great but also add flavor and crunch. A colorful display of greens and toppings makes the salad more appealing. Feel free to experiment with different seasonings. A dash of chili powder can add a nice kick. You might also try garlic powder or smoked paprika for depth. Also, think about adding extra ingredients for more variety. Black beans, diced peppers, or even fresh corn can bring new tastes. Each addition offers a chance to create your perfect salad blend. For more details on making this delicious salad, check out the Full Recipe. {{image_4}} You can easily change the protein in this salad. If you want a different taste, use pulled pork or tofu instead of chicken. Both options add great flavor. For a seafood twist, grilled shrimp works well. The shrimp adds a nice, light touch to the salad. While ranch dressing is a favorite, you can swap it out. Blue cheese dressing gives a strong flavor. A vinaigrette adds a tangy kick that brightens the salad. You can also make your own dressing blends. Mix yogurt with herbs for a fresh taste. Don't be afraid to add more veggies. Bell peppers, cucumbers, and radishes give a nice crunch. You can also roast vegetables like zucchini or carrots. Roasting adds a warm, rich taste that contrasts nicely with the cool salad. For a full recipe, check out the BBQ Ranch Chicken Salad with a Crunchy Twist. Store your BBQ Ranch Chicken Salad in an airtight container. This keeps it fresh and tasty. For best results, eat it within 2-3 days. The longer it sits, the soggier it may get. If you want to freeze some, consider freezing the chicken separately. This helps keep the chicken tasty when you eat it later. Avoid freezing the salad with dressing. The dressing makes the greens soggy, and nobody likes that! To refresh your leftovers, toss them with fresh greens. This adds crunch and makes it feel new again. If you want to reheat the BBQ chicken, do it separately. This keeps it warm without making the salad wilt. To make BBQ Ranch Chicken Salad, follow these simple steps: 1. Prepare the BBQ Chicken: Mix shredded chicken with BBQ sauce in a big bowl. Add salt and black pepper. Stir until the chicken is well coated. 2. Build the Salad Base: In another large bowl, spread the mixed greens evenly. This is your salad's base. 3. Layer Fresh Ingredients: Add halved cherry tomatoes, corn, diced avocado, and sliced red onion on top of the greens. This creates a colorful layer. 4. Top with BBQ Chicken: Spoon the BBQ chicken evenly over the fresh layers. This ensures every bite has flavor. 5. Add Creamy Cheese: Sprinkle shredded cheddar cheese over the salad. Let it melt slightly into the warm chicken. 6. Drizzle with Dressing: Pour ranch dressing over the salad. Adjust the amount to fit your taste. 7. Toss Gently: Use clean hands or tongs to mix everything. Make sure the ranch dressing coats all the ingredients. 8. Taste Test: Before serving, taste the salad. Add more salt or black pepper if needed. 9. Add Crunch and Garnish: Top with crispy tortilla strips and fresh cilantro for a nice finish. This process makes a delicious and colorful salad. For the complete recipe, check the Full Recipe above. Yes, you can prep this salad ahead of time. Here are some tips: - Cook the Chicken: You can cook and shred the chicken a day in advance. Store it in the fridge with BBQ sauce. - Chop Veggies: Cut the vegetables, like tomatoes and onions, a few hours before serving. Keep them in airtight containers. - Store Dressing Separately: Keep the ranch dressing separate until serving. This keeps the greens fresh and crisp. - Combine Before Serving: Mix everything together just before you eat. This keeps your salad from becoming soggy. This BBQ Ranch Chicken Salad goes great with several side dishes. Here are some ideas: - Crusty Bread: A nice loaf of bread pairs well and adds a hearty touch. - Chips: Tortilla chips or potato chips add crunch and fun. - Fruit Salad: A fresh fruit salad adds sweetness and a refreshing taste. - Grilled Veggies: Grilled vegetables complement the salad's flavors. - Coleslaw: A crunchy coleslaw gives a nice contrast to the salad. These sides enhance your BBQ Ranch Chicken Salad experience. Enjoy! We explored a tasty BBQ Ranch Chicken Salad. You learned about the main and optional ingredients, along with step-by-step instructions for making it. You also picked up tips for perfecting the salad and ideas for variations. Don’t forget to check the storage info for leftovers. This salad is easy to adjust, making it a fun dish for everyone. Enjoy this recipe and make it your own!](https://dishtreats.com/wp-content/uploads/2025/07/4c564630-ecab-497d-8bae-b951c19ef4f1-768x768.webp)


![- 2 boneless, skinless chicken breasts, sliced into thin strips - 2 tablespoons honey - 4 cloves garlic, minced - 2 tablespoons low-sodium soy sauce - 1 tablespoon sesame oil - 1 red bell pepper, thinly sliced - 1 cup broccoli florets - 1 cup snap peas - 1 carrot, julienned - 2 tablespoons vegetable oil - Salt and pepper to taste I love using fresh chicken for this dish. It cooks well and tastes great. Honey adds a sweet touch, while garlic gives it a nice punch. You can pick any colorful veggies you like. I usually choose bell peppers, broccoli, and snap peas for their crunch. - Sesame seeds - Sliced green onions Garnishes make your meal pop! Sesame seeds add a nutty flavor. Green onions give a fresh, sharp taste. They make the dish look fancy, too. - Skillet or wok - Mixing bowl - Whisk A large skillet or wok is best for stir-frying. It helps cook everything quickly and evenly. You’ll also need a mixing bowl for the sauce. A whisk is handy to mix your sauce smoothly. For the full recipe and cooking instructions, check the [Full Recipe]. - How to prepare the sauce To make the sauce, grab a small mixing bowl. Add 2 tablespoons of honey and 4 minced garlic cloves. Pour in 2 tablespoons of low-sodium soy sauce and 1 tablespoon of sesame oil. Whisk these ingredients well until they blend smoothly. This sauce will be full of flavor! - How to season the chicken Take 2 sliced chicken breasts and place them in a bowl. Lightly sprinkle salt and pepper over the chicken. Toss it gently to coat every piece evenly. This step is key to making sure your chicken tastes great. - Cooking the chicken Heat a large skillet or wok over medium-high heat. Add 1 tablespoon of vegetable oil. Once the oil shimmers, add the seasoned chicken strips. Cook them for about 5-7 minutes. Look for a golden color and make sure they are cooked all the way through. Remove the chicken and set it aside on a plate. - Stir-frying the vegetables In the same skillet, add another tablespoon of vegetable oil. Throw in the sliced red bell pepper, 1 cup of broccoli florets, 1 cup of snap peas, and 1 julienned carrot. Stir-fry these vegetables for 3-4 minutes. You want them to stay vibrant and crisp-tender. - Combining and flavoring the dish Now, return the cooked chicken to the skillet. Pour the honey garlic sauce over everything. Stir it well to coat all the chicken and vegetables. Cook for an extra 2-3 minutes. This allows the sauce to thicken and stick to your meal. - How to garnish and serve Once done, take the skillet off the heat. Sprinkle sesame seeds and sliced green onions over the stir fry. This adds a nice crunch and fresh flavor. For an appealing look, serve it in shallow bowls on a bed of rice or noodles. Enjoy your tasty Honey Garlic Chicken Stir Fry! Check the Full Recipe for more details! For the best stir-fry, set your heat to medium-high. This helps to cook the chicken fast and keep it juicy. When cooking, work in batches if your pan is small. This way, the chicken won’t steam. To get crisp veggies, don’t overcrowd the pan. Just like the chicken, cook the veggies fast. Stir them often, about three to four minutes will do. Add some red pepper flakes for a spicy kick. You can also try fresh ginger for a nice zing. Balancing sweet and savory is key. If it’s too sweet, add a dash more soy sauce. Taste as you go to find the perfect mix. Serve your stir fry in shallow bowls. Place it on a bed of rice or noodles for a great look. Top with extra sesame seeds and sliced green onions. A lime wedge on the side adds color and flavor! {{image_4}} You can switch the chicken for other proteins. Tofu works great for a vegetarian dish. Just press and cube the tofu, then cook it like the chicken. Shrimp is another tasty option. It cooks fast and adds a nice flavor. Feel free to mix up the veggies. Bell peppers, zucchini, and green beans all taste amazing. Seasonal flavors add fun too! Use fresh corn in summer or squash in fall. These choices bring color and taste to your meal. You can change the sauce to fit your taste. If you want less sweetness, use less honey. To make it salty, add more soy sauce. Want some heat? Toss in red chili flakes or chopped peppers. This will spice up your stir fry and make it unique. To store your honey garlic chicken stir fry, cool it down first. Place the leftovers in an airtight container. This helps keep out air and moisture. I recommend using glass or BPA-free plastic containers. They are safe and durable. Make sure to refrigerate within two hours of cooking. This keeps the dish fresh and safe to eat. Yes, you can freeze honey garlic chicken stir fry! It freezes well and saves time for future meals. To freeze, use a freezer-safe container or a zip-top bag. Remove as much air as possible before sealing. For best results, eat it within three months. When you're ready to eat, thaw it in the fridge overnight. Reheat it in a skillet over medium heat until hot. This keeps the chicken and veggies tender. Leftovers will last about three to four days in the fridge. Always check for signs of spoilage before eating. If it smells off or has a strange color, it’s best to toss it. You'll want to avoid any food safety risks. Remember, good storage means enjoying your tasty meal later! To cut the sweetness, reduce the honey. Use one tablespoon instead of two. You can also add more soy sauce to balance the flavor. Adding a splash of rice vinegar or lime juice helps too. These add tang without making it too sweet. You can also use low-sugar honey or a sugar-free sweetener. Yes, you can prepare the chicken and veggies ahead of time. Slice the chicken and chop the vegetables. Store them in the fridge until you're ready to cook. You can also mix the sauce in advance. Just keep it in a sealed container. When you are ready to eat, cook it all together for a quick meal. Some good side dishes include: - Steamed rice - Fried rice - Noodles - Quinoa - A fresh green salad These sides add more texture and flavor to your meal. They also help soak up the tasty sauce. - Full Recipe: Detailed cooking instructions for easy reference. In this blog post, we explored the key ingredients and cooking steps for honey garlic chicken stir fry. We covered how to prepare the sauce, cook the chicken, and stir-fry the veggies. I shared useful tips on enhancing flavors and balancing taste. Plus, we discussed variations and storage methods for your leftovers. Cooking can be fun and rewarding. With these skills, you can create tasty meals. Enjoy trying new ingredients and discovering your favorites. Happy cooking!](https://dishtreats.com/wp-content/uploads/2025/07/ad7e2fa8-e610-4152-a96e-e496d4740468-768x768.webp)
 for Garlic Butter Lemon Salmon Foil Packs. In this article, you learned how to make Garlic Butter Lemon Salmon Foil Packs. We covered the main ingredients, step-by-step cooking instructions, and helpful tips to ensure success. You can also explore flavor variations and storage options for leftovers. This dish is simple yet delicious, making it perfect for dinner. With these techniques, you can impress friends and family with your cooking. Enjoy your meal and feel proud of your kitchen skills!](https://dishtreats.com/wp-content/uploads/2025/07/636e4153-d701-4cda-a9a1-5094e2b11f0e-768x768.webp)