
Spicy Lentil Soup Flavorful and Hearty Recipe

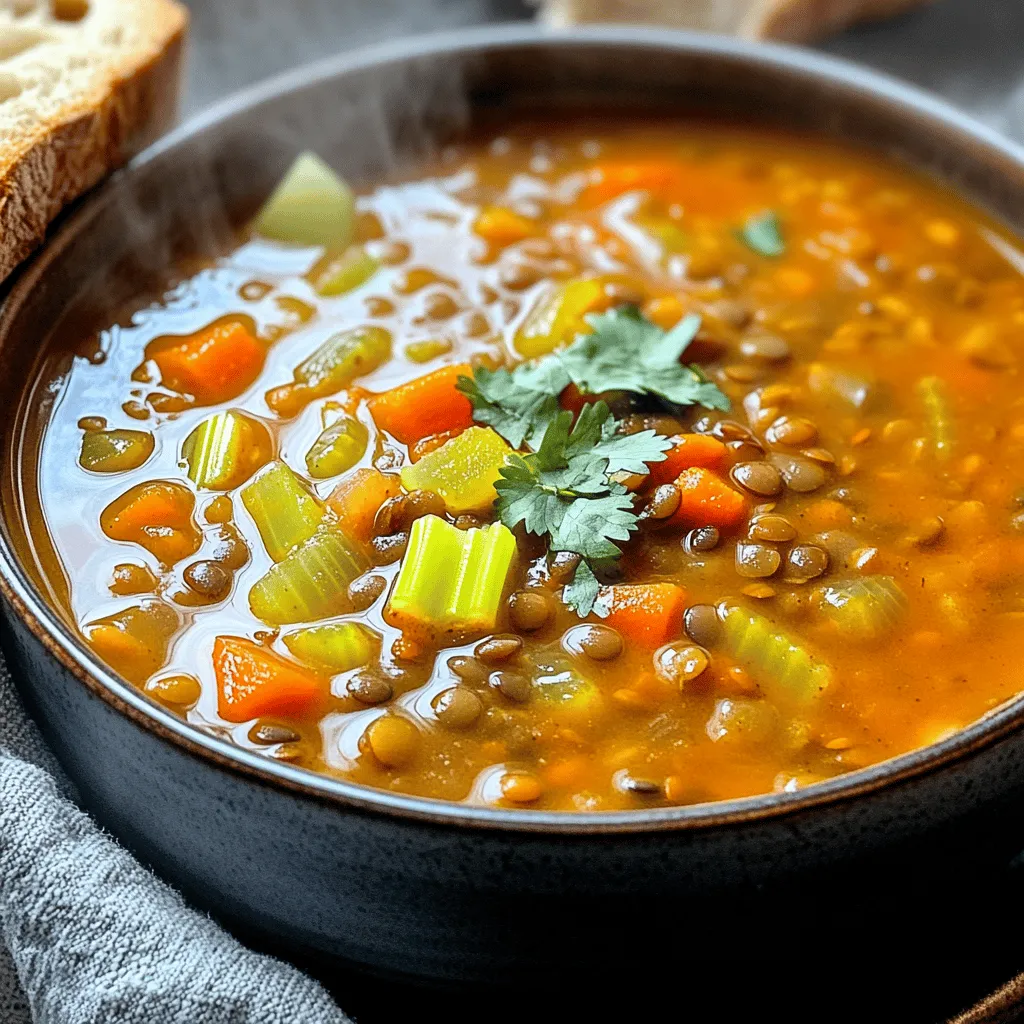
Warm up your kitchen with my Spicy Lentil Soup that’s both hearty and delicious! This recipe is packed with nutritious ingredients and bold flavors. I’ll guide you through every step so you can make this comforting dish easily. Whether you’re looking for a simple weeknight meal or something to impress guests, you’ll find tips and tricks to customize the heat and taste. Get ready to savor every spoonful!
Ingredients
Essential Ingredients for Spicy Lentil Soup
To make a hearty and spicy lentil soup, you will need:
- 1 cup dried green or brown lentils, thoroughly rinsed
- 1 medium onion, finely diced
- 2 cloves garlic, minced
- 2 medium carrots, peeled and diced
- 1 celery stalk, diced
- 1 red bell pepper, diced
- 1 can (14 oz) diced tomatoes, undrained
- 4 cups vegetable broth
- 1 tablespoon olive oil
- 1 teaspoon ground cumin
- 1 teaspoon smoked paprika
- 1/2 teaspoon cayenne pepper (adjust according to your spice preference)
- Salt and pepper to taste
- 1 tablespoon fresh lemon juice
- Fresh cilantro or parsley, finely chopped for garnish
Each ingredient adds to the soup’s flavor and heartiness. Lentils are high in protein and fiber, making them perfect for a healthy meal. The vegetables bring fresh taste and color. The spices give it a lovely heat.
I love using fresh herbs like cilantro or parsley to brighten up the dish. Don’t skip the lemon juice! It adds a nice zing that balances the flavors well.Enjoy cooking!
Step-by-Step Instructions
How to Make Spicy Lentil Soup
Preparing the base: Sautéing vegetables and spices
Start by heating olive oil in a large pot over medium heat. Once the oil shimmers, add the diced onion. Cook for about five minutes until it becomes soft and clear. Then, add minced garlic, diced carrots, diced celery, and diced red bell pepper. Sauté this mix for another five minutes. Stir it often until the veggies are tender and smell great. This step builds a strong flavor base for your soup.
Cooking lentils: The simmering process
Now, add the rinsed lentils, undrained diced tomatoes, and vegetable broth into the pot. Don’t forget to season it with salt and pepper. Next, raise the heat to bring the soup to a boil. Once it boils, lower the heat to let it simmer. Cook uncovered for about 25 to 30 minutes. You want the lentils to be soft and fully cooked. This is where the magic happens!
Adjusting flavors: Final touches for balance
When the lentils are tender, stir in fresh lemon juice. Taste the soup and adjust the seasoning as needed. This is the key step to make sure all flavors balance well. If you like it spicier, add more cayenne pepper. Serve the soup hot, garnished with chopped cilantro or parsley. This adds a fresh touch and brightens the dish.Enjoy your hearty and flavorful spicy lentil soup!
Tips & Tricks
Perfecting Your Spicy Lentil Soup
Adjusting spice levels: You can change the heat of your soup easily. If you want less spice, use less cayenne pepper. For more heat, add more cayenne or use fresh chili peppers. Start small and taste as you go.
Enhancing flavor: To make your soup even better, try adding more herbs and spices. Fresh herbs like thyme or rosemary can add depth. You can also use a bay leaf while cooking. Just remember to take it out before serving.
Cooking tips: To get tender lentils, don’t rush the cooking time. Keep the soup at a low simmer. Stir often to prevent sticking. If you find the soup too thick, add more broth or water. The goal is to have lentils that are soft but not mushy.
Variations
Exploring Flavor Combinations
You can easily change up your spicy lentil soup to suit your taste. Here are some fun ways to do it:
- Vegetarian-friendly additions: Add extra veggies like spinach, kale, or sweet potatoes. These not only boost nutrition but also add great texture and flavor. Feel free to toss in whatever you have on hand!
- Protein-packed options: If you want more protein, try adding cooked chicken, sausage, or turkey. For a plant-based option, consider using tofu or tempeh. These add heartiness and make the soup even more filling.
- Global twists: Spice things up by using flavors from around the world. For a curry twist, add coconut milk and curry powder. If you want a Mediterranean flair, mix in some olives and feta cheese. Each variation offers a new taste adventure!
These ideas let you make your spicy lentil soup unique every time.Enjoy experimenting!
Storage Info
How to Store Spicy Lentil Soup
To keep your spicy lentil soup fresh, store it properly.
- Refrigeration tips: Allow the soup to cool to room temperature first. Then, transfer it to an airtight container. It will last in the fridge for about 4 to 5 days. When ready to eat, give it a good stir before serving.
- Freezing instructions: If you want to store it longer, freezing works well. Pour the cooled soup into freezer-safe containers. Leave some space at the top for expansion. The soup can stay good in the freezer for up to 3 months. Thaw it in the fridge overnight before reheating.
- Reheating methods: Reheat the soup on the stove over medium heat. Stir it often to ensure even warming. You can also use a microwave, heating in short bursts. Add a splash of water or broth if it seems thick. This keeps the flavor and texture just right.
FAQs
Common Questions About Spicy Lentil Soup
Can I use different types of lentils?
Yes, you can use different lentils. Green, brown, or red lentils work well. Each type gives a unique taste and texture. Red lentils cook faster and break down more, making the soup creamier.
How can I make it vegan-friendly?
This soup is already vegan! It uses vegetable broth and no animal products. Just check your broth for hidden ingredients.
What are the health benefits of lentils?
Lentils are packed with nutrients. They are high in protein and fiber. They also have iron and folate, which are good for blood health. Eating lentils can help with digestion and keep you full longer.
How long does spicy lentil soup last in the fridge?
Spicy lentil soup lasts about 5 days in the fridge. Store it in an airtight container for best results. Always reheat until steaming before eating.
Can I substitute ingredients based on dietary restrictions?
Yes, you can easily swap ingredients. For gluten-free options, use gluten-free broth. If you’re allergic to certain veggies, replace them with others you enjoy. This soup is very adaptable!I covered how to prepare the base, cook lentils, and adjust flavors. With tips to perfect your soup, you can customize it to suit your taste. Variations can bring new life to the dish, and proper storage keeps it fresh longer. Remember, whether you’re aiming for heat or health, this soup is tasty and versatile. Dive in and enjoy every bowl!

![- 4 boneless, skinless chicken thighs - 2 cups long-grain rice - 4 tablespoons unsalted butter, divided - 5 cloves garlic, finely minced - 1 medium onion, finely chopped - 1 teaspoon dried oregano - 1 teaspoon paprika - Salt and freshly ground black pepper, to taste - 3 cups chicken broth - 1 cup frozen peas - Fresh parsley, chopped (for garnish) When I prepare Garlic Butter Chicken and Rice, I love the way the flavors mix. The chicken thighs bring a juicy texture. Long-grain rice soaks up all the savory chicken broth. Unsalted butter adds a rich taste. Aromatics play a big role here. Garlic cloves and onion give a sweet aroma. Dried oregano and paprika add warmth and depth. I always use fresh black pepper and salt to make the dish pop. For a splash of color, I toss in frozen peas. They keep their bright green shade when cooked. Fresh parsley adds a nice finish. It makes the dish look inviting and fresh. If you want to try this dish, check the Full Recipe for all the steps! You'll enjoy making it, and even more, eating it. 1. Start by melting 2 tablespoons of butter in a large skillet over medium heat. This will create a rich base for your dish. 2. Once the butter melts, add the chopped onion. Sauté it for about 5 minutes until it turns soft and fragrant. 3. Next, add 5 cloves of minced garlic to the skillet. Cook it for 1 minute, just until the garlic smells good but isn’t browned. 4. While the onion and garlic are cooking, season 4 chicken thighs on both sides. Use 1 teaspoon of oregano, 1 teaspoon of paprika, salt, and pepper. This will add a lot of flavor. 5. Move the onion and garlic to one side of the skillet. Place the seasoned chicken thighs in the center. Cook each side for 6-7 minutes until they turn golden brown. Once done, take the chicken out and set it aside. 1. In the same skillet, add the remaining 2 tablespoons of butter. Let it melt completely. 2. Now, stir in 2 cups of long-grain rice. Toast the rice for 2-3 minutes, stirring often. This step brings out the nutty flavor. 3. Pour 3 cups of chicken broth over the toasted rice. Gently stir to coat all the grains. Increase the heat to bring the mixture to a boil. 1. Once the broth is boiling, lower the heat to a simmer. Nestle the cooked chicken thighs on top of the rice. Cover the skillet with a lid and let it cook for 15-20 minutes. The rice should absorb most of the broth and become tender. 2. For the last 5 minutes of cooking, sprinkle 1 cup of frozen peas directly over the rice. Do not stir. This will keep the peas bright and fresh. 3. After cooking, remove the skillet from the heat. Leave it covered for an extra 5 minutes. This helps the rice fluff up nicely. 4. Finally, use a fork to fluff the rice and mix in the peas. Serve warm, with fresh parsley on top for color and flavor. This simple process makes Garlic Butter Chicken and Rice a fun and tasty comfort meal. For the complete recipe, check out the [Full Recipe]. To boost the flavor of your garlic butter chicken and rice, consider adding fresh herbs. Thyme, rosemary, or basil can bring new notes to the dish. You can also mix in some red pepper flakes for a little heat. Adjust the spices to fit your taste. If you like it spicy, add more paprika or even cayenne pepper. Remember, always taste as you go to find your perfect balance. Sautéing is key for great flavor. Start with a medium heat to avoid burning the garlic and onions. Stir them often to help them cook evenly. When cooking the chicken, ensure it's golden and cooked through. Use a meat thermometer to check the internal temperature. It should reach 165°F (75°C) for safe eating. This way, you get juicy chicken every time. For a beautiful presentation, serve your garlic butter chicken and rice on a large platter. Sprinkle fresh parsley on top for a pop of color. You can also add lemon wedges on the side. This adds a zesty touch when served. Pair your meal with a simple green salad or steamed vegetables. For drinks, try a light white wine or sparkling water with lemon. Enjoy your delicious creation! You can find the full recipe [here](#). {{image_4}} You can make this dish lighter by swapping rice for cauliflower rice. Cauliflower rice offers a low-carb option that still tastes great. It cooks quickly and absorbs flavors well. Using skinless chicken breasts instead of thighs is another healthy choice. Breasts have less fat but still provide protein. Spice things up by adding cayenne pepper for heat. A pinch can really enhance the dish. You can also try Italian seasoning for a different twist. Adding veggies like bell peppers or carrots boosts nutrition and color. They add crunch and sweetness that pairs well with garlic butter. If you need gluten-free options, use gluten-free chicken broth. It keeps the dish flavorful while meeting dietary needs. For those avoiding dairy, there are great butter substitutes. Look for dairy-free spreads made from plant oils. They work well in this recipe without losing taste. To keep your Garlic Butter Chicken and Rice fresh, store any leftovers in airtight containers. This helps lock in the flavor and moisture. Make sure to let the dish cool down before sealing it up. For longer storage, you can freeze it. Divide the dish into smaller portions to make thawing easier later. When it's time to reheat, use a skillet or a microwave. If using a skillet, add a splash of chicken broth to keep it moist. Heat it over low to medium heat, stirring gently. In the microwave, cover the dish with a damp paper towel. This keeps moisture in and avoids a dry result. Remember, you want your chicken and rice to stay tender. In the fridge, your Garlic Butter Chicken and Rice lasts about 3 to 4 days. Always check for signs before eating. Look for any off smells or changes in color. If it smells funny or looks slimy, it’s best to toss it. Always trust your senses to keep your meals safe and tasty. To amp up the flavor, try adding fresh herbs like thyme or rosemary. You can also mix in spices such as garlic powder or onion powder for extra depth. A splash of lemon juice at the end brightens the dish. For a spicy kick, consider adding crushed red pepper flakes. These little changes can make a big taste difference. Yes, you can! To adapt this recipe, first, brown the chicken thighs in a skillet. This step gives great flavor. Then, place the chicken, onions, garlic, and rice into the slow cooker. Add chicken broth and spices. Cook on low for 4-6 hours. Check the rice for doneness. Slow cooking makes this dish very tender and delicious. This dish pairs well with a side of steamed vegetables like broccoli or green beans. A fresh salad with vinaigrette is also nice. For drinks, consider serving iced tea or a light white wine. These choices balance the rich flavors of the chicken and rice. Absolutely! You can make this dish ahead of time. Store the chicken and rice in separate containers to keep them fresh. It lasts up to four days in the fridge. When ready to eat, simply reheat in the microwave or on the stovetop. This makes it a perfect option for busy weekdays. For the full recipe, check out the link above. This article guides you through making Garlic Butter Chicken and Rice. You learned about key ingredients like chicken thighs, long-grain rice, and garlic. I shared easy steps for cooking flavorful meals, plus tips to enhance taste and presentation. In conclusion, this dish is tasty and versatile. You can adjust it to fit your diet or mood. Enjoy experimenting with flavors and make it your own! Happy cooking!](https://dishtreats.com/wp-content/uploads/2025/05/2b69aced-7351-4258-8c9e-dc4a3c9f0304-768x768.webp)
![To make stuffed bell peppers with quinoa, gather these tasty ingredients: - 4 large bell peppers (mixed colors) - 1 cup quinoa (rinsed) - 2 cups vegetable broth - 1 can black beans (drained and rinsed) - 1 cup corn kernels - 1 medium onion (finely chopped) - 2 cloves garlic (minced) - 1 teaspoon ground cumin - 1 teaspoon chili powder - ½ teaspoon smoked paprika - Salt and pepper to taste - 1 cup diced tomatoes - 1 cup shredded cheese - Fresh cilantro (optional for garnish) These ingredients work together to create a colorful and healthy meal. Quinoa is the star here, adding protein and fiber. The bell peppers not only look great but also bring sweetness and crunch. If you want to learn how to combine them into a delicious dish, check out the Full Recipe. - To cook quinoa with vegetable broth, start by rinsing 1 cup of quinoa under cold water. This step removes bitterness. Pour the rinsed quinoa into a medium saucepan. Add 2 cups of vegetable broth for added flavor. Bring the mixture to a boil over medium-high heat. Once boiling, reduce the heat to low. Cover the pan and let it simmer for about 15 minutes. You will know it's done when all the liquid is absorbed. - After cooking, fluff the quinoa with a fork. This makes it light and airy. Set the quinoa aside to cool while you prepare the other ingredients. - Heat a non-stick skillet over medium heat. Add 1 medium onion, finely chopped, and 2 cloves of minced garlic. Cook these until the onion turns soft and translucent. This takes about 3 to 5 minutes. - Next, add 1 can of drained black beans and 1 cup of corn kernels to the skillet. Stir in 1 cup of diced tomatoes, along with 1 teaspoon of ground cumin, 1 teaspoon of chili powder, ½ teaspoon of smoked paprika, and salt and pepper to taste. Mix well and let it cook for an additional 5 minutes until everything is warm. - To prepare the bell peppers, slice off the tops and remove the seeds and membranes. Choose 4 large bell peppers for a colorful dish. Place the hollowed peppers upright in a baking dish. Make sure they stand stable. - Now, fill each bell pepper with the quinoa and vegetable mix. Press it down gently to pack it in well. For a cheesy touch, top each pepper with 1 cup of shredded cheese. Let it cascade down the sides for a fun look. - Cover the baking dish with aluminum foil. This helps keep the moisture in. Place it in the preheated oven at 375°F (190°C). Bake for 25 minutes. - After 25 minutes, carefully remove the foil. Return the dish to the oven for another 10 to 15 minutes. You want the peppers to be tender, and the cheese to melt and bubble. It should have a lovely golden color when done. Now you have a delicious, colorful dish ready to serve! For full details, refer to the [Full Recipe]. How to choose the right bell peppers Pick large, firm bell peppers for stuffing. Look for vibrant colors like red, yellow, or green. The best peppers have smooth skin. Avoid any with soft spots or blemishes. This ensures a tasty bite every time. Ensuring even cooking Cut off the tops of the peppers evenly. This helps them stand upright. Remove seeds and membranes for better stuffing. Place them in a baking dish that fits snugly. This keeps them from tipping over during cooking. Adding herbs or spices for variety Fresh herbs like cilantro or parsley boost flavor. Try adding a pinch of oregano or thyme for depth. For a spicy touch, sprinkle in some red pepper flakes. These small tweaks make a big difference in taste. Recommended cheese types for best flavor Cheddar and mozzarella melt well and taste great. For a kick, use pepper jack cheese. If you like tang, feta cheese can add a nice twist. Experiment to find your favorite cheese blend. Essential kitchen tools and equipment You’ll need a sharp knife and a cutting board for prep. A medium saucepan is great for cooking quinoa. Use a non-stick skillet for sautéing vegetables. A sturdy spoon helps you mix everything well. Baking dish recommendations for even heat distribution Choose a glass or ceramic baking dish. These materials distribute heat evenly. Make sure it’s big enough to hold all your stuffed peppers. This way, they cook through without burning. For the full recipe, follow this link: [Full Recipe]. {{image_4}} You can change the protein in stuffed peppers easily. If you want a meat option, try ground turkey. It adds great flavor. For a plant-based choice, use tofu. You can mash it and mix it into the filling. Black beans are great, but these options offer variety. You can also make vegetarian or vegan options. Use black beans or lentils for protein. These keep it meat-free. Just ensure you skip the cheese for a vegan meal. There are many ways to customize the protein to fit your needs. Quinoa is a fantastic base for stuffed peppers, but you can switch grains. Rice is a classic choice that works well. Farro or couscous can also bring a different texture. They make the meal hearty and filling. If you need gluten-free options, use rice or quinoa. Both are naturally gluten-free. This way, everyone can enjoy your stuffed peppers without worry. Think about different flavors to spice things up. For a Mexican twist, add jalapeños or taco seasoning. This gives the dish a kick and adds excitement. You can also use salsa for added flavor. For a Mediterranean vibe, add olives or crumbled feta cheese. These ingredients enhance the taste and bring a fresh feel. Both options are simple yet effective ways to change your stuffed peppers. To keep your stuffed bell peppers fresh, store them in the fridge. Place them in an airtight container. They will stay good for up to 4 days. If you want to save them for later, freezing is a great option. Wrap each stuffed pepper in plastic wrap, then put them in a freezer-safe bag. This way, they can last for up to 3 months. For reheating in the oven, preheat it to 350°F (175°C). Place the peppers in a baking dish with a little broth or water. Cover with foil to keep moisture in. Bake for about 20 minutes or until heated through. If you need a quick option, use the microwave. Place one stuffed pepper on a microwave-safe plate. Heat on high for about 2-3 minutes. If it's not hot enough, heat in 30-second bursts until warm. Stuffed peppers last in the fridge for about 4 days. After that, they may spoil. Look out for any signs of spoilage. If you see mold or a bad smell, it's time to toss them. Always trust your senses! You typically bake stuffed bell peppers for 35 to 40 minutes. Start by covering them with foil for the first 25 minutes. This keeps them moist. After that, remove the foil to let the cheese melt and brown for another 10 to 15 minutes. Check the peppers to ensure they are tender but not mushy. Yes, you can prepare stuffed peppers in advance. Stuff the peppers and place them in a baking dish. Cover with foil and store them in the fridge for up to 24 hours. When ready to bake, just pop them in the oven. You may need to extend the baking time by a few minutes. If you want to swap quinoa, try rice, farro, or couscous. These grains provide a nice texture. Rice cooks quickly and absorbs flavors well. Farro adds a chewy bite, while couscous is fluffy and light. You can also use lentils for a protein boost. Stuffed peppers are quite healthy! They are full of fiber from the quinoa, beans, and veggies. Bell peppers are rich in vitamins A and C. This dish tends to be low in calories and high in nutrients. It offers a balanced meal with protein, carbs, and healthy fats. Absolutely! You can use green, red, yellow, or orange bell peppers. Each type has a unique taste. Green peppers are more bitter, while red ones are sweet and fruity. Mixing colors not only looks pretty but also gives different flavors. Feel free to choose your favorite or what’s on hand! For the complete method to make flavorful stuffed bell peppers, check out the [Full Recipe]. Here, I’ll share key details about the dish that will help you create a yummy meal your family will love. Stuffed bell peppers are colorful and fun. They make a great meal for any day. You can use any bell pepper color. Red, yellow, and green peppers add a nice look to your plate. Each color has a different taste too. Quinoa is the star here. It’s a healthy grain packed with protein. Rinsing it before cooking helps remove any bitter taste. You cook quinoa in vegetable broth for extra flavor. This makes it soft and fluffy, perfect for mixing with veggies. The filling is made from black beans, corn, diced tomatoes, and spices. Black beans add protein and fiber. Corn brings sweetness and crunch. Diced tomatoes add moisture and flavor, making the filling juicy. The spices—cumin, chili powder, and smoked paprika—give your dish a tasty kick. They create layers of flavor that make each bite exciting. Don’t forget to add salt and pepper to taste! When you stuff the peppers, pack the filling well. This keeps everything together during cooking. Topping with shredded cheese adds a melty touch. As the peppers bake, the cheese melts and gets golden. Baking them with foil keeps the peppers moist. Then, removing the foil lets the cheese get bubbly and brown. The result is a beautiful dish that is sure to impress! Stuffed peppers combine colorful ingredients into a tasty meal. We discussed how to prepare quinoa, sauté vegetables, and stuff the peppers. I shared tips for choosing the right peppers and flavoring your dish. Variations allow you to substitute proteins and grains based on your taste. Storing leftovers properly extends the life of your meal. Making stuffed peppers can be fun and creative. Enjoy trying new flavors and share this recipe with others!](https://dishtreats.com/wp-content/uploads/2025/06/552026c8-f020-4e58-b656-10611c333f52-768x768.webp)
![To make Honey Mustard Chicken Thighs, you need simple, fresh ingredients. Here’s what you will need: - 4 bone-in chicken thighs, skin-on - 1/4 cup honey - 1/4 cup Dijon mustard - 2 tablespoons olive oil - 3 cloves garlic, minced - 1 teaspoon dried thyme - 1 teaspoon paprika - Salt and black pepper to taste - Fresh parsley for garnish These ingredients bring great flavor to your meal. The honey adds sweetness, while the Dijon mustard gives it a nice tang. Olive oil keeps the chicken juicy, and garlic boosts the taste. Dried thyme and paprika add depth, making every bite delicious. Don’t forget the parsley! It makes your dish look pretty and fresh. This recipe is quick and easy, perfect for any night. For the full instructions, check the Full Recipe. First, preheat your oven to 400°F (200°C). This heat will cook your chicken just right. In a small bowl, whisk together these ingredients: - 1/4 cup honey - 1/4 cup Dijon mustard - 2 tablespoons olive oil - 3 cloves garlic, minced - 1 teaspoon dried thyme - 1 teaspoon paprika - Salt and black pepper to taste Make sure to mix well. This creates a smooth and tasty marinade. Next, take your chicken thighs and place them in a large bowl or a resealable bag. Pour the marinade over the chicken. Ensure each piece is coated well. For the best flavor, let it marinate for at least 30 minutes. If you have more time, refrigerating it overnight works wonders. Now, heat a large oven-safe skillet over medium-high heat. Once hot, add the marinated chicken thighs, skin-side down. Sear them for about 5-7 minutes until the skin is golden brown. This step gives the chicken a nice crisp. After that, flip the thighs using tongs. Transfer the skillet to your preheated oven. Bake for 25-30 minutes. Check that the internal temperature reaches 165°F (75°C). If the juices run clear, the chicken is done. Once cooked, take the skillet from the oven and let the chicken rest for 5 minutes. This helps keep it juicy. Before serving, sprinkle some fresh parsley on top for a lovely finish. For the complete recipe, don't forget to check the [Full Recipe]. To get the best flavor, marinate the chicken thighs well. Use a large bowl or a resealable plastic bag for this. After mixing the marinade, pour it over the chicken. Make sure each piece is coated. For great results, let the chicken sit in the marinade for at least 30 minutes. You can also refrigerate it overnight. This extra time helps the flavors soak in deep. Cooking chicken thighs at the right temperature is key. Preheat your oven to 400°F (200°C). This hot oven cooks the chicken evenly and keeps it juicy. After searing the chicken for 5-7 minutes on the stovetop, transfer it to the oven. Bake for 25-30 minutes. Check the chicken's internal temperature. It should reach 165°F (75°C) for safe eating. Let it rest for 5 minutes before serving, which helps keep it moist. When serving, presentation matters. Place the chicken thighs on a white platter or a wooden board. Drizzle any leftover marinade over the top for added flavor. Garnish with fresh parsley for a pop of color. This simple touch makes the dish look more inviting. You can pair the chicken with roasted veggies or a fresh salad. These sides complement the sweet and tangy flavors of the honey mustard. For the full recipe, check out the details above. {{image_4}} You can change the sauce to fit your taste. Try using maple syrup instead of honey. This gives a unique sweetness. You can also mix in some soy sauce for a savory twist. If you like heat, add a dash of hot sauce or cayenne pepper. For a tangy flavor, consider apple cider vinegar. Each option adds a new layer to the dish. While chicken thighs are great, you can also use chicken breasts. They cook faster but stay moist if cooked right. Drumsticks are another option. They have lots of flavor and a nice crisp skin. You can even use a whole chicken, just adjust cooking time. Each cut brings its own charm to the recipe. For a full meal, add vegetables. Root veggies like carrots and potatoes roast well. Toss them in the marinade for extra flavor. You can also use green beans or broccoli. Place them in the skillet with the chicken. They will soak up the sauce and cook perfectly. This way, you have a tasty one-pan meal that's easy to serve. For the full recipe, check out the previous section. After cooking, let the chicken cool down. Place the chicken thighs in an airtight container. Store them in the fridge for up to three days. Make sure the temperature stays below 40°F (4°C). This keeps your chicken safe and tasty. If you want to store the chicken longer, freezing is a great option. Wrap each thigh tightly in plastic wrap. Then put them in a freezer-safe bag. You can freeze them for up to three months. Remember to label the bag with the date. When you are ready to enjoy leftovers, preheat your oven to 350°F (175°C). Place the chicken in a baking dish. Cover it with foil to keep it moist. Heat for about 20-25 minutes. You can also use a microwave, but it may dry the chicken out. For the best taste, the oven is the way to go. Enjoy your meal again! You should marinate honey mustard chicken thighs for at least 30 minutes. This allows the flavors to soak into the meat. If you have time, marinating overnight works even better. It deepens the taste and makes the chicken more tender. Yes, you can use boneless chicken thighs. They cook faster than bone-in thighs. Adjust the cooking time to about 20-25 minutes in the oven. Always check that the internal temperature reaches 165°F (75°C) for safety. Honey mustard chicken thighs pair well with many sides. Here are some ideas: - Steamed vegetables: Broccoli or green beans add color. - Rice or quinoa: Both soak up the sauce nicely. - Salad: A fresh green salad balances the meal. - Mashed potatoes: Creamy potatoes are a great comfort food option. You can find the full recipe to help you create this delicious meal. In this post, I shared ingredients and steps for making honey mustard chicken thighs. I provided tips for marinating and cooking this dish to enhance its flavor. You learned about variations and how to store leftovers properly. Remember, simple changes can make a big impact on taste. I encourage you to try these ideas for yourself. Enjoy cooking and delight in every bite!](https://dishtreats.com/wp-content/uploads/2025/06/0b4fb8df-5400-4b6b-9acb-490ad2d6fca7-768x768.webp)
![To make spicy chickpea tacos, you need some key items. Here is what you will need: - 1 can (15 oz) chickpeas, thoroughly drained and rinsed - 2 tablespoons extra virgin olive oil - 1 teaspoon ground chili powder - 1 teaspoon ground cumin - 1/2 teaspoon smoked paprika - 1/4 teaspoon cayenne pepper - Sea salt and freshly cracked black pepper to taste - 8 small corn or flour tortillas - 1 ripe avocado, sliced into thin pieces - 1 cup finely shredded purple cabbage - Fresh cilantro leaves for garnish - Lime wedges for serving These ingredients create a tasty and spicy base for your tacos. The spices bring warmth and depth, while the chickpeas offer a great source of protein and fiber. You can add some unique touches to your tacos. Here are some ideas: - Diced tomatoes for freshness - Sliced jalapeños for extra heat - A dollop of sour cream or yogurt for creaminess - Shredded cheese for richness - Corn or black beans for more texture Feel free to mix and match these extras. They can elevate your tacos to a whole new level. Chickpeas are not just tasty; they are also very healthy. Here are some benefits: - High in protein, which helps build muscle - Rich in fiber, aiding in digestion - Contain vitamins and minerals like iron and magnesium - Low in fat, making them a great choice for heart health Including chickpeas in your diet can support your overall health. They are a smart ingredient in any meal. For the full recipe, check the [Full Recipe]. Start by opening a can of chickpeas. Drain and rinse them well. In a bowl, use a fork or potato masher to gently mash the chickpeas. Leave some chunks for texture. You want them slightly broken but not a paste. This will help them stay firm while cooking. Heat 2 tablespoons of extra virgin olive oil in a skillet over medium heat. Once the oil shimmers, add the mashed chickpeas. Sprinkle in the spices: 1 teaspoon of chili powder, 1 teaspoon of cumin, 1/2 teaspoon of smoked paprika, and 1/4 teaspoon of cayenne pepper. Add sea salt and black pepper to taste. Stir well to coat all the chickpeas. Cook for about 5 to 7 minutes. This will make the spices fragrant and the chickpeas slightly crispy. While the chickpeas cook, warm the tortillas in another skillet for about 30 seconds on each side. You can also heat them in the oven. Once the chickpeas are ready, spoon a generous amount onto each tortilla. Top with sliced avocado, shredded purple cabbage, and fresh cilantro. Serve with lime wedges on the side. This adds a zesty touch just before eating. For the full recipe, check out the complete guide! To make your spicy chickpea tacos pop, use a mix of spices. I love pairing chili powder with cumin for a warm base. Adding smoked paprika brings a nice depth. If you want more heat, cayenne pepper is the way to go. You can also try adding garlic powder or onion powder for extra flavor. Experiment until you find your favorite blend. Warming your tortillas is key to a great taco. You can heat them in a skillet, about 30 seconds on each side. This keeps them soft and pliable. Alternatively, stack them, wrap in foil, and warm in the oven. If you prefer a crispy texture, try frying them lightly in oil. Just be careful not to overcook them! Serving matters! Place your tacos on a large platter. Add lime wedges and fresh cilantro for color. You can even include cherry tomatoes or sliced radishes for a vibrant touch. This not only looks great but also invites your guests to dig in. For a fun twist, serve with a side of salsa or guacamole to enhance the flavor. Enjoy the Full Recipe for more tips! {{image_4}} You can turn your spicy chickpea tacos into a taco bowl. Start with a base of rice or quinoa. Then, add your chickpea mixture on top. Pile on shredded cabbage, avocado, and cilantro. This bowl offers a fun twist on the classic taco. You could also add salsa or hot sauce for extra flavor. Feel free to mix in different proteins or veggies. You can add cooked chicken, beef, or shrimp if you want. For a veggie boost, try bell peppers, corn, or zucchini. These options add variety and nutrition to your meal. You can also swap chickpeas for black beans or lentils for a new taste. Making this dish gluten-free is easy. Just use corn tortillas instead of flour ones. They are tasty and safe for those with gluten issues. This recipe is already vegan, so you can enjoy it as is. To enhance flavors, add avocado or a vegan sour cream. These small changes can make a big difference in taste and texture. For the full recipe, check out the earlier sections. To store leftover chickpeas, place them in a clean, airtight container. Make sure the lid seals tightly. You can keep them in the fridge for up to three days. If you want to store them for longer, freeze the chickpeas. They will last for about three months in the freezer. Just remember to label your container with the date. This helps you keep track of freshness. Reheating your tacos is easy! You can microwave them for about 30 seconds. Make sure to cover them with a damp paper towel. This keeps the tortillas soft. If you prefer a crispier taco, reheat them in a skillet. Heat the skillet on medium and warm each taco for about one minute on each side. This way, you keep that delicious crunch! For storing your ingredients, glass containers are best. They are safe, durable, and help keep food fresh. You can also use plastic containers, but make sure they are BPA-free. Small jars work well for spices and herbs. Label each container so you can find what you need quickly. Keep everything in a cool, dry place for the best results. For a full recipe, check the Spicy Chickpea Tacos section. You can make chickpea tacos spicier by adding more cayenne pepper. Start with 1/2 teaspoon and adjust to your heat level. You can also use hot sauce for an extra kick. Another idea is to add chopped jalapeños or serrano peppers. These fresh peppers bring heat and flavor. If you love smoky flavors, try adding chipotle powder. This will give your tacos a nice depth. Yes, you can prepare chickpea tacos in advance. I suggest cooking the chickpeas and storing them in an airtight container. Keep the tortillas and toppings separate until ready to serve. This way, everything stays fresh. You can store the chickpea mixture in the fridge for up to three days. Just reheat it before serving. Fresh toppings like avocado and cilantro should be added last. Spicy chickpea tacos pair well with many sides. You could serve them with rice or quinoa for a filling meal. A fresh salad adds brightness and crunch. Try a simple cabbage slaw or a corn salad. You might also enjoy salsa or guacamole on the side. For drinks, consider a refreshing limeade or a cold beer. This will balance the spice and add flavor. For the full recipe, check out the detailed instructions above. In this post, we covered how to make spicy chickpea tacos. We explored essential ingredients and their health benefits. You learned step-by-step instructions for preparing and cooking chickpeas, assembling tacos, and customizing them. We shared tips for seasoning, tortilla methods, and serving ideas. Variations included taco bowls and gluten-free options. Finally, we discussed how to store leftovers effectively. These tacos are fun, tasty, and good for you. Ready to enjoy your homemade spicy chickpea tacos?](https://dishtreats.com/wp-content/uploads/2025/06/78aca89b-dca0-4457-a4a9-555278ab1264-768x768.webp)