57. Honey Garlic Chicken Thighs Savory and Simple Dish
![To make this dish, you need a few key items. These ingredients work together for great flavor. Here’s what you will need: - 4 chicken thighs, bone-in and skin-on - 1/4 cup honey - 1/4 cup low-sodium soy sauce - 4 cloves garlic, finely minced - 1 tablespoon fresh ginger, grated - 1 teaspoon sesame oil - 1 tablespoon olive oil - Salt and freshly ground black pepper to taste While the main ingredients shine, you can add optional items for extra flavor. Try using these to enhance your dish: - A splash of rice vinegar for acidity - A pinch of red pepper flakes for heat - Fresh herbs like cilantro or parsley for freshness Presentation matters when serving food! Beautiful garnishes make a dish pop. Here’s what to top your chicken with: - 2 green onions, finely sliced - Sesame seeds for a crunchy finish First, grab a medium mixing bowl. Add 1/4 cup honey, 1/4 cup low-sodium soy sauce, 4 minced garlic cloves, 1 tablespoon of grated ginger, and 1 teaspoon of sesame oil. Whisk them together until mixed well. This sweet and savory blend will become your marinade and glaze. It infuses the chicken thighs with tasty flavor. Next, season the chicken thighs. Use salt and freshly ground black pepper on both sides. Heat 1 tablespoon of olive oil in a large skillet over medium-high heat. Once hot, place the chicken thighs skin-side down. Let them sear for about 6-8 minutes. You want that skin golden brown and crispy. This step adds great texture and taste. After searing, flip the chicken thighs. Pour the honey garlic mixture over them. Let it simmer gently, coating the chicken in flavor. Cover the skillet and reduce the heat. Cook for 15-20 minutes until the chicken reaches 165°F (75°C) inside. When the chicken is ready, remove the lid. Turn the heat back up to medium-high. Let the sauce simmer for 5 minutes, stirring often. This will thicken the sauce, helping it stick to the chicken. Once thickened, take the skillet off the heat. Allow the chicken to rest for a few minutes. This lets the juices settle, keeping the meat tender. Serve the chicken on a platter, drizzling the sauce over the top. Add a sprinkle of sliced green onions and sesame seeds for a bright finish. Enjoy your Honey Garlic Chicken Thighs! For the full recipe, refer to [Full Recipe]. To get crispy skin, start with bone-in, skin-on chicken thighs. Pat the skin dry with paper towels. This step removes moisture and helps the skin crisp up nicely. Heat olive oil in a hot skillet before adding the chicken. Sear it skin-side down for 6-8 minutes. Resist the urge to move the chicken too much. Let it cook undisturbed for a golden crust. For tender chicken, season it well with salt and pepper. This enhances flavor and locks in moisture. When cooking, keep an eye on the internal temperature. Aim for 165°F (75°C) to ensure it’s fully cooked. Let the chicken rest after cooking. This lets the juices settle back in, making each bite juicy and satisfying. Honey garlic chicken pairs well with several sides. Try serving it with steamed rice for a classic combo. The rice soaks up the tasty sauce. You can also serve it with a fresh green salad. The crunch of the veggies complements the soft chicken perfectly. Roasted vegetables add color and flavor, making for a well-rounded meal. For the full recipe, check out [Full Recipe]. {{image_4}} You can change the taste of honey garlic chicken thighs by swapping some ingredients. For a fruitier twist, try using maple syrup instead of honey. This will give your dish a rich, deep flavor. You can also replace soy sauce with coconut aminos for a gluten-free option. If you like citrus, add some fresh orange juice to the marinade. It brightens the flavor and adds a zesty note. While chicken thighs are juicy, you can use other cuts too. Chicken breasts work well if you prefer leaner meat. Just remember, they may dry out faster, so watch the cooking time. Drumsticks are another tasty option. They are fun to eat and stay moist during cooking. Whichever cut you choose, make sure it is about the same size for even cooking. Want some heat? It's easy to spice things up! Add red pepper flakes or sriracha to the marinade for a kick. You can also use fresh jalapeños or chili paste for a bolder flavor. Adjust the amount based on your heat tolerance. If you love spicy food, this will make your honey garlic chicken thighs truly exciting. For the full recipe, check out the [Full Recipe]. Store your honey garlic chicken thighs in an airtight container. Make sure to let them cool to room temperature first. They will stay fresh in the fridge for up to 3 days. This keeps the flavors intact and ensures the chicken remains juicy. To reheat, place the chicken thighs in a skillet over low heat. Cover the skillet to keep moisture in. Heat until warmed through, about 5-10 minutes. You can also microwave them, but cover the dish to prevent drying out. You can freeze the chicken thighs for later use. Wrap each thigh in plastic wrap, then place them in a freezer bag. They will last for about 2-3 months in the freezer. Thaw them in the fridge overnight before reheating. This method keeps the chicken tasty and tender. For the full recipe, refer to the section above. You should cook chicken thighs for about 20-25 minutes. Start by searing them for 6-8 minutes on the skin side. Then, flip them over and pour the sauce on top. Cover the skillet and let them simmer for 15-20 minutes. This method helps keep the meat juicy and full of flavor. Yes, you can use boneless chicken thighs. They will cook faster than bone-in thighs. Sear them for about 5-7 minutes on each side. Make sure to check their internal temperature. It should reach 165°F (75°C) to be safe to eat. The best way to check if the chicken is done is with a meat thermometer. Insert it into the thickest part of the thigh. When it reads 165°F (75°C), the chicken is ready. You can also cut into the meat. If the juices run clear, it’s cooked. To adjust the sweetness, add more honey for a sweeter taste. If you want it less sweet, add more soy sauce or a splash of vinegar. Taste the sauce as you go. This way, you can find the perfect balance for your dish. For the full recipe, please check the [Full Recipe]. Honey garlic chicken thighs are simple and tasty. We covered the key ingredients and optional marinades. You learned how to prepare the marinade and cook the chicken. I shared tips for crispy skin, tender meat, and delicious sides. We also explored variations and storage tips to keep your meals fresh. When you try this recipe, it will impress your family and friends. Enjoy the rich flavors and make it your own!](https://dishtreats.com/wp-content/uploads/2025/06/32d13aa5-8be9-48e3-be5a-1699ade8ce81.webp)
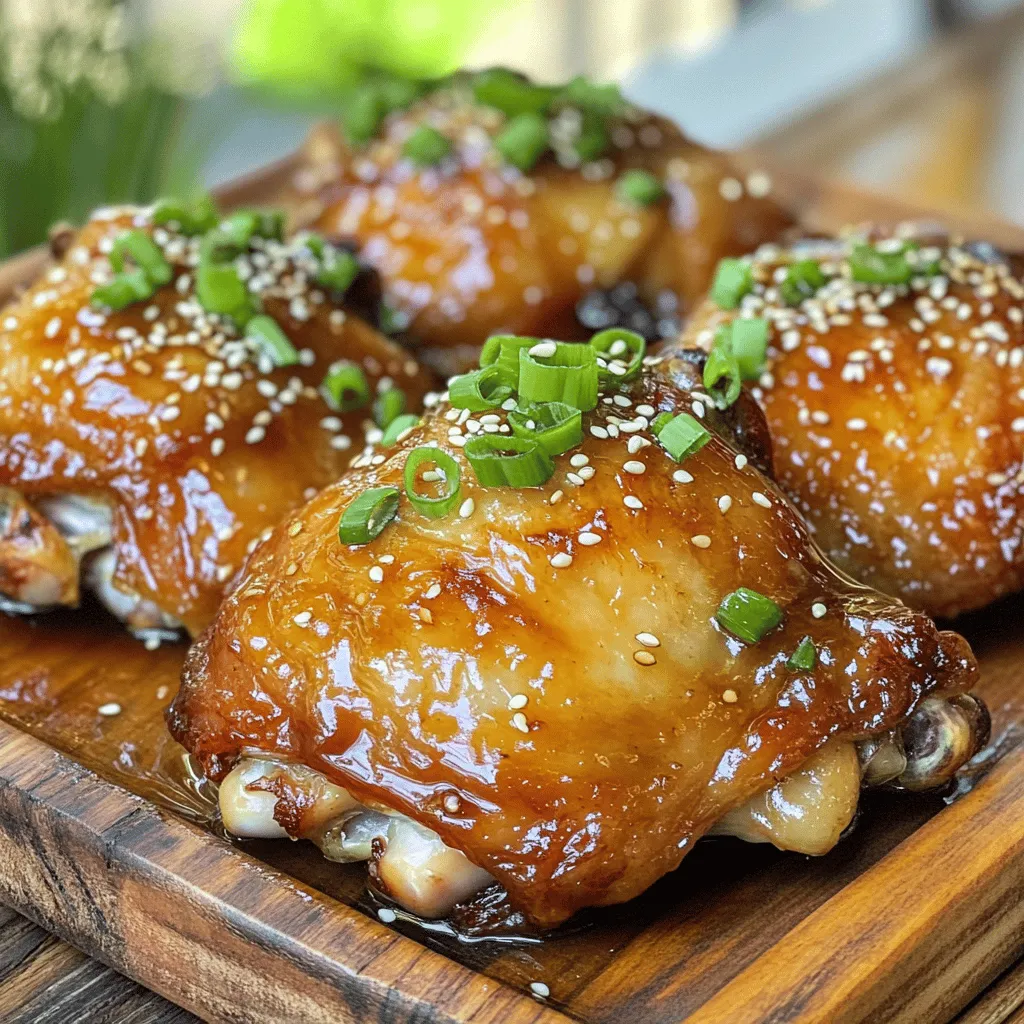
Craving a dish that’s both savory and simple? Let me introduce you to Honey Garlic Chicken Thighs. This recipe combines sweet honey, zesty garlic, and juicy chicken for a meal that’s sure to satisfy. With easy steps and a few basic ingredients, you’ll have a flavorful dinner in no time. Ready to impress your family with this tasty dish? Let’s dive into the delicious world of Honey Garlic Chicken Thighs!
Ingredients
Main Ingredients for Honey Garlic Chicken Thighs
To make this dish, you need a few key items. These ingredients work together for great flavor. Here’s what you will need:
- 4 chicken thighs, bone-in and skin-on
- 1/4 cup honey
- 1/4 cup low-sodium soy sauce
- 4 cloves garlic, finely minced
- 1 tablespoon fresh ginger, grated
- 1 teaspoon sesame oil
- 1 tablespoon olive oil
- Salt and freshly ground black pepper to taste
Optional Marinade Ingredients
While the main ingredients shine, you can add optional items for extra flavor. Try using these to enhance your dish:
- A splash of rice vinegar for acidity
- A pinch of red pepper flakes for heat
- Fresh herbs like cilantro or parsley for freshness
Garnishes for Presentation
Presentation matters when serving food! Beautiful garnishes make a dish pop. Here’s what to top your chicken with:
- 2 green onions, finely sliced
- Sesame seeds for a crunchy finish
Step-by-Step Instructions
Preparing the Marinade
First, grab a medium mixing bowl. Add 1/4 cup honey, 1/4 cup low-sodium soy sauce, 4 minced garlic cloves, 1 tablespoon of grated ginger, and 1 teaspoon of sesame oil. Whisk them together until mixed well. This sweet and savory blend will become your marinade and glaze. It infuses the chicken thighs with tasty flavor.
Cooking the Chicken Thighs
Next, season the chicken thighs. Use salt and freshly ground black pepper on both sides. Heat 1 tablespoon of olive oil in a large skillet over medium-high heat. Once hot, place the chicken thighs skin-side down. Let them sear for about 6-8 minutes. You want that skin golden brown and crispy. This step adds great texture and taste.
After searing, flip the chicken thighs. Pour the honey garlic mixture over them. Let it simmer gently, coating the chicken in flavor. Cover the skillet and reduce the heat. Cook for 15-20 minutes until the chicken reaches 165°F (75°C) inside.
Thickening the Sauce and Serving
When the chicken is ready, remove the lid. Turn the heat back up to medium-high. Let the sauce simmer for 5 minutes, stirring often. This will thicken the sauce, helping it stick to the chicken.
Once thickened, take the skillet off the heat. Allow the chicken to rest for a few minutes. This lets the juices settle, keeping the meat tender. Serve the chicken on a platter, drizzling the sauce over the top. Add a sprinkle of sliced green onions and sesame seeds for a bright finish. Enjoy your Honey Garlic Chicken Thighs!
Tips & Tricks
Achieving Crispy Skin
To get crispy skin, start with bone-in, skin-on chicken thighs. Pat the skin dry with paper towels. This step removes moisture and helps the skin crisp up nicely. Heat olive oil in a hot skillet before adding the chicken. Sear it skin-side down for 6-8 minutes. Resist the urge to move the chicken too much. Let it cook undisturbed for a golden crust.
Ensuring Tender and Juicy Chicken
For tender chicken, season it well with salt and pepper. This enhances flavor and locks in moisture. When cooking, keep an eye on the internal temperature. Aim for 165°F (75°C) to ensure it’s fully cooked. Let the chicken rest after cooking. This lets the juices settle back in, making each bite juicy and satisfying.
Best Sides to Serve with Honey Garlic Chicken Thighs
Honey garlic chicken pairs well with several sides. Try serving it with steamed rice for a classic combo. The rice soaks up the tasty sauce. You can also serve it with a fresh green salad. The crunch of the veggies complements the soft chicken perfectly. Roasted vegetables add color and flavor, making for a well-rounded meal.
Variations
Substituting Ingredients for Different Flavors
You can change the taste of honey garlic chicken thighs by swapping some ingredients. For a fruitier twist, try using maple syrup instead of honey. This will give your dish a rich, deep flavor. You can also replace soy sauce with coconut aminos for a gluten-free option. If you like citrus, add some fresh orange juice to the marinade. It brightens the flavor and adds a zesty note.
Using Different Cuts of Chicken
While chicken thighs are juicy, you can use other cuts too. Chicken breasts work well if you prefer leaner meat. Just remember, they may dry out faster, so watch the cooking time. Drumsticks are another tasty option. They are fun to eat and stay moist during cooking. Whichever cut you choose, make sure it is about the same size for even cooking.
Making it Spicy: Adding Heat to the Dish
Want some heat? It’s easy to spice things up! Add red pepper flakes or sriracha to the marinade for a kick. You can also use fresh jalapeños or chili paste for a bolder flavor. Adjust the amount based on your heat tolerance. If you love spicy food, this will make your honey garlic chicken thighs truly exciting.
Storage Info
How to Store Leftovers
Store your honey garlic chicken thighs in an airtight container. Make sure to let them cool to room temperature first. They will stay fresh in the fridge for up to 3 days. This keeps the flavors intact and ensures the chicken remains juicy.
Reheating the Chicken for Best Results
To reheat, place the chicken thighs in a skillet over low heat. Cover the skillet to keep moisture in. Heat until warmed through, about 5-10 minutes. You can also microwave them, but cover the dish to prevent drying out.
Freezing Honey Garlic Chicken Thighs
You can freeze the chicken thighs for later use. Wrap each thigh in plastic wrap, then place them in a freezer bag. They will last for about 2-3 months in the freezer. Thaw them in the fridge overnight before reheating. This method keeps the chicken tasty and tender.
FAQs
How long should I cook the chicken thighs?
You should cook chicken thighs for about 20-25 minutes. Start by searing them for 6-8 minutes on the skin side. Then, flip them over and pour the sauce on top. Cover the skillet and let them simmer for 15-20 minutes. This method helps keep the meat juicy and full of flavor.
Can I use boneless chicken thighs?
Yes, you can use boneless chicken thighs. They will cook faster than bone-in thighs. Sear them for about 5-7 minutes on each side. Make sure to check their internal temperature. It should reach 165°F (75°C) to be safe to eat.
What’s the best way to know when the chicken is done?
The best way to check if the chicken is done is with a meat thermometer. Insert it into the thickest part of the thigh. When it reads 165°F (75°C), the chicken is ready. You can also cut into the meat. If the juices run clear, it’s cooked.
How do I adjust the sweetness of the sauce?
To adjust the sweetness, add more honey for a sweeter taste. If you want it less sweet, add more soy sauce or a splash of vinegar. Taste the sauce as you go. This way, you can find the perfect balance for your dish.
Honey garlic chicken thighs are simple and tasty. We covered the key ingredients and optional marinades. You learned how to prepare the marinade and cook the chicken. I shared tips for crispy skin, tender meat, and delicious sides. We also explored variations and storage tips to keep your meals fresh.
When you try this recipe, it will impress your family and friends. Enjoy the rich flavors and make it your own!
![To make this dish, you need a few key items. These ingredients work together for great flavor. Here’s what you will need: - 4 chicken thighs, bone-in and skin-on - 1/4 cup honey - 1/4 cup low-sodium soy sauce - 4 cloves garlic, finely minced - 1 tablespoon fresh ginger, grated - 1 teaspoon sesame oil - 1 tablespoon olive oil - Salt and freshly ground black pepper to taste While the main ingredients shine, you can add optional items for extra flavor. Try using these to enhance your dish: - A splash of rice vinegar for acidity - A pinch of red pepper flakes for heat - Fresh herbs like cilantro or parsley for freshness Presentation matters when serving food! Beautiful garnishes make a dish pop. Here’s what to top your chicken with: - 2 green onions, finely sliced - Sesame seeds for a crunchy finish First, grab a medium mixing bowl. Add 1/4 cup honey, 1/4 cup low-sodium soy sauce, 4 minced garlic cloves, 1 tablespoon of grated ginger, and 1 teaspoon of sesame oil. Whisk them together until mixed well. This sweet and savory blend will become your marinade and glaze. It infuses the chicken thighs with tasty flavor. Next, season the chicken thighs. Use salt and freshly ground black pepper on both sides. Heat 1 tablespoon of olive oil in a large skillet over medium-high heat. Once hot, place the chicken thighs skin-side down. Let them sear for about 6-8 minutes. You want that skin golden brown and crispy. This step adds great texture and taste. After searing, flip the chicken thighs. Pour the honey garlic mixture over them. Let it simmer gently, coating the chicken in flavor. Cover the skillet and reduce the heat. Cook for 15-20 minutes until the chicken reaches 165°F (75°C) inside. When the chicken is ready, remove the lid. Turn the heat back up to medium-high. Let the sauce simmer for 5 minutes, stirring often. This will thicken the sauce, helping it stick to the chicken. Once thickened, take the skillet off the heat. Allow the chicken to rest for a few minutes. This lets the juices settle, keeping the meat tender. Serve the chicken on a platter, drizzling the sauce over the top. Add a sprinkle of sliced green onions and sesame seeds for a bright finish. Enjoy your Honey Garlic Chicken Thighs! For the full recipe, refer to [Full Recipe]. To get crispy skin, start with bone-in, skin-on chicken thighs. Pat the skin dry with paper towels. This step removes moisture and helps the skin crisp up nicely. Heat olive oil in a hot skillet before adding the chicken. Sear it skin-side down for 6-8 minutes. Resist the urge to move the chicken too much. Let it cook undisturbed for a golden crust. For tender chicken, season it well with salt and pepper. This enhances flavor and locks in moisture. When cooking, keep an eye on the internal temperature. Aim for 165°F (75°C) to ensure it’s fully cooked. Let the chicken rest after cooking. This lets the juices settle back in, making each bite juicy and satisfying. Honey garlic chicken pairs well with several sides. Try serving it with steamed rice for a classic combo. The rice soaks up the tasty sauce. You can also serve it with a fresh green salad. The crunch of the veggies complements the soft chicken perfectly. Roasted vegetables add color and flavor, making for a well-rounded meal. For the full recipe, check out [Full Recipe]. {{image_4}} You can change the taste of honey garlic chicken thighs by swapping some ingredients. For a fruitier twist, try using maple syrup instead of honey. This will give your dish a rich, deep flavor. You can also replace soy sauce with coconut aminos for a gluten-free option. If you like citrus, add some fresh orange juice to the marinade. It brightens the flavor and adds a zesty note. While chicken thighs are juicy, you can use other cuts too. Chicken breasts work well if you prefer leaner meat. Just remember, they may dry out faster, so watch the cooking time. Drumsticks are another tasty option. They are fun to eat and stay moist during cooking. Whichever cut you choose, make sure it is about the same size for even cooking. Want some heat? It's easy to spice things up! Add red pepper flakes or sriracha to the marinade for a kick. You can also use fresh jalapeños or chili paste for a bolder flavor. Adjust the amount based on your heat tolerance. If you love spicy food, this will make your honey garlic chicken thighs truly exciting. For the full recipe, check out the [Full Recipe]. Store your honey garlic chicken thighs in an airtight container. Make sure to let them cool to room temperature first. They will stay fresh in the fridge for up to 3 days. This keeps the flavors intact and ensures the chicken remains juicy. To reheat, place the chicken thighs in a skillet over low heat. Cover the skillet to keep moisture in. Heat until warmed through, about 5-10 minutes. You can also microwave them, but cover the dish to prevent drying out. You can freeze the chicken thighs for later use. Wrap each thigh in plastic wrap, then place them in a freezer bag. They will last for about 2-3 months in the freezer. Thaw them in the fridge overnight before reheating. This method keeps the chicken tasty and tender. For the full recipe, refer to the section above. You should cook chicken thighs for about 20-25 minutes. Start by searing them for 6-8 minutes on the skin side. Then, flip them over and pour the sauce on top. Cover the skillet and let them simmer for 15-20 minutes. This method helps keep the meat juicy and full of flavor. Yes, you can use boneless chicken thighs. They will cook faster than bone-in thighs. Sear them for about 5-7 minutes on each side. Make sure to check their internal temperature. It should reach 165°F (75°C) to be safe to eat. The best way to check if the chicken is done is with a meat thermometer. Insert it into the thickest part of the thigh. When it reads 165°F (75°C), the chicken is ready. You can also cut into the meat. If the juices run clear, it’s cooked. To adjust the sweetness, add more honey for a sweeter taste. If you want it less sweet, add more soy sauce or a splash of vinegar. Taste the sauce as you go. This way, you can find the perfect balance for your dish. For the full recipe, please check the [Full Recipe]. Honey garlic chicken thighs are simple and tasty. We covered the key ingredients and optional marinades. You learned how to prepare the marinade and cook the chicken. I shared tips for crispy skin, tender meat, and delicious sides. We also explored variations and storage tips to keep your meals fresh. When you try this recipe, it will impress your family and friends. Enjoy the rich flavors and make it your own!](https://dishtreats.com/wp-content/uploads/2025/06/32d13aa5-8be9-48e3-be5a-1699ade8ce81-300x300.webp)