
Lemon Herb Grilled Vegetables Flavorful and Simple Dish
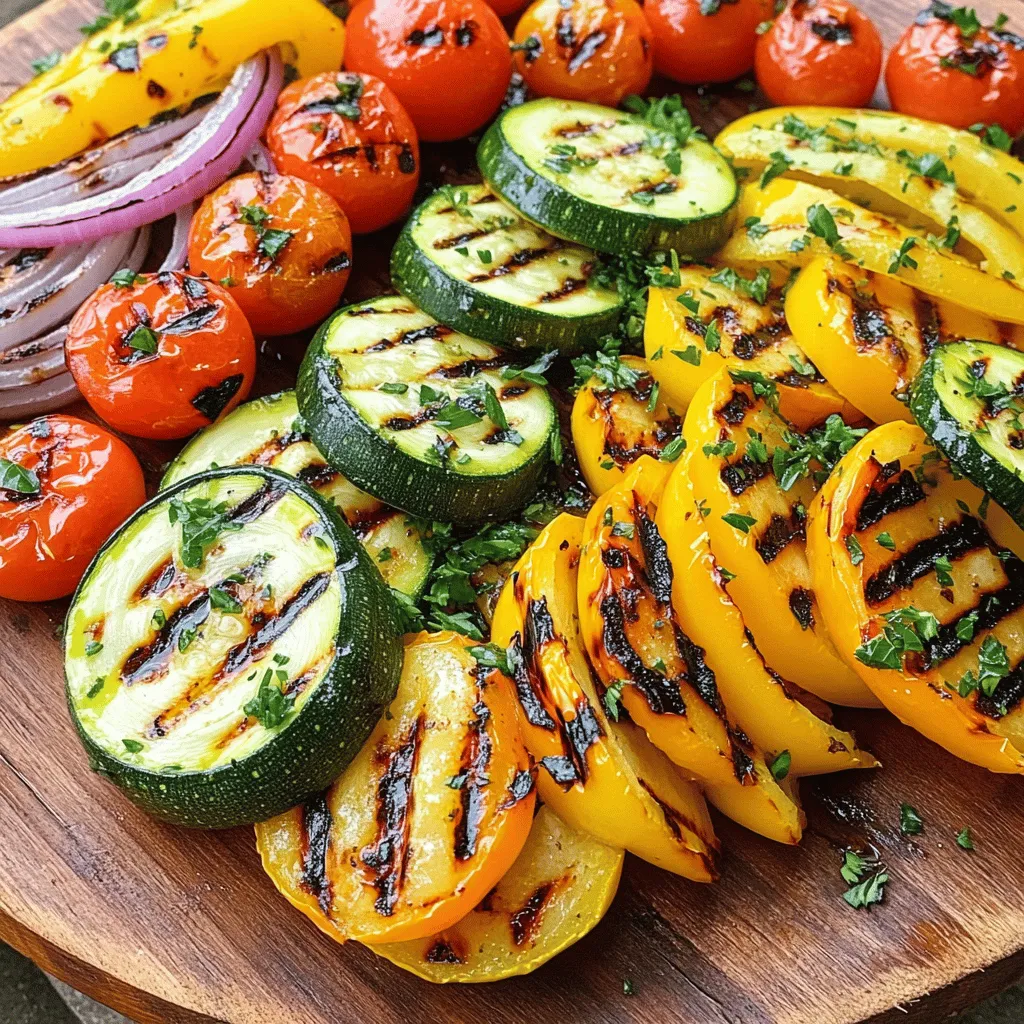
Are you ready to transform your meals with a quick and tasty dish? Lemon Herb Grilled Vegetables are both simple to make and packed with bright flavors. This vibrant recipe will make your veggies shine, thanks to a zesty lemon marinade. Whether you’re grilling for a crowd or prepping meal prep, I’ll guide you through every step. Let’s dive into this delicious way to enjoy fresh vegetables!
Ingredients
To make lemon herb grilled vegetables, you will need the following fresh ingredients:
- 1 medium zucchini, cut into thick rounds
- 1 yellow bell pepper, sliced into wide strips
- 1 red bell pepper, sliced into wide strips
- 1 medium red onion, cut into wedges
- 1 cup cherry tomatoes, whole
- 3 tablespoons extra virgin olive oil
- Zest and juice of 1 large lemon
- 2 teaspoons dried oregano
- 2 teaspoons dried thyme
- 2 cloves garlic, minced finely
- Salt and freshly ground black pepper, to taste
- Fresh parsley, finely chopped (for garnish)
These ingredients bring out the natural flavors of the vegetables. The lemon juice brightens everything up, while the herbs add depth. The cherry tomatoes burst with flavor, making each bite a delight. With this simple list, you can create a dish that impresses everyone.
Step-by-Step Instructions
Preparation and Marination
- First, combine the extra virgin olive oil, lemon zest, and lemon juice in a bowl.
- Add dried oregano, dried thyme, minced garlic, salt, and pepper. Mix well until smooth.
- Next, toss the zucchini, bell peppers, red onion, and cherry tomatoes in the marinade.
- Cover the bowl with plastic wrap and place it in the fridge for at least 30 minutes.
Grilling Process
- While the vegetables marinate, preheat your grill or grill pan over medium-high heat.
- Once hot, arrange the marinated vegetables on the grill. Make sure they are not crowded.
- Grill the vegetables for 6-8 minutes. Turn them occasionally with tongs until they are tender and marked.
Serving Suggestions
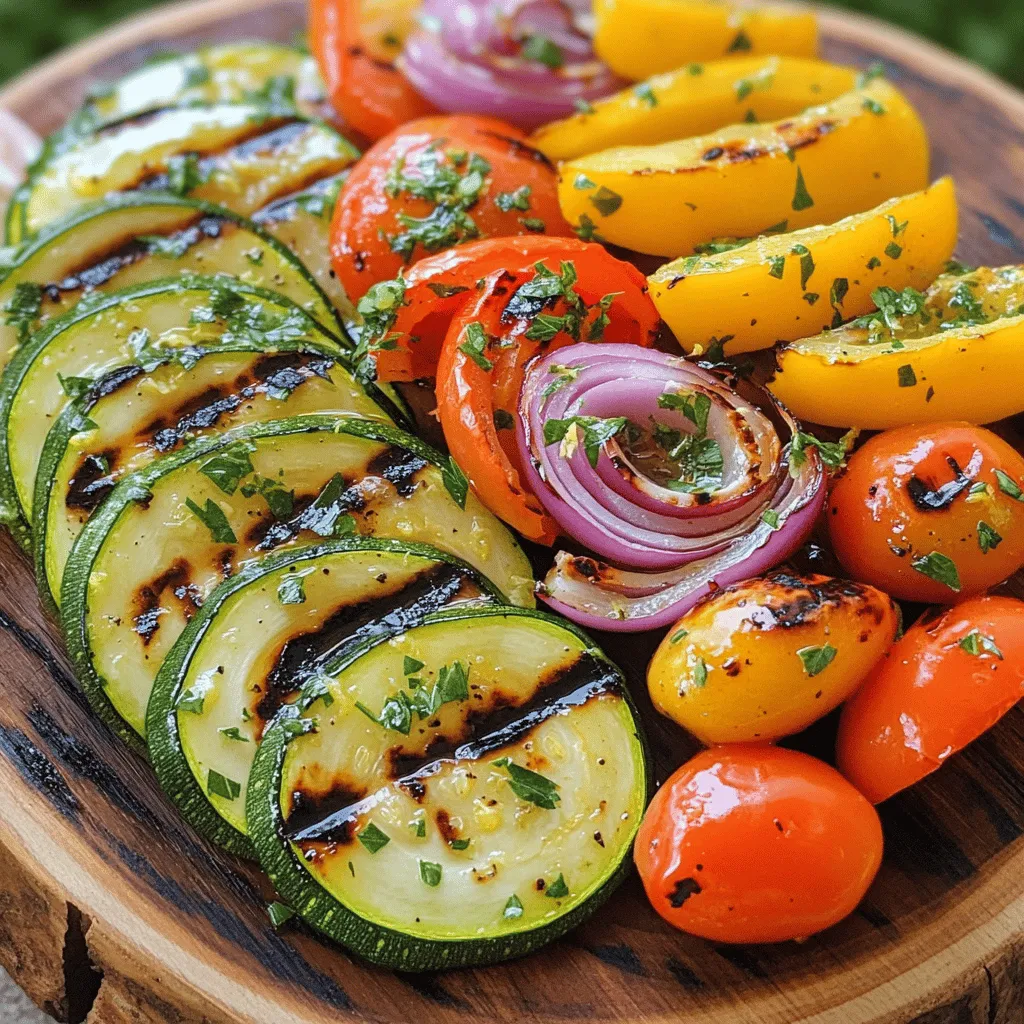
- After grilling, transfer the vegetables to a serving platter.
- Garnish with fresh parsley to add color and flavor.
- For an extra touch, serve with a lemon wedge on the side. This gives a nice option for guests to add more lemon juice if they like.
Tips & Tricks
Perfect Grilling Tips
To get the best results when grilling vegetables, follow these tips:
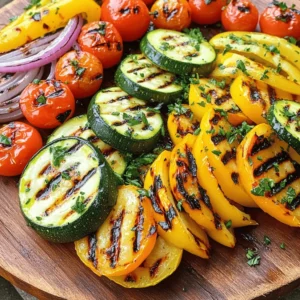
- Ensuring even cooking: Cut your vegetables into similar sizes. This way, they cook at the same rate. For example, slice zucchini into thick rounds and bell peppers into wide strips.
- How to tell when vegetables are ready: Look for nice grill marks and a tender texture. You can poke the veggies with a fork to check for doneness. They should be soft but not mushy.
Flavor Enhancement
To make your grilled vegetables burst with flavor, consider these ideas:
- Adding fresh herbs vs. dried herbs: Fresh herbs offer brighter flavors. Use fresh parsley or basil when serving. Dried herbs work well in the marinade but can be less intense.
- Suggested oils or seasoning alternatives: Extra virgin olive oil is great, but you can try avocado oil for a different taste. You can also add a splash of balsamic vinegar for a tangy twist.
Variations
Different Vegetable Options
You can change up the vegetables based on the season. Some great choices include:
- Asparagus
- Eggplant
- Mushrooms
- Carrots
If you have allergies or personal likes, feel free to swap veggies. For instance, if you can’t eat bell peppers, you can use snap peas or squash instead.
Flavor Profile Adjustments
Want to spice things up? Add a pinch of red pepper flakes for heat. You can also try different citrus flavors. Instead of lemon, use lime or orange for a fresh twist. These changes will keep your grilled vegetables exciting and new!Enjoy every bite!
Storage Info
Refrigeration Guidelines
To keep your lemon herb grilled vegetables fresh, store them in an airtight container. This method prevents moisture loss and keeps them tasty. They will stay fresh for up to three days in the fridge. Make sure to cool them down to room temperature before storing. This avoids condensation, which can make them soggy.
Reheating Suggestions
When it’s time to enjoy leftovers, avoid the microwave if you can. The microwave can make your veggies mushy. Instead, use the oven or stovetop. Heat them in a pan over medium heat for a few minutes. This keeps their texture and flavor intact. You can also add a splash of olive oil for extra taste.
For a creative spin, toss your reheated veggies into a salad or wrap them in a tortilla. They also work well as a side dish with grilled meats or pasta. Enjoying them this way brings new life to your meal!
FAQs
Common Questions
How long should I marinate the vegetables?
Marinate the vegetables for at least 30 minutes. This time helps them soak up the flavors. If you can, let them sit for an hour to enhance the taste even more.
Can I use frozen vegetables for this recipe?
You can use frozen vegetables, but fresh ones are best. Frozen veggies may lose some texture when grilled. If using frozen, thaw them first and pat them dry.
What can I serve with lemon herb grilled vegetables?
These grilled veggies pair well with many dishes. Serve them with grilled chicken, fish, or pasta. They can also be a great addition to salads or sandwiches.
Cooking and Grilling Questions
Can I roast vegetables instead of grilling?
Yes, roasting is a great option! Toss the marinated vegetables on a baking sheet and roast them at 425°F. This method gives a nice caramelization and depth of flavor.
What grill temperature is ideal for grilling vegetables?
Aim for medium-high heat, around 400°F to 450°F. This temperature ensures the vegetables cook through while achieving those lovely grill marks. Adjust the heat as needed to prevent burning.
This blog post covered how to make delicious lemon herb grilled vegetables. You learned about the ingredients, grilling steps, and storage tips. I shared how to select fresh veggies and enhance their flavor. Using these tips can help you create a tasty dish. Enjoy experimenting with different vegetables and spices! Now you can impress friends and family with your grilling skills. Keep these basics in mind, and you’ll master grilled veggies in no time. Dive into your next cooking adventure!


![- 1 lb Brussels sprouts, trimmed and halved - 3 tablespoons extra virgin olive oil - 2 tablespoons pure maple syrup - 1 tablespoon Dijon mustard - 1 teaspoon garlic powder - 1/4 cup chopped walnuts (optional for added crunch) - Fresh parsley, roughly chopped, for garnish (optional) - Salt - Freshly ground black pepper When making Maple Mustard Brussels Sprouts, the main ingredients are key to flavor. Brussels sprouts bring a nice crunch. Extra virgin olive oil adds richness, while pure maple syrup gives a sweet touch. Dijon mustard adds a tangy kick that ties it all together. You might want to add garlic powder for more flavor. If you like crunch, chopped walnuts work well. A sprinkle of fresh parsley adds color and freshness to the dish. For seasoning, salt and freshly ground black pepper enhance the taste. Be sure to adjust these to your liking. The balance of flavors makes this dish a standout! Check the [Full Recipe] for detailed steps to prepare these delightful sprouts. - Preheat your oven to 400°F (200°C). - Line a baking sheet with parchment paper. This makes cleanup easy. - In a bowl, combine olive oil, maple syrup, Dijon mustard, and garlic powder. - Season with salt and pepper. Whisk until smooth. - Add halved Brussels sprouts to the dressing. - Toss until evenly coated. Make sure every sprout gets some flavor. - Spread sprouts on the baking sheet in a single layer. - If you like, sprinkle with walnuts for crunch. - Roast for 25-30 minutes. Remember to stir halfway through for even cooking. - Check if the sprouts are fork-tender and caramelized. - Garnish with fresh parsley before serving. This adds color and freshness to your dish. For the complete recipe, check out the [Full Recipe]. To get that golden-brown color, you need to space the Brussels sprouts well on the baking sheet. If they are too close, they will steam instead of roast. Stir them halfway through cooking. This helps them cook evenly and get that nice caramelized look. You can add more flavor by mixing in balsamic vinegar for a tangy twist. This will balance the sweetness of the maple syrup. Also, try using herbs like thyme or rosemary. These herbs add a fresh taste that brightens the dish. Use a large mixing bowl when tossing your ingredients. This gives you enough space to coat the Brussels sprouts well. A high-quality baking sheet is key for even roasting. It helps them brown nicely without sticking. For the full recipe, check out the details above. {{image_4}} To make this dish vegan, swap out the Dijon mustard for a vegan option. There are many great choices available, like a chickpea or tahini-based mustard. These alternatives keep the flavor bold and rich, just like the traditional recipe. You won’t lose any taste while making it plant-based. If you need a nut-free dish, simply leave out the walnuts. The Brussels sprouts will still have a lovely texture and taste. The maple and mustard glaze adds all the flavor you want. You can enjoy this dish without any worries about allergies. For a heartier meal, consider adding protein. Roasted chickpeas or crispy tofu work great here. They pair perfectly with the sweet and tangy flavors of the Brussels sprouts. You can serve them together on the same plate for a filling and nutritious dish. This option makes it easy to create a balanced meal. For the full recipe, check out the details above! Store any leftover Maple Mustard Brussels Sprouts in an airtight container. They will stay fresh for up to 3 days. This keeps them safe and tasty for later meals. Just remember to let them cool down first before sealing them up. You can freeze roasted Brussels sprouts for up to 2 months. To do this, place them in a freezer-safe bag or container. Make sure to squeeze out as much air as possible. This helps prevent freezer burn and keeps their flavor intact. To enjoy your Brussels sprouts again, reheat them in the oven or on the stovetop. The oven gives them a nice crispy texture. If you choose the stovetop, keep the heat medium to avoid burning. Just warm them through until they are hot and ready to eat. For the full recipe, check out the [Full Recipe]. The ideal roasting time is 25-30 minutes. This time allows them to cook perfectly. You want them fork-tender and golden brown. Stir them halfway through to help them caramelize well. Yes, you can prep these sprouts a day ahead. Just mix the Brussels sprouts with the maple-mustard dressing and store them in the fridge. When you're ready to serve, simply roast them before your meal. This saves time and keeps flavors fresh. Pair them with proteins like chicken or fish. They also go great with grains like quinoa or rice. The sweet and tangy flavor of the sprouts complements many dishes well. Absolutely! Maple Mustard Brussels Sprouts store well in the fridge. You can enjoy them throughout the week. Just reheat them in the oven or on the stovetop for the best texture. For the full recipe, be sure to check the earlier sections. This blog post shared a simple and tasty recipe for Maple Mustard Brussels Sprouts. You learned about the main ingredients and optional add-ins. The step-by-step instructions ensure you roast them to perfection. I’ve also shared tips for flavor and storage, plus variations to suit your needs. These Brussels sprouts are easy to make and full of flavor. Try them with your favorite protein for a delicious meal! Enjoy experimenting with this recipe and make it your own.](https://dishtreats.com/wp-content/uploads/2025/06/4f608c6e-5907-49f6-a9cf-d865501fb0be-768x768.webp)
![To make creamy avocado toast, you need these fresh ingredients: - 4 ripe avocados - 8 slices of whole grain bread - 1 tablespoon fresh lemon juice - ½ teaspoon garlic powder - ½ teaspoon smoked paprika - Salt and black pepper, to taste - 1 cup cherry tomatoes, halved - Fresh basil leaves for garnish These ingredients come together to create a bright and tasty dish. The avocados provide creaminess, while the lemon juice adds a zing. Garlic powder and smoked paprika give the avocado spread a delicious depth. You can customize your toast with these optional toppings: - Crumbled feta cheese - Red chili flakes - A drizzle of balsamic glaze These extras let you explore different flavors. Feta adds a salty kick, while red chili flakes bring heat. Balsamic glaze offers a sweet contrast. Feel free to mix and match to suit your taste! Avocados are not just tasty; they also pack a punch in nutrition. They are rich in healthy fats, which can help lower bad cholesterol. They also contain fiber, which aids digestion. Plus, avocados are high in vitamins C, E, and K, supporting your immune system and skin health. Eating avocados promotes heart health and keeps you feeling full longer. This creamy avocado toast is not only a simple delight but a smart choice for your meals. For the full recipe, check out the detailed instructions! To make creamy avocado toast, start by toasting your bread. Use a toaster or a skillet. Aim for a golden brown color. This creates a firm base for your toppings. While the bread toasts, cut the ripe avocados in half. Remove the pits carefully. Use a spoon to scoop the soft flesh into a bowl. Next, add fresh lemon juice, garlic powder, smoked paprika, salt, and black pepper. Mix these into the avocado. Use a fork to mash it until creamy. It should still have some small chunks for texture. Taste it and adjust the seasoning if needed. Once the bread is ready, spread the avocado mix generously over each slice. Make sure to cover the bread completely. For the best toast, choose whole grain bread. It adds flavor and nutrition. Toasting in a skillet gives a nice crispness. Preheat the skillet over medium heat. Add a bit of olive oil for extra flavor. If using a toaster, toast twice for extra crunch. Keep an eye on the bread to avoid burning. Perfect toast should be firm and golden. To achieve the best creaminess, use ripe avocados. They should yield slightly when pressed. Start mashing with a fork in a bowl. Press down firmly to break it up. Mix in your other ingredients as you mash. This helps blend the flavors well. You want a creamy texture, but some chunks are great for bite. Don’t over-mash; keep it fun and textured. For the full recipe, you can check out the [Full Recipe]. When choosing avocados, look for ones that feel slightly soft when you gently squeeze them. A ripe avocado should give a little but not feel mushy. Check the skin color too; darker skin often means it's ripe. If you find hard avocados, leave them at room temperature for a few days to ripen. You can speed this up by placing them in a paper bag with a banana. If you have leftover avocado mixture, store it in an airtight container. To keep it fresh, add a layer of plastic wrap on top, pressing it directly against the surface. This prevents air from causing browning. You can also add a little extra lemon juice for added protection. Serve your creamy avocado toast with fresh toppings for added flavor and fun. Consider adding sliced radishes for crunch, or a poached egg for protein. You can also try smoked salmon or a sprinkle of nuts for extra texture. Customize each slice to create a unique bite every time. For the full recipe, check out the detailed steps and enjoy this simple dish! {{image_4}} Let’s get creative with your creamy avocado toast! You can mix and match toppings to make each bite special. Here are some ideas: - Crumbled feta cheese: This adds a salty kick. - Red chili flakes: For a spicy touch, sprinkle these on top. - Balsamic glaze: Drizzle it for a sweet and tangy flavor. - Radish slices: These add crunch and a peppery note. - Sliced boiled eggs: They provide extra protein and creaminess. You can change the whole vibe of your toast with different flavors. Here are some tasty combos: - Spicy: Mash in jalapeños or add hot sauce for heat. - Mediterranean: Mix in olives, sun-dried tomatoes, and a bit of oregano. - Mexican: Top with black beans, corn, and a squeeze of lime. - Asian: Add sesame seeds, soy sauce, and sliced green onions. Avocado toast is great for everyone! Here are some easy swaps: - Vegan bread: Choose gluten-free bread to keep it vegan and gluten-free. - Nutritional yeast: Use this instead of cheese for a cheesy flavor. - Chickpeas: Mash these into the avocado for added protein and flavor. - Hummus: Spread a layer of hummus under the avocado for extra creaminess. Feel free to explore these variations and make this dish your own. For the full recipe, check the recipe section above. If you have leftover toast, store it in an airtight container. This keeps it from getting soggy. You can also wrap it in foil or plastic wrap. Toast is best eaten fresh, but you can enjoy it later. Just reheat it in a toaster or oven to bring back its crunch. To keep avocados fresh, sprinkle lemon juice on the cut side. The acid slows browning. Cover the avocado tightly with plastic wrap. You can also store it in an airtight container. Place the pit back in the unused half to help it stay fresh longer. If you prepare avocado toast but can't eat it right away, store it carefully. Place the toast in a container with a lid. Avoid stacking to prevent sogginess. When ready to eat, reheat it for a few minutes in an oven. This brings back the crispy texture. For the best taste, enjoy it fresh if you can. Check out the Full Recipe for more tips! To make creamy avocado toast, you need ripe avocados, whole grain bread, and a few spices. Start by toasting the slices of bread until golden brown. Next, cut the avocados in half, remove the pits, and scoop the flesh into a bowl. Add lemon juice, garlic powder, smoked paprika, salt, and pepper. Mash the mixture until creamy but slightly chunky. Spread it on the toast, top with cherry tomatoes, and finish with fresh basil. For full details, check out the Full Recipe. Avocados are packed with good fats. They are rich in fiber, which helps digestion. They also contain vitamins like C, E, K, and B6. These nutrients support heart health and skin. Eating avocados can also boost your mood and give you energy. Plus, they can help lower cholesterol! You can prepare the avocado mixture ahead of time. Store it in an airtight container with lemon juice to prevent browning. However, I advise against toasting the bread too early. Toasted bread tastes best fresh and crunchy. Assemble your avocado toast right before serving for the best flavor and texture. Whole grain bread is my go-to choice. It adds a nice nutty flavor and fiber. Sourdough is also excellent for a tangy twist. Gluten-free bread works well too. Choose a bread that you enjoy, as it will make your toast even better! Creamy avocado toast is simple and delicious. You learned the key ingredients, from ripe avocados to tasty toppings. Following the steps ensures the perfect texture and creaminess. Remember to choose ripe avocados and store them right. You can explore unique flavor combos for a fun twist. This dish offers great health benefits and endless variations. Enjoy making this tasty treat!](https://dishtreats.com/wp-content/uploads/2025/06/dc41bef5-23d5-41ad-b579-59fa0f16c9c9-768x768.webp)