Cheesy Spinach and Artichoke Dip Delicious Party Snack

Looking for the perfect party snack? My Cheesy Spinach and Artichoke Dip is a crowd-pleaser that’ll make your next gathering unforgettable! Packed with creamy goodness and vibrant veggies, this dip brings flavor to every bite. Whether you dip tortilla chips, baguette slices, or fresh veggies, you’ll satisfy every palate. Ready to impress your guests? Let’s whip up this tasty treat together!
Ingredients
List of Main Ingredients
To make a great cheesy spinach and artichoke dip, here are the key ingredients you need:
- 1 cup fresh spinach, finely chopped
- 1 cup canned artichoke hearts, thoroughly drained and roughly chopped
- 1 cup cream cheese, brought to room temperature
- 1/2 cup sour cream, at room temperature
- 1 cup shredded mozzarella cheese
- 1/2 cup freshly grated Parmesan cheese
- 1 garlic clove, finely minced
- 1 teaspoon fresh lemon juice
- 1/2 teaspoon crushed red pepper flakes (optional for a hint of heat)
- Salt and pepper to taste
These ingredients blend together to create a creamy and cheesy dip that’s perfect for any gathering.
Common Substitutions
If you want to switch things up, here are some good alternatives:
- Instead of cream cheese, you can try using Greek yogurt or ricotta cheese for a lighter twist.
- For sour cream, low-fat plain yogurt works well, giving a similar taste while cutting calories.
- If you’re dairy-free, look for plant-based cream cheese or cheese shreds made from nuts or soy.
These substitutions allow you to tailor the dip to fit your taste and dietary needs.
Recommended Serving Suggestions
To enjoy this dip, here are some tasty options for serving:
- Serve it with crispy tortilla chips for a classic crunch.
- Toasted baguette slices make for a delicious and elegant option.
- Fresh vegetable sticks like carrots, bell peppers, and celery add a healthy touch.
These dippers not only enhance the flavor but also make your serving platter look great.
Step-by-Step Instructions
Preparation of Ingredients
First, prepare your spinach and artichokes. Use fresh spinach for the best taste. Wash it well, then chop it finely. For canned artichokes, drain them and chop them into small pieces. This helps them mix well in the dip.
Next, soften the cream cheese. Take it out of the fridge at least 30 minutes before you start. This makes mixing much easier. You want it smooth and creamy for the best texture.
Mixing the Ingredients
Now, let’s mix the ingredients. In a medium-sized bowl, combine the softened cream cheese, sour cream, shredded mozzarella cheese, and grated Parmesan cheese. Use a spatula or hand mixer to blend these until smooth. Make sure there are no lumps; a smooth dip is key.
After that, fold in the chopped spinach, artichokes, minced garlic, lemon juice, and optional crushed red pepper flakes. Mixing these in well is important for even flavor throughout.
Season the mixture with salt and pepper to taste. Taste as you go to get it just right.
Baking Process
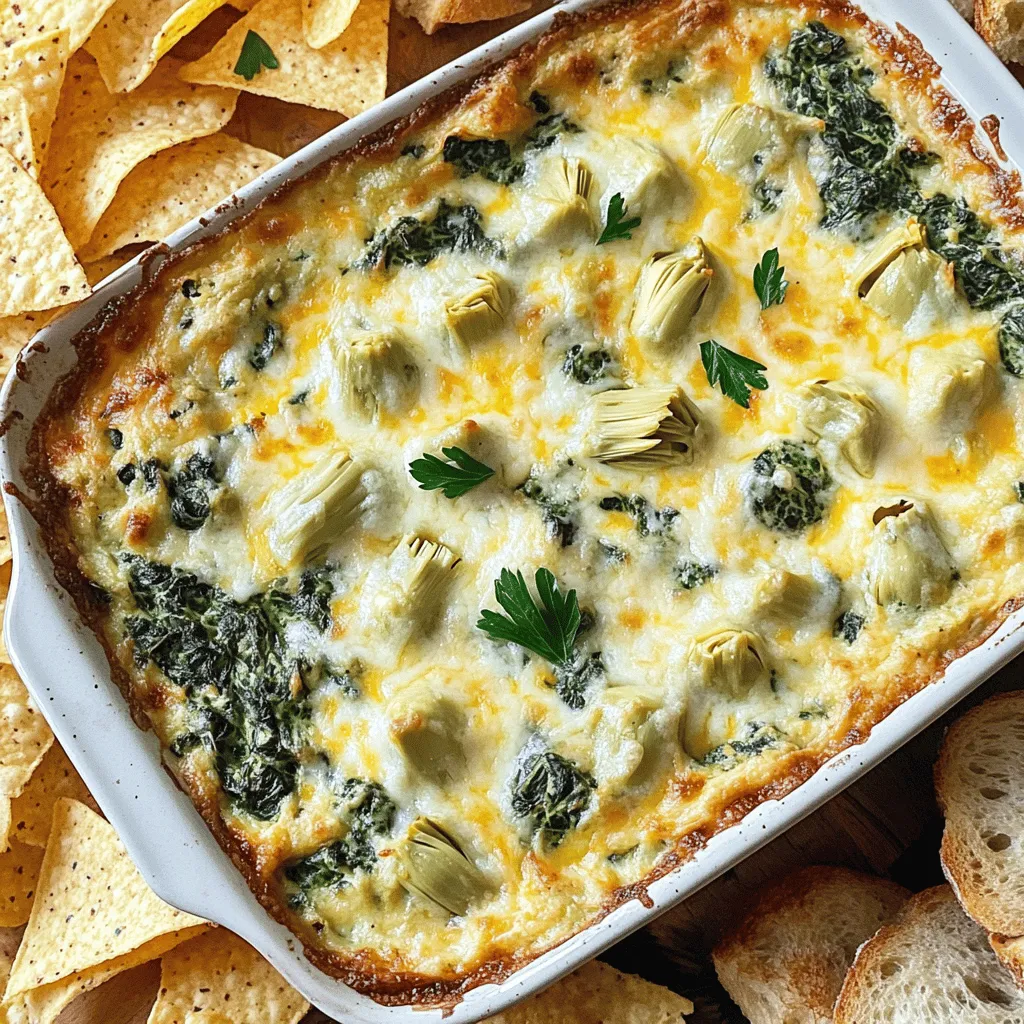
Now, set your oven temperature to 350°F (175°C) and let it preheat. Once it’s hot, spoon the creamy mixture into a baking dish. Spread it evenly for even cooking.
Bake the dip for 25-30 minutes. Keep an eye on it. You’ll know it’s done when it’s bubbly and the top turns a light golden brown.
After baking, carefully remove the dish from the oven. Let it cool for a few minutes before serving. This dip pairs perfectly with tortilla chips or toasted baguette slices.
Tips & Tricks
Perfecting the Dip
To make a smooth dip, avoid lumps in the mixture. Start with softened cream cheese. Beat it well before adding the other ingredients. Use a spatula or mixer to blend until creamy. This helps ensure a nice texture.
For a golden top, bake at 350°F (175°C) for 25-30 minutes. Keep an eye on the dip. It should bubble and turn light brown. If the top is not golden, broil it for a minute or two. Just watch it closely to avoid burning.
Enhancing Flavor
Spices and herbs can boost the flavor of your dip. I love adding garlic and fresh lemon juice. They add zest and brightness. You can also use dried herbs like oregano or thyme for extra taste.
For a creamier texture, mix in more sour cream or cream cheese. This makes it rich and smooth. Some like to add a splash of cream or a bit of mayonnaise. This can also help if the dip feels too thick.
Serving Suggestions
Serve this dip warm for the best taste. It’s creamy and gooey when hot. You can make it ahead and reheat it before serving.
For plating ideas, use a shallow dish. Spread the dip evenly. Surround it with tortilla chips or toasted baguette slices. This makes it look inviting and fun. You can also sprinkle fresh parsley on top for a pop of color.
Variations
Flavor Enhancements
You can make cheesy spinach and artichoke dip even tastier. Adding cooked bacon or sausage brings a savory twist. Just chop them finely and mix them in. It adds a nice crunch and depth of flavor. You can also try using different cheeses. Swap mozzarella for gouda or add cheddar for a sharp kick. Mixing cheeses gives the dip a rich, gooey texture.
Dietary Adjustments
If you’re looking for a vegan option, use cashew cream instead of dairy. Blend soaked cashews with nutritional yeast for a cheesy taste. You can also use vegan cream cheese. For gluten-free options, serve the dip with fresh vegetable sticks or gluten-free chips. This makes it perfect for everyone at your gathering.
Regional Influences
You can add a fun twist by mixing in Mediterranean flavors. Try adding sun-dried tomatoes or kalamata olives. This gives the dip a bright, tangy taste. For a Southwest spin, include jalapeños for some heat. Just chop them finely and fold them in. It adds a spicy kick that many will love.
Storage Info
Proper Storage Techniques
After making your cheesy spinach and artichoke dip, you might have leftovers. Store them in the fridge to keep them fresh. Use airtight containers to avoid any unwanted odors. Glass containers work great since they do not stain or hold smells. Make sure to seal the lid tightly to keep moisture in.
Reheating Instructions
When it’s time to enjoy your dip again, reheating is simple. To keep it creamy, use the oven if you can. Preheat it to 350°F (175°C). Place the dip in an oven-safe dish and cover it with foil. This prevents it from drying out. Heat for about 15-20 minutes or until hot. You can also use the microwave. Just heat it in short bursts to avoid overcooking. Stir in between to keep it smooth.
Freezing Tips
If you want to freeze the dip, it’s easy! First, let it cool completely. Then, put it in a freezer-safe container. Make sure to leave some space at the top for expansion. Seal it well and label it with the date. To thaw, move it to the fridge for a few hours or overnight. Reheat it using the same methods mentioned above. Enjoy your cheesy spinach and artichoke dip anytime with these simple storage tips!
FAQs
How long does Cheesy Spinach and Artichoke Dip last in the fridge?
Cheesy Spinach and Artichoke Dip lasts about 3 to 5 days in the fridge. Make sure to store it in an airtight container. This keeps the dip fresh and tasty for your next snack. If you find leftovers, check for any off smells or changes in texture before eating.
Can I make Cheesy Spinach and Artichoke Dip in advance?
Yes, you can make this dip in advance. Prepare the dip up to the baking step. Then, cover and chill it in the fridge. When you’re ready to serve, just bake it until bubbly. This method saves time and keeps your party stress-free.
What can I serve with Cheesy Spinach and Artichoke Dip?
I love serving this dip with tortilla chips or toasted baguette slices. Both options add a nice crunch. You can also try fresh vegetable sticks like carrots or celery for a healthy touch. These pair well and create a fun snack spread.
Is it safe to freeze Cheesy Spinach and Artichoke Dip?
Yes, you can freeze the dip. Store it in a freezer-safe container. It stays good for up to 3 months. When ready to eat, thaw it overnight in the fridge. Then, reheat it in the oven for best results.
How can I make Cheesy Spinach and Artichoke Dip spicier?
To add some heat, mix in crushed red pepper flakes. You can also use diced jalapeños or hot sauce. Adjust the amount to fit your taste. A little spice can make this dip even more exciting and flavorful.
This article covered everything you need to create a delicious Cheesy Spinach and Artichoke Dip. You learned the main ingredients, substitutions, and serving ideas. I provided step-by-step instructions for prep, mixing, and baking.
Remember to explore variations to suit your taste and dietary needs. Proper storage and reheating tips will keep your dip fresh. Enjoy sharing it with friends and family at your next gathering!


![- 2 boneless, skinless chicken breasts, sliced into thin strips - 2 tablespoons honey - 4 cloves garlic, minced - 2 tablespoons low-sodium soy sauce - 1 tablespoon sesame oil - 1 red bell pepper, thinly sliced - 1 cup broccoli florets - 1 cup snap peas - 1 carrot, julienned - 2 tablespoons vegetable oil - Salt and pepper to taste I love using fresh chicken for this dish. It cooks well and tastes great. Honey adds a sweet touch, while garlic gives it a nice punch. You can pick any colorful veggies you like. I usually choose bell peppers, broccoli, and snap peas for their crunch. - Sesame seeds - Sliced green onions Garnishes make your meal pop! Sesame seeds add a nutty flavor. Green onions give a fresh, sharp taste. They make the dish look fancy, too. - Skillet or wok - Mixing bowl - Whisk A large skillet or wok is best for stir-frying. It helps cook everything quickly and evenly. You’ll also need a mixing bowl for the sauce. A whisk is handy to mix your sauce smoothly. For the full recipe and cooking instructions, check the [Full Recipe]. - How to prepare the sauce To make the sauce, grab a small mixing bowl. Add 2 tablespoons of honey and 4 minced garlic cloves. Pour in 2 tablespoons of low-sodium soy sauce and 1 tablespoon of sesame oil. Whisk these ingredients well until they blend smoothly. This sauce will be full of flavor! - How to season the chicken Take 2 sliced chicken breasts and place them in a bowl. Lightly sprinkle salt and pepper over the chicken. Toss it gently to coat every piece evenly. This step is key to making sure your chicken tastes great. - Cooking the chicken Heat a large skillet or wok over medium-high heat. Add 1 tablespoon of vegetable oil. Once the oil shimmers, add the seasoned chicken strips. Cook them for about 5-7 minutes. Look for a golden color and make sure they are cooked all the way through. Remove the chicken and set it aside on a plate. - Stir-frying the vegetables In the same skillet, add another tablespoon of vegetable oil. Throw in the sliced red bell pepper, 1 cup of broccoli florets, 1 cup of snap peas, and 1 julienned carrot. Stir-fry these vegetables for 3-4 minutes. You want them to stay vibrant and crisp-tender. - Combining and flavoring the dish Now, return the cooked chicken to the skillet. Pour the honey garlic sauce over everything. Stir it well to coat all the chicken and vegetables. Cook for an extra 2-3 minutes. This allows the sauce to thicken and stick to your meal. - How to garnish and serve Once done, take the skillet off the heat. Sprinkle sesame seeds and sliced green onions over the stir fry. This adds a nice crunch and fresh flavor. For an appealing look, serve it in shallow bowls on a bed of rice or noodles. Enjoy your tasty Honey Garlic Chicken Stir Fry! Check the Full Recipe for more details! For the best stir-fry, set your heat to medium-high. This helps to cook the chicken fast and keep it juicy. When cooking, work in batches if your pan is small. This way, the chicken won’t steam. To get crisp veggies, don’t overcrowd the pan. Just like the chicken, cook the veggies fast. Stir them often, about three to four minutes will do. Add some red pepper flakes for a spicy kick. You can also try fresh ginger for a nice zing. Balancing sweet and savory is key. If it’s too sweet, add a dash more soy sauce. Taste as you go to find the perfect mix. Serve your stir fry in shallow bowls. Place it on a bed of rice or noodles for a great look. Top with extra sesame seeds and sliced green onions. A lime wedge on the side adds color and flavor! {{image_4}} You can switch the chicken for other proteins. Tofu works great for a vegetarian dish. Just press and cube the tofu, then cook it like the chicken. Shrimp is another tasty option. It cooks fast and adds a nice flavor. Feel free to mix up the veggies. Bell peppers, zucchini, and green beans all taste amazing. Seasonal flavors add fun too! Use fresh corn in summer or squash in fall. These choices bring color and taste to your meal. You can change the sauce to fit your taste. If you want less sweetness, use less honey. To make it salty, add more soy sauce. Want some heat? Toss in red chili flakes or chopped peppers. This will spice up your stir fry and make it unique. To store your honey garlic chicken stir fry, cool it down first. Place the leftovers in an airtight container. This helps keep out air and moisture. I recommend using glass or BPA-free plastic containers. They are safe and durable. Make sure to refrigerate within two hours of cooking. This keeps the dish fresh and safe to eat. Yes, you can freeze honey garlic chicken stir fry! It freezes well and saves time for future meals. To freeze, use a freezer-safe container or a zip-top bag. Remove as much air as possible before sealing. For best results, eat it within three months. When you're ready to eat, thaw it in the fridge overnight. Reheat it in a skillet over medium heat until hot. This keeps the chicken and veggies tender. Leftovers will last about three to four days in the fridge. Always check for signs of spoilage before eating. If it smells off or has a strange color, it’s best to toss it. You'll want to avoid any food safety risks. Remember, good storage means enjoying your tasty meal later! To cut the sweetness, reduce the honey. Use one tablespoon instead of two. You can also add more soy sauce to balance the flavor. Adding a splash of rice vinegar or lime juice helps too. These add tang without making it too sweet. You can also use low-sugar honey or a sugar-free sweetener. Yes, you can prepare the chicken and veggies ahead of time. Slice the chicken and chop the vegetables. Store them in the fridge until you're ready to cook. You can also mix the sauce in advance. Just keep it in a sealed container. When you are ready to eat, cook it all together for a quick meal. Some good side dishes include: - Steamed rice - Fried rice - Noodles - Quinoa - A fresh green salad These sides add more texture and flavor to your meal. They also help soak up the tasty sauce. - Full Recipe: Detailed cooking instructions for easy reference. In this blog post, we explored the key ingredients and cooking steps for honey garlic chicken stir fry. We covered how to prepare the sauce, cook the chicken, and stir-fry the veggies. I shared useful tips on enhancing flavors and balancing taste. Plus, we discussed variations and storage methods for your leftovers. Cooking can be fun and rewarding. With these skills, you can create tasty meals. Enjoy trying new ingredients and discovering your favorites. Happy cooking!](https://dishtreats.com/wp-content/uploads/2025/07/ad7e2fa8-e610-4152-a96e-e496d4740468-768x768.webp)