
Chocolate Peanut Butter Energy Bars Packed with Flavor
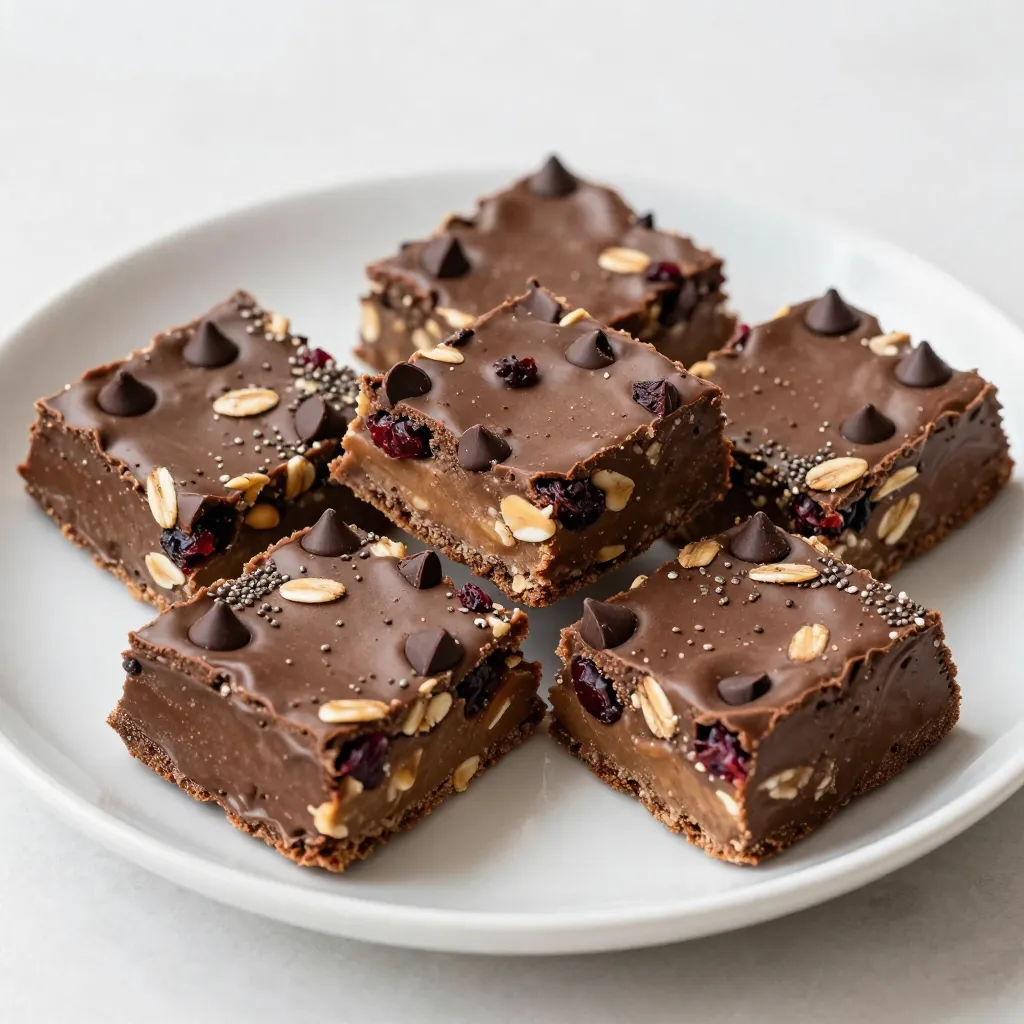

Looking for a delicious snack that gives you energy without the sugar crash? Let me introduce you to Chocolate Peanut Butter Energy Bars Packed with Flavor! These bars are easy to make, tasty, and packed with good ingredients. Perfect for busy days or a quick pick-me-up, they’re your new go-to treat. Let’s dive into the simple steps to create these delightful energy bars and keep your cravings in check!
Why I Love This Recipe
- Nutritious Energy Boost: These bars are packed with wholesome ingredients that provide sustained energy, making them perfect for a snack before or after workouts.
- Customizable Ingredients: You can easily adapt this recipe to your taste by swapping in different nuts, seeds, or dried fruits, ensuring it suits your preferences.
- Quick and Easy to Prepare: With just a few simple steps and minimal prep time, you can have delicious energy bars ready to go in no time.
- Perfect for Meal Prep: These energy bars store well in the fridge, making them an excellent option for meal prepping healthy snacks for the week ahead.
Ingredients
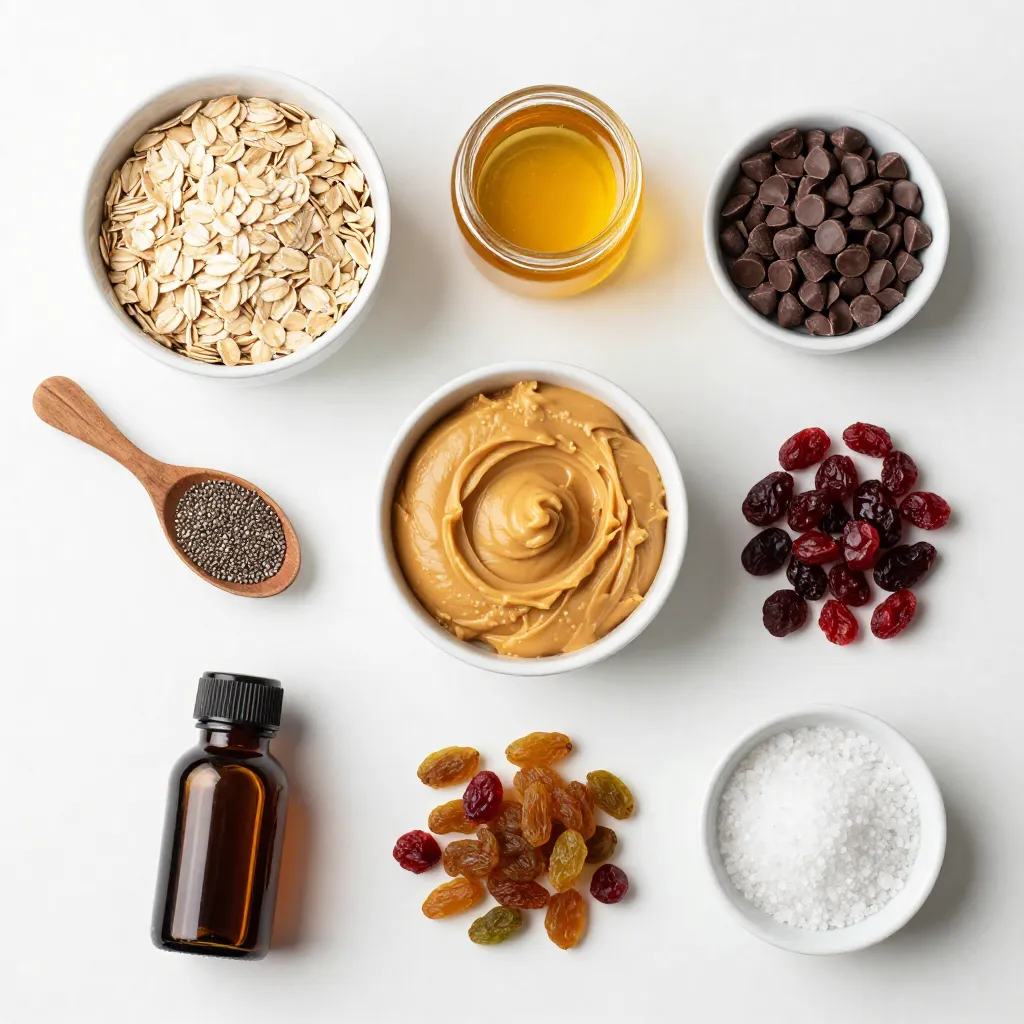
When making Chocolate Peanut Butter Energy Bars, you need simple and tasty ingredients. Here’s what you will need:
- 1 cup rolled oats
- ½ cup natural peanut butter (preferably creamy)
- ¼ cup honey or maple syrup
- ½ cup dark chocolate chips (or chopped dark chocolate)
- ¼ cup chia seeds
- ¼ cup dried cranberries or raisins
- 1 teaspoon vanilla extract
- A pinch of sea salt
These ingredients work together to create a bar full of flavor and energy. The rolled oats give the bars a nice chew. The natural peanut butter adds creaminess and protein. Honey or maple syrup adds sweetness, making it a treat. Dark chocolate chips bring rich chocolate flavor, which makes these bars hard to resist. Chia seeds add crunch and nutrients, while dried cranberries or raisins add a fruity touch. Vanilla extract enhances all the flavors. Lastly, the pinch of sea salt balances the sweetness perfectly.
Gather these ingredients before you start. You will love how easy it is to mix them into a delicious snack!
Step-by-Step Instructions
Preparation of Dry Ingredients
Start by grabbing a medium mixing bowl. Combine 1 cup of rolled oats, ¼ cup of chia seeds, and a pinch of sea salt. Mix them well. This blend gives your bars a nice texture and adds nutrients.
Making the Peanut Butter Mixture
Next, take a separate microwave-safe bowl. Add ½ cup of natural peanut butter, ¼ cup of honey (or maple syrup), and 1 teaspoon of vanilla extract. Heat this mix in the microwave for 15-20 seconds. Stir until it becomes smooth and creamy. This simple step makes the peanut butter easier to mix with the dry ingredients.
Combining Everything Together
Now, pour the warmed peanut butter mixture into the bowl with dry ingredients. Use a spatula to stir gently. You want to combine everything until it feels cohesive. Once mixed, fold in ½ cup of dark chocolate chips and ¼ cup of dried cranberries (or raisins). This adds a sweet touch and delicious flavor.
Pressing and Chilling
Prepare an 8×8-inch baking pan by lining it with parchment paper. Leave some paper hanging over the edges. This helps with easy removal later. Transfer the mixture into the pan. Use your hands or a spatula to press it down firmly. This helps the bars hold together well. Place the pan in the refrigerator for 1 hour.
Cutting and Serving
After chilling, lift the whole slab out of the pan using the parchment paper. Cut it into squares or rectangles. Enjoy your homemade Chocolate Peanut Butter Energy Bars! They’re great for a quick snack or a tasty treat.
Tips & Tricks
Perfecting the Texture
To make these bars great, compact the mixture well. This step is key. Firmly press the mix into the pan. A tight fit creates a sturdy bar that holds together well. You can adjust the sweetness using honey or maple syrup. If you want sweeter bars, add a bit more syrup. For less sweetness, reduce it a little.
Enhancing Flavor
You can add fun twists to these bars. Try mixing in nuts or seeds for extra crunch. Almonds, walnuts, or sunflower seeds work well. They add flavor and healthy fats. For drizzling, melt dark chocolate gently. Use a microwave or double boiler. Start with short bursts of heat. Stir often to avoid burning.
Presentation Tips
Serve your energy bars on a nice plate for a special touch. A rustic wooden board looks great. You can sprinkle chia seeds on top for a pop of color. A drizzle of melted chocolate also makes them appealing. These small details make your bars look as good as they taste!
Pro Tips
- Use Fresh Ingredients: Ensure that your oats, nuts, and dried fruits are fresh for the best flavor and texture in your energy bars.
- Experiment with Sweeteners: Feel free to substitute honey with agave syrup or date syrup for a different sweetness profile, especially for vegan options.
- Customize Your Add-ins: You can mix in other ingredients like shredded coconut, chopped nuts, or seeds to make these bars uniquely yours.
- Press Firmly: When packing the mixture into the baking pan, make sure to press it down firmly to avoid crumbly bars once cut.
Variations
Vegan Chocolate Peanut Butter Energy Bars
To make these bars vegan, use maple syrup instead of honey. Maple syrup adds a nice sweetness. It keeps the bars moist and tasty. You won’t miss the honey at all. Just swap it in the recipe where it says honey. The rest of the ingredients stay the same. You still get that rich chocolate and nut flavor. Plus, you can enjoy them without any animal products.
Protein-Packed Options
Want to boost the protein in your bars? Add protein powder or nut butters. You can mix in one scoop of your favorite protein powder. This is a great way to fuel up after a workout. If you prefer more nutty flavor, use almond or cashew butter. These will add creaminess and extra protein. Just remember to keep the total nut butter amount the same to maintain texture.
Flavor Combinations
Feel free to get creative with flavors! Different dried fruits and nuts can change your bars. Try using dried cherries, apricots, or even apples. Each fruit adds its own unique taste. You can also mix in nuts like walnuts or pecans for crunch. These additions make your bars more exciting and fun. Experiment with what you like best!
Storage Info
Best Practices for Storage
To keep your chocolate peanut butter energy bars fresh, store them in an airtight container. This helps prevent moisture from getting in and keeps the bars tasty. You can use glass or plastic containers with tight lids. For extra care, wrap each bar in plastic wrap before placing them in the container. This way, they stay separate and fresh longer.
Refrigerating your bars is also a great idea. The cool temperature helps them hold their shape and flavor. Just make sure they are in a sealed container to avoid any fridge odors.
Shelf Life of Energy Bars
These energy bars can stay fresh in the refrigerator for up to two weeks. After that, they may lose flavor or texture. If you notice any changes, it’s best to toss them. Always check for any signs of spoilage before enjoying them.
Freezing Options
If you want to store your energy bars for longer, freezing is a good option. To freeze, wrap each bar tightly in plastic wrap. Then, place them in a freezer bag or airtight container. Make sure to label the bag with the date.
You can freeze the bars for up to three months. When you’re ready to enjoy them, let the bars thaw in the fridge overnight. This keeps them from getting too mushy. Enjoy your delicious treat anytime!
FAQs
What is the nutritional value of Chocolate Peanut Butter Energy Bars?
These energy bars are a tasty snack. Each bar has about 150 calories. You get 5 grams of protein and 8 grams of sugar. The oats and chia seeds add fiber, which is great for digestion. The dark chocolate chips bring antioxidants, making it a smart treat!
How can I make these energy bars gluten-free?
To make these bars gluten-free, choose certified gluten-free oats. You can also use almond flour instead of oats for a different texture. Make sure your peanut butter and chocolate chips are gluten-free, too. This way, everyone can enjoy these delicious bars!
Can I use alternative sweeteners?
Yes, you can! Agave syrup and stevia are great options. If you want a lower-calorie choice, try stevia. If you like a milder flavor, agave syrup works well. Just remember to adjust the amount to taste, as they can be sweeter than honey.
What is the best way to cut the bars?
For clean cuts, use a sharp knife. Make sure the bars are cold before cutting. This helps them hold their shape. You can also wipe the knife with a damp cloth between cuts. This keeps the edges neat and prevents crumbling.
You now have a tasty recipe for Chocolate Peanut Butter Energy Bars. We covered the key ingredients needed, step-by-step instructions for making them, and helpful tips to enhance flavor and texture. Also included are variations, storage best practices, and answers to common questions.
These energy bars are easy to make and great for snacks. Enjoy crafting your own version to fit your tast

Chocolate Peanut Butter Energy Bars
Ingredients
- 1 cup rolled oats
- 0.5 cup natural peanut butter (preferably creamy)
- 0.25 cup honey or maple syrup (for a vegan option)
- 0.5 cup dark chocolate chips (or chopped dark chocolate)
- 0.25 cup chia seeds
- 0.25 cup dried cranberries or raisins (or a mix of both)
- 1 teaspoon vanilla extract
- a pinch sea salt
Instructions
- In a medium mixing bowl, thoroughly combine the rolled oats, chia seeds, and a pinch of sea salt, ensuring even distribution.
- In a separate microwave-safe bowl, mix the natural peanut butter, honey (or maple syrup), and vanilla extract. Heat in the microwave for 15-20 seconds until it softens. Stir until you achieve a smooth and creamy consistency.
- Gradually pour the warmed peanut butter mixture into the oat mixture. Use a spatula to stir until all ingredients are fully combined and the mix appears cohesive.
- Gently fold in the dark chocolate chips and dried cranberries (or raisins) until they are evenly distributed throughout the mixture.
- Prepare a square baking pan (approximately 8x8 inches) by lining it with parchment paper. Leave a bit of overhang on the edges to make removal easier later.
- Transfer the mixture into the lined baking pan. Using a spatula or your clean hands, firmly press the mixture into an even layer, ensuring it's compacted well for optimal bar texture.
- Place the pan in the refrigerator and chill for at least 1 hour to allow the bars to set properly.
- After they are set, lift the entire slab out of the pan using the parchment paper overhang. Cut into squares or rectangles, depending on your preferred serving size.
- Store any leftover bars in an airtight container in the refrigerator, where they will stay fresh for up to two weeks.

![To create this tasty dip, you will need key ingredients that bring out the fall flavors. Here’s what you’ll need: - 8 oz cream cheese, softened to room temperature - 1 cup pumpkin puree (not pumpkin pie filling) - 1/2 cup powdered sugar - 1 tablespoon packed brown sugar - 1 teaspoon pure vanilla extract - 1 teaspoon pumpkin pie spice (plus extra for garnish) - 1/2 teaspoon ground cinnamon - 1/2 cup whipped topping (such as Cool Whip) - Assorted dippers: graham crackers, fresh apple slices, or pretzels Using the correct measurements is vital for the best flavor and texture. Too much cream cheese can make the dip thick. Too little sugar can make it bland. I recommend sticking closely to these amounts. This balance creates a creamy dip that is not too sweet. When it comes to serving your dip, you need the right dippers. Here are my favorites: - Graham crackers give a nice crunch. - Fresh apple slices add a crisp and juicy touch. - Pretzels offer a salty contrast. Feel free to mix and match! These options will make your dip even more fun. For the full recipe, check the recipe section. Start by taking your softened cream cheese. Place it in a large mixing bowl. Use an electric mixer on medium speed. Beat the cream cheese until it is smooth. Make sure there are no lumps left. This step is key for a creamy dip. Next, add the pumpkin puree into the cream cheese. Mix it in well. Now, add the powdered sugar, brown sugar, and vanilla extract. Include the pumpkin pie spice and ground cinnamon. Continue mixing on low speed. Ensure everything is combined but still smooth. You want a uniform texture without any streaks. Take your whipped topping and gently fold it in. Use a spatula for this step. Be careful to keep the dip light and fluffy. Stop mixing as soon as the whipped topping is blended in. This lightness adds to the creamy texture of the dip. For the full recipe, you can refer back to the beginning. Enjoy your creamy pumpkin spice cheesecake dip! To boost the flavor of your Pumpkin Spice Cheesecake Dip, try adding a pinch of nutmeg. This spice adds depth and warmth. If you like it sweeter, add more powdered sugar or brown sugar. You can also swap in maple syrup for a rich twist. For a touch of tang, mix in a bit of cream cheese with a hint of lemon juice. Taste as you go for the best result. Serving your dip in a fun bowl can make it pop. Use a bright or themed bowl for special occasions. A light dusting of pumpkin pie spice on top looks nice and smells great. Arrange your dippers around the bowl for a colorful display. This not only makes it pretty but also invites guests to dig in. You can even use cookie cutters to shape apple slices for extra flair. Making this dip ahead of time is a smart move. Chill it for at least 30 minutes before serving. This helps the flavors mix well and taste better. You can prepare it a day in advance and keep it covered in the fridge. Just remember to add the whipped topping right before serving for that fluffy texture. For the full recipe, check out the details above. {{image_4}} You can make a lighter version of this dip. Use Greek yogurt instead of cream cheese. Greek yogurt adds protein and tang. It keeps the dip creamy and delicious. Just blend 1 cup of Greek yogurt with the other ingredients. This swap helps cut down on calories while keeping flavor intact. Want to try something different? You can change the flavor profile easily. Swap pumpkin puree for sweet potato puree. This gives a unique taste that is still rich. You can also add a splash of maple syrup for a sweet twist. Another fun option is to mix in some Nutella for a chocolatey delight. Use seasonal ingredients to enhance your dip. In fall, add a handful of chopped pecans or walnuts for crunch. In winter, try mixing in dried cranberries for a tart flavor. You can also sprinkle some fresh nutmeg on top for a fragrant touch. These seasonal additions make your dip even more inviting and festive. For the full recipe, check out the [Full Recipe]. To keep your pumpkin spice cheesecake dip fresh, store it in an airtight container. Make sure the lid is tight to prevent air from getting in. I recommend refrigerating it as soon as you're done serving. This dip stays creamy and flavorful when stored properly. You can freeze this dip, but keep in mind it may change texture. To freeze, place the dip in a freezer-safe container. Leave some space at the top for expansion. When you're ready to use it, let it thaw in the fridge overnight. Stir well before serving to help regain some creaminess. The dip lasts about 3 to 5 days in the fridge. Check for any off smells or changes in texture. If it looks or smells funny, it’s best to toss it. To enjoy its best flavor, eat it within the first couple of days. For full instructions, see the Full Recipe. Yes, you can use homemade pumpkin puree! It adds a fresh taste. To make it, roast a pumpkin until soft, then blend until smooth. Just ensure it is thick like store-bought puree. This helps your dip stay creamy. To cut the sweetness, reduce the powdered sugar. You can also add more cream cheese. Another option is to mix in a bit of plain yogurt. This gives a nice tang, balancing the sweet flavors. Taste as you go to find your perfect mix. Absolutely! If you want to make it dairy-free, try vegan cream cheese. For a lower sugar option, use a sugar substitute. If you need gluten-free dippers, serve with apple slices or gluten-free pretzels. Be creative and adapt the recipe to fit your needs! For the full recipe, check out the details above. This article explored how to make a delicious pumpkin spice cheesecake dip. We covered key ingredients, the steps for mixing and folding, and helpful tips for flavor enhancements. You learned about storage options and creative variations, like using Greek yogurt or seasonal ingredients. Remember, making this dip can be fun and easy. Use fresh ingredients for the best taste. Enjoy creating your own version, and don’t forget to share with friends!](https://dishtreats.com/wp-content/uploads/2025/07/05024715-abe0-47f7-b5fb-2040be13b0f2-768x768.webp)