Cinnamon Swirl Chocolate Chip Bread Easy and Tasty Treat
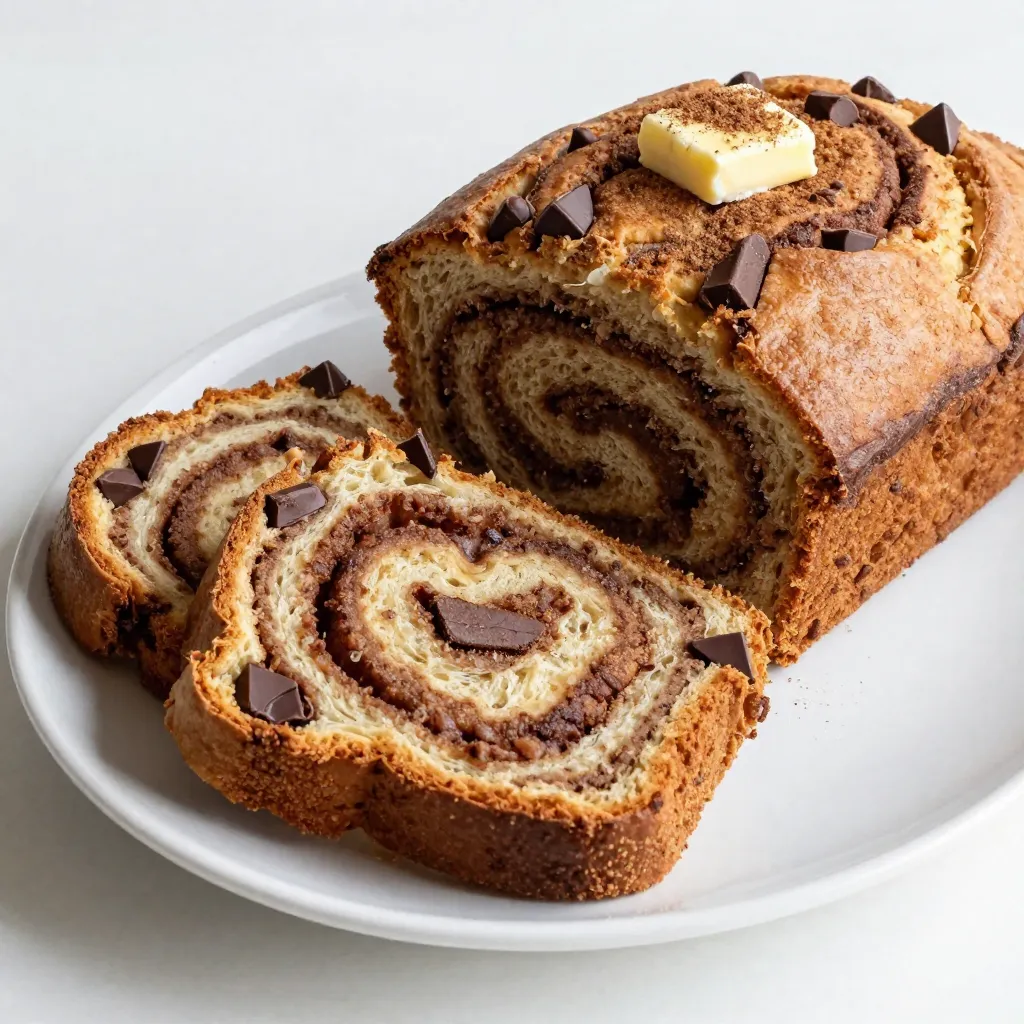

Cinnamon Swirl Chocolate Chip Bread is a delightful treat that’s easy to bake. Imagine biting into warm, fluffy bread swirled with cinnamon and chocolate. In this article, I’ll guide you through each step, from gathering ingredients to baking the perfect loaf. You’ll learn useful tips to make your baking experience smooth and fun. So grab your apron, and let’s create a sweet masterpiece together!
Why I Love This Recipe
- Delicious Combination: The rich chocolate chips paired with the warm cinnamon create a heavenly flavor that is perfect for any occasion.
- Easy to Make: With simple ingredients and straightforward steps, this recipe is accessible for bakers of all skill levels.
- Perfect for Sharing: This loaf makes about 10 slices, making it ideal for sharing with family and friends or for a cozy brunch.
- Versatile Enjoyment: Enjoy it warm, toasted, or even with a drizzle of glaze; this bread is delightful at any time of day.
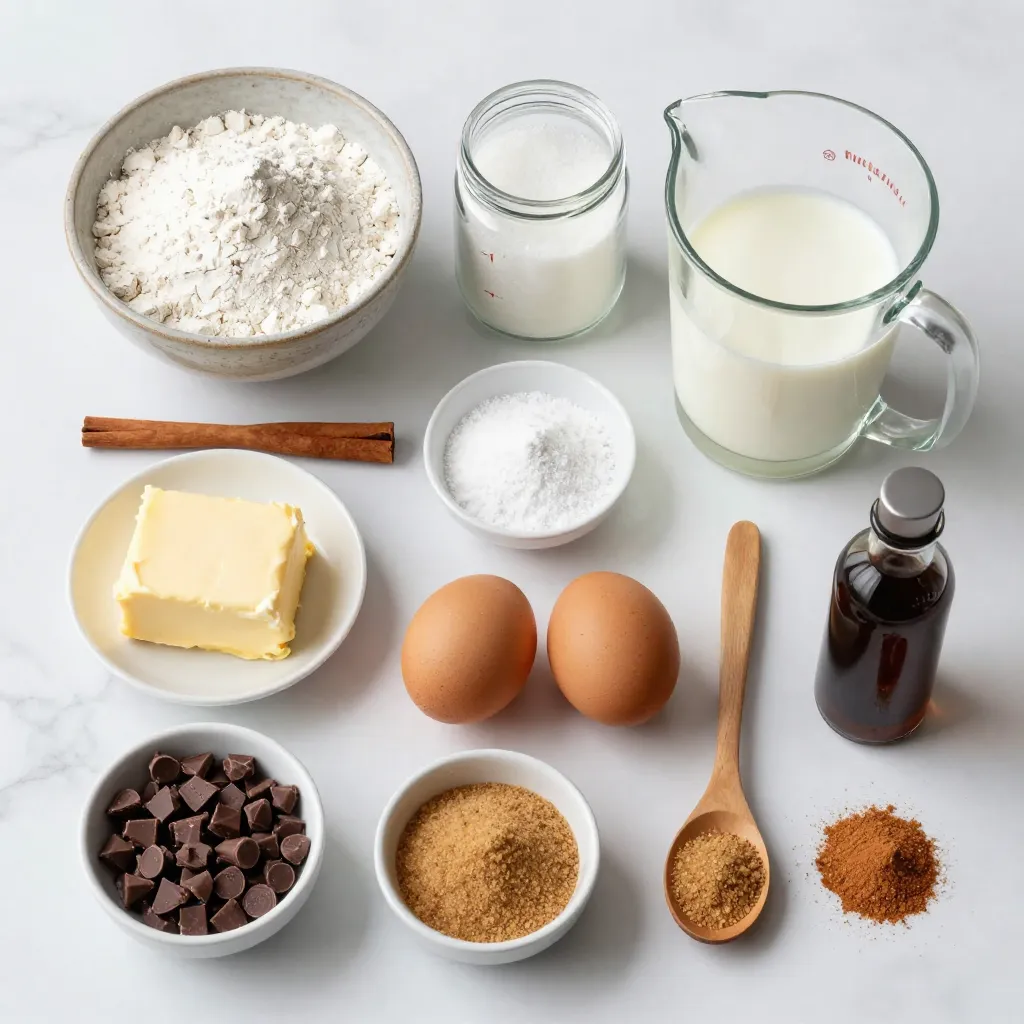
Ingredients
Dry Ingredients
- 2 cups all-purpose flour
- 1 cup granulated sugar
- 1 tablespoon baking powder
- 1/2 teaspoon salt
- 1 teaspoon ground cinnamon
Wet Ingredients
- 1/2 cup unsalted butter, softened
- 2 large eggs
- 1 cup buttermilk (or milk plus vinegar)
- 1 teaspoon pure vanilla extract
Additional Ingredients
- 1 cup semi-sweet chocolate chips
- 1/4 cup brown sugar (for the cinnamon swirl)
- 1 tablespoon ground cinnamon (for the cinnamon swirl)
Gathering the right ingredients is key to making the best cinnamon swirl chocolate chip bread. Start with the dry items. You’ll need all-purpose flour, granulated sugar, baking powder, salt, and ground cinnamon. Each of these adds flavor and texture to our bread.
Next, we focus on the wet ingredients. Use unsalted butter that’s soft. This helps it mix well. The two large eggs will help bind everything together. For moisture, we use buttermilk, but you can easily make your own with milk and vinegar. Lastly, add pure vanilla extract for a warm flavor boost.
Don’t forget the stars of our recipe—the chocolate chips! Semi-sweet ones give that perfect chocolatey taste. To create the cinnamon swirl, mix brown sugar and ground cinnamon. This mix will make each slice a delightful surprise. Each ingredient plays a role in creating a treat that’s both easy and tasty!
Step-by-Step Instructions
Prepping the Oven and Pan
1. Preheat your oven to 350°F (175°C). This step is key for even baking.
2. Grease a 9×5 inch loaf pan with butter or cooking spray. This helps the bread come out easily.
Mixing Ingredients
1. In a large bowl, add the dry ingredients:
- 2 cups all-purpose flour
- 1 cup granulated sugar
- 1 tablespoon baking powder
- 1/2 teaspoon salt
- 1 teaspoon ground cinnamon
Whisk together until mixed well. Set this bowl aside.
2. In a medium bowl, cream the softened butter and granulated sugar together. Use an electric mixer for 2-3 minutes. The mix should be light and fluffy.
3. Add 2 large eggs one at a time. Mix well after each egg. Then pour in 1 cup of buttermilk and 1 teaspoon of pure vanilla extract. Mix until smooth.
Final Preparations and Baking
1. Gradually add the dry mix to the wet mix. Stir gently with a spatula. Don’t over-mix! This keeps your bread tender.
2. Carefully fold in 1 cup of semi-sweet chocolate chips. Make sure they are evenly spread in the batter.
3. In a small bowl, mix together 1/4 cup of brown sugar and 1 tablespoon of ground cinnamon for the swirl.
4. Pour half of the batter into the greased loaf pan. Sprinkle half of the cinnamon-sugar mix on top.
5. Add the rest of the batter and top with the remaining cinnamon-sugar mix.
6. Use a butter knife or skewer to swirl the batter gently. You want to see nice cinnamon swirls, not a mixed-up batter.
7. Place the loaf pan in the oven. Bake for 50-60 minutes. A toothpick should come out clean or with a few crumbs.
8. When done, let the bread cool in the pan for about 10 minutes. Then, move it to a wire rack to cool completely before slicing.
Tips & Tricks
Achieving the Perfect Texture
To get the best texture, avoid over-mixing. Mixing too long can make the bread tough. Stir just until the flour blends with the wet mix. This keeps your bread light and soft.
If you don’t have buttermilk, don’t fret. You can mix 1 cup of milk with 1 tablespoon of vinegar. Let it sit for 5 minutes. This simple swap works great in recipes.
Enhancing Flavor and Presentation
You can change up the chocolate chips for fun. Try milk chocolate or even white chocolate. Each brings a unique taste to your bread.
For serving, slice your bread and arrange it on a pretty plate. You can drizzle melted chocolate on top. A sprinkle of cinnamon adds a nice touch too. Warm bread tastes amazing, especially toasted.
Baking Storage Tips
Cooling your bread properly is key. After baking, let it sit in the pan for about 10 minutes. Then, move it to a wire rack. This helps keep the bread from getting soggy.
To store your bread, wrap it in plastic wrap. It stays fresh on the counter for about 3 days. For longer storage, consider freezing it. Just slice it first for easy use later.
Pro Tips
- Use Room Temperature Ingredients: Ensure that your butter and eggs are at room temperature for better incorporation into the batter, resulting in a lighter texture.
- Don’t Over-Mix: When combining the wet and dry ingredients, mix just until combined to avoid a dense bread. A few lumps are okay!
- Chocolate Chip Choice: Feel free to mix chocolate chip varieties, such as milk chocolate or dark chocolate, to customize the flavor profile of your bread.
- Storing the Bread: This bread stays fresh for several days at room temperature or can be frozen for up to 3 months. Wrap it tightly to prevent freezer burn.
Variations
Ingredient Swaps
You can make small changes to this recipe to suit your taste.
- Using whole wheat flour: Swap half of the all-purpose flour for whole wheat flour. This adds fiber and a nutty flavor.
- Alternative sweeteners: Try using honey or maple syrup instead of granulated sugar. Adjust the liquid in the recipe slightly to balance it out.
Flavor Additions
Mix in fun flavors to make this bread your own.
- Nuts or fruit variations: You can add chopped walnuts or pecans for crunch. Dried fruits like raisins or cranberries also work well.
- Using dark chocolate chips: For a richer taste, swap semi-sweet chocolate chips for dark chocolate chips. It adds depth to the sweet flavor.
Seasonal Twists
Change the bread for special occasions and seasons.
- Pumpkin spice version: Add 1 cup of pumpkin puree and a teaspoon of pumpkin spice to the batter. This gives a cozy fall flavor.
- Festive holiday variations: For the holidays, mix in a teaspoon of orange zest or use peppermint extract. This will make your bread festive and fresh.
Storage Info
Short-term Storage
- Room temperature storage: Keep the bread in a cool, dry place. Use a breadbox or wrap it in plastic wrap. It stays fresh for about 3-4 days.
- Refrigerator storage: If you prefer, store the bread in the fridge. This can help it last a bit longer, about a week. Just wrap it well to avoid dryness.
Long-term Storage
- Freezing options: For longer storage, freeze the bread. Slice it first for easy access. Wrap each slice in plastic wrap, then place them in a freezer bag. It can last up to 3 months in the freezer.
- Thawing instructions: To thaw, take out a slice and leave it at room temperature for about 30 minutes. You can also use the microwave for a quick thaw. Heat for about 15-20 seconds.
Reheating Tips
- Best methods for reheating: Use the oven for the best taste. Preheat to 350°F (175°C). Place the bread in for about 10-15 minutes. This warms it nicely and keeps it soft.
- Re-crisping instructions: If the crust feels soft, you can re-crisp it. Use a toaster or a hot skillet for a few minutes. This adds a nice crunch to your bread.
FAQs
Common Questions
Can I make this recipe gluten-free?
Yes, you can! Use a gluten-free flour mix instead of all-purpose flour. Make sure it has a good binding agent, like xanthan gum. This change keeps the texture nice and moist.
How can I make it dairy-free?
To make this bread dairy-free, swap the buttermilk for a non-dairy milk. Almond milk or soy milk works well. Add a little vinegar like in the recipe. This gives the same tangy flavor.
What can I do if I don’t have buttermilk?
If you lack buttermilk, mix 1 cup of milk with 1 tablespoon of vinegar. Let it sit for 5 minutes. This creates a simple homemade buttermilk substitute.
Baking Queries
How do I know when the bread is done?
Check if it is done by inserting a toothpick into the center. If it comes out clean or with a few moist crumbs, it is ready. If not, bake for a few more minutes.
Can I make mini loaves instead?
Yes, you can! Just divide the batter into smaller pans. Check the baking time, as mini loaves take less time to bake. Start checking at 30 minutes.
What is the best way to store leftovers?
To store leftovers, wrap the bread tightly in plastic wrap. You can also use foil. Keep it at room temperature for a few days. For longer storage, freeze it.
Recipe Adjustments
How to increase or decrease servings?
To change servings, simply adjust the ingredients. If you want more bread, double the recipe. For less, halve it. Keep the ratios the same for best results.
Can I use a different pan size?
Yes, you can use a different pan size. Just keep in mind that baking times may vary. A smaller pan may bake faster, while a larger one may take longer.
This blog post covers everything you need to bake a delicious loaf of bread. We discussed the key ingredients and step-by-step instructions to guide your baking journey. You learned tips for texture and flavor enhancements and explored various ingredient swaps and seasonal twists.
With proper storage methods and answers to common questions, you now have the tools to succeed. Happy baking, and enjoy every bite of your homemade creatio
Cinnamon Swirl Chocolate Chip Bread
Ingredients
- 2 cups all-purpose flour
- 1 cup granulated sugar
- 1 tablespoon baking powder
- 0.5 teaspoon salt
- 1 teaspoon ground cinnamon
- 0.5 cup unsalted butter, softened to room temperature
- 2 large eggs
- 1 cup buttermilk (or substitute with 1 cup milk plus 1 tablespoon vinegar, allowing it to sit for 5 minutes)
- 1 teaspoon pure vanilla extract
- 1 cup semi-sweet chocolate chips
- 0.25 cup brown sugar (for the cinnamon swirl)
- 1 tablespoon ground cinnamon (for the cinnamon swirl)
Instructions
- Preheat the Oven: Begin by preheating your oven to 350°F (175°C). Grease a 9x5 inch loaf pan generously with butter or cooking spray.
- Combine Dry Ingredients: In a large mixing bowl, add the flour, granulated sugar, baking powder, salt, and 1 teaspoon of ground cinnamon. Whisk together until evenly combined and set aside.
- Cream Butter and Sugar: In a separate medium bowl, use an electric mixer to cream the softened butter and granulated sugar together until the mixture is light, fluffy, and pale in color. This should take about 2-3 minutes.
- Mix Wet Ingredients: Add the eggs one at a time, beating well after each addition to fully incorporate. Then, pour in the buttermilk and vanilla extract, mixing until everything is smooth and well combined.
- Combine Dry and Wet Mixtures: Gradually add the dry ingredient mixture to the wet ingredients, stirring gently with a spatula just until combined. Be cautious not to over-mix to maintain a tender bread.
- Add Chocolate Chips: Carefully fold in the semi-sweet chocolate chips, ensuring they are evenly distributed within the batter.
- Prepare Cinnamon Swirl Mixture: In a small bowl, mix together the brown sugar and 1 tablespoon of ground cinnamon until well blended.
- Layer the Batter: Pour half of the batter into the prepared loaf pan. Evenly sprinkle half of the cinnamon-sugar mixture over the top. Then, pour the remaining batter over the sprinkle layer, and finish off by topping with the rest of the cinnamon-sugar mixture.
- Create the Swirl: Using a butter knife or a skewer, gently swirl your batter within the loaf pan to create a beautiful marbled effect. Be careful not to over-mix; you want to see distinct cinnamon swirls throughout.
- Bake: Place the loaf pan in the preheated oven and bake for 50-60 minutes, or until a toothpick inserted into the center comes out clean or with just a few moist crumbs.
- Cool: Once baked, allow the bread to cool in the pan for about 10 minutes. After cooling slightly, transfer the bread to a wire rack to cool completely before slicing.

![To make your chocolate chip banana bread, you need these key ingredients: - 2 ripe bananas, thoroughly mashed - 1/3 cup coconut oil, melted - 1 teaspoon pure vanilla extract - 1/2 cup packed brown sugar - 1/4 cup granulated sugar - 2 large eggs at room temperature - 1 teaspoon baking soda - 1/4 teaspoon fine salt - 1 1/2 cups all-purpose flour - 1/2 cup semi-sweet or dark chocolate chips - 1/4 cup walnuts or pecans, chopped (optional) Each ingredient plays a vital role in crafting a moist and tasty loaf. Ripe bananas add sweetness and moisture. Coconut oil gives a rich flavor and a soft texture. The sugars create that perfect crust while the eggs help bind everything together. You can personalize your chocolate chip banana bread with fun add-ins. Here are some ideas: - Chopped nuts for crunch - Dried fruits like cranberries or raisins - A sprinkle of cinnamon for warmth - Peanut butter or nutella swirls for extra richness Feel free to mix and match! These add-ins can bring new flavors and textures to your bread. Using high-quality ingredients makes a big difference. Choose ripe bananas; they should be spotty and soft. Fresh eggs bring richness and flavor. Use pure vanilla extract for the best taste. For the oils, opt for organic coconut oil if possible. Quality flour helps create the right texture. Remember, great ingredients lead to great results! For the full recipe, check out the [Full Recipe]. Start by preheating your oven to 350°F (175°C). This step is crucial for even baking. Next, grab a 9x5 inch loaf pan. Lightly grease it with cooking spray or butter. You can also use parchment paper to line the pan. This makes removing the banana bread easier. In a large mixing bowl, take 2 ripe bananas and mash them well. You want them smooth with no lumps. Then, add 1/3 cup of melted coconut oil. Mix them together until they blend into a creamy base. This combination gives your bread moisture and flavor. Add 1 teaspoon of pure vanilla extract, 1/2 cup of packed brown sugar, and 1/4 cup of granulated sugar to the banana mix. Stir until it’s smooth. Now, crack in 2 large eggs. Mix well after each egg. Then, sprinkle 1 teaspoon of baking soda and 1/4 teaspoon of fine salt over the mix. Stir gently. Next, sift in 1 1/2 cups of all-purpose flour. Fold it in carefully. Don’t overmix; this keeps your loaf tender. Finally, gently fold in 1/2 cup of semi-sweet or dark chocolate chips. If you like, add 1/4 cup of chopped nuts too. Pour the batter into your prepared loaf pan. Smooth the top with a spatula. Place it in the oven and bake for 55-65 minutes. It’s done when a toothpick comes out clean or with a few crumbs. Let the bread cool in the pan for 10 minutes. Then, carefully move it to a wire rack to cool completely. This cooling step helps set the flavors. For the full recipe, refer to the section above. To get the best texture, use ripe bananas. The riper, the better! They must be soft and spotty. This way, you get a sweet and moist bread. Mash them well to avoid lumps. Mix ingredients gently after adding the flour. Over-mixing can make your bread tough. Aim for a light, fluffy loaf. Keep your banana bread fresh by wrapping it tightly. You can use plastic wrap or foil. Store it at room temperature for up to four days. If you want it to last longer, place it in the fridge for about a week. To keep it even longer, freeze it. Slice it before freezing for easy serving. Just make sure to wrap each slice well. Serve your chocolate chip banana bread warm. It tastes best right out of the oven! Add some butter on top for richness. You can also sprinkle powdered sugar for a sweet touch. For extra fun, top with fresh banana slices or more chocolate chips. This makes it look pretty and taste even better! For the complete recipe, check out the Full Recipe section in this article. {{image_4}} You can enjoy chocolate chip banana bread without gluten. Use a gluten-free flour blend. This blend works well as a one-to-one substitute. Make sure it has xanthan gum. This helps bind the ingredients. The flavor stays rich and delicious. Just follow the same steps as in the Full Recipe. You will love the texture and taste. For a vegan version, swap eggs for flax eggs. To make a flax egg, mix one tablespoon of flaxseed meal with three tablespoons of water. Let it sit for a few minutes to thicken. Use non-dairy milk and coconut oil as well. This keeps the bread moist and soft. You can still add chocolate chips, just choose dairy-free ones. You can add your favorite spices for extra flavor. Cinnamon and nutmeg pair well with bananas. A pinch of each can make a big difference. You can also try almond or coconut extract. These extracts add depth. Experiment to find your favorite combo. Each twist makes the bread unique and fun. To keep your chocolate chip banana bread fresh, store it at room temperature. Wrap it tightly in plastic wrap or foil. This helps keep moisture in. Place it in a cool, dry spot, away from direct sunlight. If you prefer, you can also use an airtight container. This will help maintain its soft texture and rich flavor. Freezing is a great option if you want to save some for later. First, let the banana bread cool completely. Then, wrap it tightly in plastic wrap, followed by aluminum foil. This extra layer prevents freezer burn. You can freeze it for up to three months. When you're ready to enjoy it, simply thaw it in the fridge overnight. Reheating banana bread can bring back its lovely warmth. You can use a toaster oven or a conventional oven. Preheat your oven to 350°F (175°C). Slice the bread and place it on a baking sheet. Heat for about 5-10 minutes. If you want a softer texture, cover it with foil. You can also pop a slice in the microwave for about 10-15 seconds. Enjoy it warm for a cozy treat! Your chocolate chip banana bread is done when a toothpick comes out clean. Insert it in the center. If it has a few crumbs, that is fine too. The bread usually bakes for 55-65 minutes. The top should look golden brown. Yes, you can substitute some ingredients. For example, use olive oil instead of coconut oil. You can also swap brown sugar for maple syrup. Make sure to adjust the amounts as needed for the best results. Chocolate chip banana bread lasts about 3-4 days at room temperature. Store it in an airtight container. For longer storage, keep it in the fridge for a week. You can also freeze it for up to 3 months. You can use applesauce or mashed bananas as egg substitutes. Use 1/4 cup of applesauce or 1/2 banana for each egg. Both options keep the bread moist and flavorful. This chocolate chip banana bread stands out because of its rich flavors. The combination of ripe bananas and chocolate chips creates a sweet treat. Using coconut oil adds a subtle depth to the taste. The option to add nuts gives extra texture. You can find the complete recipe in the Full Recipe section. This blog post covered how to make delicious chocolate chip banana bread. We discussed key ingredients, optional add-ins, and the importance of ingredient quality. I shared step-by-step instructions to guide you through the baking process. We explored tips for the perfect texture, storage methods, and fun variations like gluten-free and vegan options. With these insights, you can easily bake this treat and impress everyone. Enjoy your baking journey!](https://dishtreats.com/wp-content/uploads/2025/06/ff2d306f-7b8f-4bb2-a8a5-5e2882fba681-768x768.webp)
![To make these delightful cookies, you need a few key ingredients: - 1 cup ricotta cheese - 1/2 cup unsalted butter, softened - 1 cup granulated sugar - 1 large egg - 2 teaspoons fresh lemon zest - 2 tablespoons fresh lemon juice - 2 cups all-purpose flour - 1 teaspoon baking powder - 1/2 teaspoon baking soda - 1/4 teaspoon fine sea salt - Powdered sugar for dusting These ingredients create a soft and tasty cookie that bursts with lemon flavor. For this recipe, you will need: - A large mixing bowl - An electric mixer - A medium mixing bowl - Whisk - Baking sheet - Parchment paper - Cookie scoop or spoon - Wire rack Having the right tools makes baking easy and fun. You can easily swap some ingredients if needed: - Use low-fat ricotta for a lighter option. - Replace unsalted butter with coconut oil for a dairy-free cookie. - Substitute lemon with orange for a different flavor. - Use gluten-free flour to make these cookies gluten-free. These alternatives let you customize the recipe to fit your needs. For the full recipe, check the details provided above. First, heat your oven to 350°F (175°C). This step is key for baking. Next, line a baking sheet with parchment paper. This prevents the cookies from sticking. In a large bowl, mix the ricotta cheese and softened butter. Use an electric mixer on medium speed. Beat them for about 2-3 minutes. You want a smooth and creamy mix. This will be the base of your cookies. Now, it’s time to add the sugar. Gradually sprinkle in the granulated sugar, mixing as you go. Keep beating until it’s light and fluffy. Next, crack in the egg. Add the lemon zest and lemon juice. Mix until everything is well combined. In a separate bowl, whisk together the flour, baking powder, baking soda, and sea salt. Once mixed, add the dry ingredients to the ricotta mix. Stir gently until just combined. Be careful not to overmix. This helps keep the cookies soft. Use a spoon or cookie scoop to drop rounded tablespoons of dough onto the baking sheet. Leave about 2 inches of space between each cookie. This allows them to spread while baking. Place the sheet in the oven and bake for 12-15 minutes. Look for lightly golden edges and soft centers. After baking, let the cookies cool on the sheet for about 5 minutes. Then carefully transfer them to a wire rack. Let them cool completely. Once cooled, dust lightly with powdered sugar for a sweet touch. Enjoy these delightful lemon ricotta cookies! For the complete recipe, check out the [Full Recipe]. To make your lemon ricotta cookies soft, use fresh ricotta cheese. It adds moisture and flavor. Avoid overmixing the dough. Mix just until combined. This keeps the cookies light. Let the dough chill for about 30 minutes. Chilling helps the cookies hold their shape while baking. Accurate measurements are key to great cookies. Use dry measuring cups for flour and sugar. Spoon the flour into the cup, then level it off with a knife. Do not pack it down. For liquids, use a clear liquid measuring cup. Fill it to the desired line while checking at eye level. One common mistake is not preheating the oven. Always preheat to ensure even baking. Another mistake is baking on an ungreased or unlined pan. Use parchment paper to prevent sticking. Finally, don’t skip cooling the cookies on a wire rack. This helps them set and stay soft. For the full recipe, check out the step-by-step guide. {{image_4}} You can add chocolate chips for a sweet twist. Use semi-sweet or milk chocolate chips. Just fold in one cup of chips into the dough after mixing in the dry ingredients. This change creates a fun contrast with the lemon flavor. The rich chocolate and bright lemon make each bite exciting! To make these cookies gluten-free, swap the all-purpose flour with a gluten-free blend. Look for a blend that includes xanthan gum. This ingredient helps the cookies hold their shape. Follow the same recipe steps, and you will have delicious gluten-free cookies that everyone can enjoy. You can enhance the flavor by adding herbs or spices. Try mixing in a teaspoon of fresh thyme or rosemary for a unique taste. You could also use vanilla extract for warmth. These small changes can take your lemon ricotta cookies to a whole new level. Experiment with flavors and find what you like best! To keep your lemon ricotta cookies fresh, place them in an airtight container. This will help maintain their soft texture. I recommend layering the cookies with parchment paper. This way, they won’t stick together. Store the container at room temperature for up to five days. If you live in a humid area, consider refrigerating them. Just remember to bring them to room temperature before enjoying. If you want to save some cookies for later, freezing is a great option. First, let the cookies cool completely. Then, place them in a single layer on a baking sheet. Freeze for about an hour until firm. After that, transfer the cookies to a freezer-safe bag or container. Make sure to remove as much air as possible. You can freeze them for up to three months. When you’re ready to enjoy, thaw them in the fridge overnight. Lemon ricotta cookies are best enjoyed fresh, but they can last. If stored correctly, they stay soft for about five days at room temperature. Over time, they may become a bit dry. To refresh them, you can microwave a cookie for about 10 seconds. This will bring back some of the softness. Always check for any signs of spoilage before eating. If they smell off or look strange, it’s best to toss them. Enjoy your cookies! For the full recipe, refer to the main article. Yes, you can use pre-made ricotta cheese. Just make sure it is fresh and creamy. Store-bought ricotta saves time and still brings great taste. If it's a bit watery, drain it before use. This will keep your cookies from getting too soggy. To make these cookies dairy-free, replace ricotta cheese with tofu. Use firm tofu, blend it, and add a bit of lemon juice for flavor. For butter, try coconut oil or a dairy-free spread. These swaps keep the cookies soft and delicious without dairy. The best way to glaze these cookies is with a simple lemon glaze. Mix powdered sugar with fresh lemon juice until smooth. Drizzle the glaze over cooled cookies for a sweet finish. You can also add lemon zest on top for extra flavor. You will know the cookies are done when the edges turn golden. The centers should still look soft and puffy. A toothpick inserted in the center should come out clean or with a few crumbs. Avoid over-baking for the softest texture. Yes, you can make these cookies healthier. Use whole wheat flour instead of all-purpose flour. Replace granulated sugar with coconut sugar or a sugar substitute. You can also cut down on butter by using applesauce or Greek yogurt. These changes keep cookies tasty and lower in calories. For the full recipe, check the [Full Recipe]. In this post, we covered how to make lemon ricotta cookies step by step. We explored key ingredients, baking equipment, and helpful tips. I shared ways to customize the cookies with flavors and special diets. Finally, we discussed storage methods to keep them fresh. With these insights, you can bake delicious cookies that are soft and bright in flavor. Enjoy your baking experience and share these treats with friends!](https://dishtreats.com/wp-content/uploads/2025/07/5405bae2-00aa-4997-8585-ece8a42539ac-768x768.webp)