
Creamy Spinach Stuffed Salmon Flavorful Dinner Delight


Looking for a meal that impresses with minimal effort? This Creamy Spinach Stuffed Salmon is your answer. With just a few ingredients, you can create a flavorful dinner delight that’s both healthy and delicious. Imagine tender salmon fillets filled with a rich, creamy spinach mixture, baked to perfection. It’s easy, quick, and will leave everyone asking for seconds. Ready to elevate your dinner game? Let’s dive into this tasty recipe!
Why I Love This Recipe
- Delicious Flavor Combination: The creamy spinach filling complements the rich taste of salmon, creating a heavenly bite that is both satisfying and indulgent.
- Quick and Easy to Prepare: With just 15 minutes of prep time, this recipe is perfect for busy weeknights or impressing guests without spending hours in the kitchen.
- Nutritious Ingredients: This dish is packed with healthy omega-3 fatty acids from salmon and vitamins from fresh spinach, making it a wholesome choice for any meal.
- Beautiful Presentation: The vibrant green spinach filling and golden-brown crust make this dish visually appealing, perfect for serving at dinner parties or special occasions.
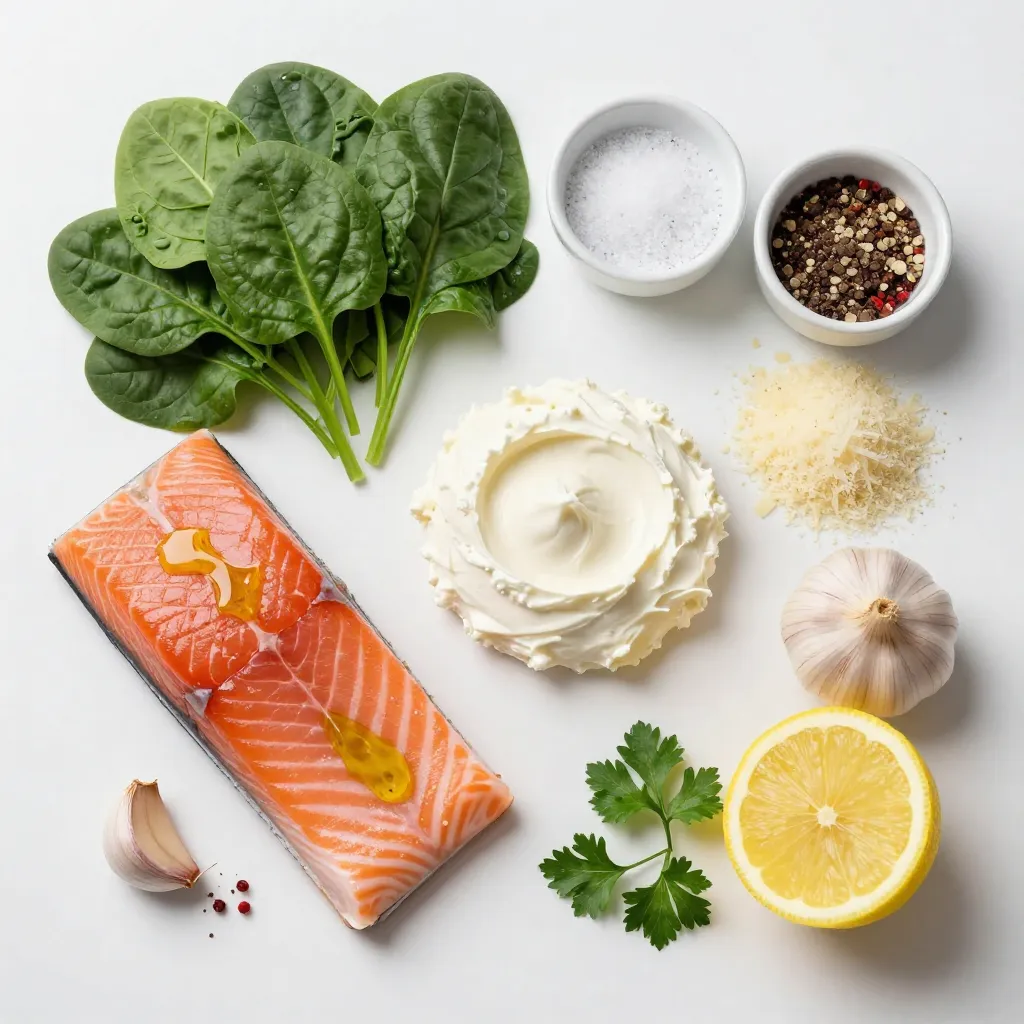
Ingredients
Main Ingredients
- 4 salmon fillets (6 oz each)
- 1 cup fresh spinach, finely chopped
- 1/2 cup cream cheese, softened
- 1/4 cup grated Parmesan cheese
Flavor Enhancers
- 1 clove garlic, minced
- 1 tablespoon fresh lemon juice
- 1/4 teaspoon red pepper flakes
Cooking Essentials
- Salt and freshly ground black pepper to taste
- 2 tablespoons olive oil
- 1 tablespoon fresh parsley, finely chopped (for garnish)
To make creamy spinach stuffed salmon, gather these ingredients. You need fresh salmon fillets that are thick enough to hold the filling. The spinach adds color and nutrition. Cream cheese gives that rich, creamy texture, while Parmesan adds a nice salty kick. Garlic brings in flavor, and lemon juice brightens everything up. Red pepper flakes give it a little heat, but you can adjust that to your taste.
Using salt and pepper helps enhance all the flavors. Olive oil keeps the salmon moist and adds depth. Finally, fresh parsley makes for a beautiful garnish. Once you have these ingredients, you’re ready to create a meal that’s not just tasty but also visually appealing.
Step-by-Step Instructions
Preparing the Filling
To make the filling, start by mixing the spinach, cream cheese, and spices. In a bowl, add 1 cup of finely chopped fresh spinach. Then, add 1/2 cup of softened cream cheese and 1/4 cup of grated Parmesan cheese. Next, add 1 minced garlic clove, 1 tablespoon of fresh lemon juice, and 1/4 teaspoon of red pepper flakes. Sprinkle in some salt and pepper to taste. Mix everything together until it is smooth and well combined. This will give your filling a rich and flavorful taste.
Preparing the Salmon
Now, let’s prepare the salmon. Take 4 salmon fillets, each weighing about 6 ounces. Use a sharp knife to create a pocket in the center of each fillet. Be careful not to cut all the way through; you want to keep the filling secure. Once you have the pockets ready, generously stuff each fillet with the creamy spinach mixture. Press the edges gently to keep the filling inside.
Cooking Process
Heat 2 tablespoons of olive oil in a skillet over medium heat. Meanwhile, lightly season the outside of the stuffed salmon fillets with salt and pepper. Place the fillets in the skillet and sear them for about 3-4 minutes on each side. Look for a golden brown crust. After searing, transfer the salmon to a baking dish lined with parchment paper. Bake in your preheated oven at 375°F for 12-15 minutes. The salmon is done when it is opaque and flakes easily with a fork. Let it rest for a couple of minutes before serving. This resting time enhances the flavors.
Tips & Tricks
Perfecting the Spinach Filling
To make the filling just right, adjust the seasonings to your taste. You might like more garlic or a pinch of salt. If you want a twist, try substituting the cream cheese or Parmesan with other cheeses. Goat cheese or ricotta can add a fun flavor.
Cooking Techniques
Keep your salmon moist by not overcooking it. Use a meat thermometer and aim for 145°F (63°C). Sear the salmon on medium heat. This helps create a nice, crispy exterior. Don’t rush this step; it adds great flavor and texture.
Presentation Ideas
Serve your salmon with a lemon wedge on the side. This adds a pop of color and freshness. For a fancy touch, sprinkle chopped parsley over the top. It makes the dish look great on the plate. A light drizzle of olive oil can also enhance the look and taste.
Pro Tips
- Choose Fresh Salmon: Opt for wild-caught salmon if available; it has a richer flavor and better texture than farmed salmon.
- Customize the Filling: Feel free to add in other ingredients like sun-dried tomatoes or artichokes to enhance the flavor of the spinach filling.
- Don’t Overcook: Keep an eye on the cooking time; salmon is perfectly cooked when it’s opaque and flakes easily with a fork.
- Rest Before Serving: Allow the salmon to rest for a few minutes after baking; this helps the juices redistribute for a moist and flavorful dish.
Variations
Ingredient Swaps
You can change fresh spinach for frozen spinach. Just make sure to thaw and drain it well. This swap saves time and adds convenience. You can also try different cheeses. Cream cheese and Parmesan work well, but mozzarella or feta can add a nice twist.
Flavor Additions
Get creative with your filling! You can add herbs like dill or basil for extra flavor. A pinch of nutmeg can also work wonders. If you want to try different seafood, consider using trout or halibut. Each fish brings its own taste and texture.
Dietary Modifications
If you need gluten-free options, ensure your ingredients meet this need. Use gluten-free breadcrumbs if you want to add a crunchy topping. For a lower-calorie choice, reduce the cream cheese or use a lighter version. You can also add more spinach to boost nutrition without adding many calories.
Storage Info
Refrigeration Suggestions
To keep your creamy spinach stuffed salmon fresh, store leftovers in an airtight container. Make sure to let the salmon cool before sealing it. This helps keep the moisture in. You can refrigerate it for up to three days. If you want to eat it later, follow the freezing guidelines below.
Reheating Instructions
When reheating, I recommend using the oven. Preheat your oven to 350°F (175°C). Place the salmon on a baking sheet. Cover it with foil to keep it moist. Heat for about 10-15 minutes or until it’s warm. You want to keep the flavors and moisture intact, so don’t rush this step.
Freezing Guidelines
Yes, you can freeze stuffed salmon! To prepare, wrap each stuffed fillet tightly in plastic wrap. Place them in a freezer-safe bag or container. Make sure to squeeze out as much air as possible. This prevents freezer burn. You can freeze it for up to three months. When ready to eat, thaw it in the fridge overnight before reheating.
FAQs
How long do I bake the stuffed salmon?
Bake the stuffed salmon for 12-15 minutes. The time depends on how thick your fillets are. Thicker fillets may need a bit longer. Always check if the salmon is opaque and flakes easily with a fork.
Can I use other types of fish for this recipe?
Yes, you can use other fish. Options like trout or tilapia work well. Both have a mild flavor that pairs nicely with the creamy spinach filling. Just adjust the cooking time based on the thickness of the fish you choose.
What side dishes pair well with Creamy Spinach Stuffed Salmon?
Several sides go great with this dish:
- Steamed asparagus
- Garlic mashed potatoes
- Quinoa salad
- Roasted vegetables
- Rice pilaf
These sides will enhance the meal experience and balance the salmon’s rich flavors.
You learned how to make Creamy Spinach Stuffed Salmon in this article. We covered each ingredient, from salmon to seasonings. You now know how to prepare, cook, and serve this dish. Don’t forget to try different flavors or cheeses to make it your own. Store leftovers properly to keep them fresh. Enjoy your cooking and impress your family with this tasty meal. Each bite will show your effort and skill. Trust me, they will love i

Creamy Spinach Stuffed Salmon
Ingredients
- 4 fillets salmon fillets (6 oz each)
- 1 cup fresh spinach, finely chopped
- 0.5 cup cream cheese, softened to room temperature
- 0.25 cup grated Parmesan cheese
- 1 clove garlic, minced
- 1 tablespoon fresh lemon juice
- 0.25 teaspoon red pepper flakes (adjust to taste)
- to taste Salt and freshly ground black pepper
- 2 tablespoons olive oil
- 1 tablespoon fresh parsley, finely chopped (for garnish)
Instructions
- Preheat your oven to 375°F (190°C). Prepare a baking dish by lining it with parchment paper for easy cleanup.
- In a mixing bowl, thoroughly combine the finely chopped spinach, softened cream cheese, grated Parmesan cheese, minced garlic, lemon juice, red pepper flakes, and a pinch of salt and pepper. Stir until the mixture is smooth and well blended.
- Carefully take each salmon fillet and, using a sharp knife, create a pocket in the center of the fillet. Make sure not to slice all the way through to keep the filling secure.
- Generously stuff each salmon fillet with the creamy spinach filling, gently pressing the edges to hold the mixture in place.
- In a skillet, heat the olive oil over medium heat. Lightly season the outside of each stuffed salmon fillet with salt and pepper to enhance flavors.
- Place the stuffed salmon fillets in the skillet and sear them for about 3-4 minutes on each side or until they develop a beautiful golden brown crust.
- Once seared, transfer the salmon to the prepared baking dish. Bake in the preheated oven for 12-15 minutes, or until the salmon is opaque and flakes easily with a fork.
- Upon removing from the oven, allow the salmon to rest for a couple of minutes to enhance the flavors.
- Just before serving, sprinkle the stuffed salmon with freshly chopped parsley for a vibrant touch.
![For a great eggplant and chickpea curry, you need some key ingredients. Here’s what you’ll need: - 1 large eggplant, diced into bite-sized cubes - 1 (15 oz) can of chickpeas, thoroughly drained and rinsed - 1 medium onion, finely chopped - 2 cloves garlic, minced - 1-inch piece of fresh ginger, grated These ingredients bring out the best flavors. The eggplant adds a rich texture. Chickpeas give protein and heartiness. Onions, garlic, and ginger provide a wonderful base. Spices make this dish pop with flavor. Here are the key spices you should have: - 2 tablespoons curry powder - 1 teaspoon turmeric powder - Salt and freshly cracked pepper, to taste Curry powder gives the dish its main flavor. Turmeric adds a warm color and depth. Always adjust salt and pepper based on your taste. Every curry needs a creamy base to bring it all together. Use these liquids: - 1 (14 oz) can of coconut milk - 1 cup diced tomatoes (can be fresh or canned) Coconut milk creates a rich and creamy sauce. Diced tomatoes add freshness and balance the spices. Together, they make the dish comforting and enjoyable. For the complete preparation, check out the Full Recipe. Start by heating olive oil in a large skillet over medium heat. Add the chopped onion. Sauté it until it turns soft and clear, about five minutes. Stir occasionally to prevent it from burning. Next, add the minced garlic and grated ginger. Cook this mix for one minute. You want it to smell good. Now, sprinkle in the curry powder and turmeric. Stir this for about 30 seconds. This toasts the spices and brings out their flavors. Time to add the star of the dish! Toss in the diced eggplant. Stir well to coat it with the spices. Let it cook for about five to seven minutes. Stir occasionally until it starts to soften. Next, add the diced tomatoes and coconut milk to the skillet. Gently mix in the chickpeas. Season with salt and pepper to your taste. Bring the curry to a gentle simmer. Cover the skillet and let it cook for 15 to 20 minutes. Stir it occasionally. This helps the eggplant become tender and the flavors meld together. Before serving, taste the curry. Adjust the seasoning as needed. You may want to add more salt, pepper, or spices. Let it rest for a few minutes after cooking. This helps the flavors develop more. Enjoy your flavorful and simple eggplant and chickpea curry! For the full recipe, check out the details above. To make your eggplant and chickpea curry stand out, focus on toasting spices. Toasting spices brings out their oils and deepens their flavor. Heat the spices for just a short time in the oil before adding other ingredients. This step is easy and makes a big difference. Cooking eggplant to perfection is also key. Eggplant can absorb a lot of oil, so don’t add too much at first. Cook it until it's tender but not mushy. This keeps the texture nice and adds depth to your dish. Pair this curry with rice or naan. Both options soak up the rich sauce well. Basmati rice adds a fluffy texture that contrasts nicely with the creamy curry. Warm naan bread is perfect for scooping up the curry. Garnish your dish with fresh cilantro. It adds a burst of color and brightness. Just sprinkle some on top before serving. This small step can elevate your dish's look and taste. One common mistake is overcooking the eggplant. It can turn mushy, losing its shape and texture. Keep an eye on it while it cooks, stirring occasionally. Another mistake is ignoring seasoning adjustments. Always taste your curry before serving. You might need to add more salt, pepper, or spices to get the flavor just right. Each ingredient plays a role, so this step is vital. For the full recipe, check the section above. {{image_4}} You can easily change the recipe by swapping legumes. Instead of chickpeas, try lentils or black beans. They bring unique textures and flavors. You can also mix them for a hearty dish. For vegetables, feel free to use zucchini, bell peppers, or spinach. Each adds a different taste and nutrition. Remember to adjust cooking times for firmer veggies like carrots. To change the spice level, add chili powder or fresh chilies. If you want it spicy, use one or two chopped green chilies. For a mild version, skip the heat or add a touch of sugar. This balances the spices and keeps it tasty. This dish is naturally vegan. You can enjoy rich flavors without any animal products. If you want a creamier texture, try a vegan yogurt option on top. For gluten-free diets, ensure your curry powder is free of gluten. Always check labels to be safe. Pair it with gluten-free rice or bread for a complete meal. If you want more details, check the Full Recipe. To keep your eggplant and chickpea curry fresh, let it cool. Place it in an airtight container. Refrigerate it within two hours of cooking. It stays good for about three to four days. If you want to enjoy it later, be sure to label the container with the date. You can freeze this curry for longer storage. Use a freezer-safe container or a heavy-duty freezer bag. Leave some space at the top, as it will expand when frozen. It’s best to freeze it within a day or two of cooking. The curry can last for up to three months in the freezer. When ready to enjoy, thaw it overnight in the fridge. Reheat your curry using the stovetop or microwave. For the stovetop, pour the curry into a pot on medium heat. Stir it often to avoid sticking. Heat until it is hot throughout, about 5-10 minutes. If using a microwave, place it in a microwave-safe bowl. Cover it loosely and heat in 1-minute bursts, stirring in between, until hot. Enjoy your meal quickly after reheating for the best taste. For the full recipe, check out the detailed steps to make this delicious dish. Making eggplant and chickpea curry takes about 35 minutes. You will need 10 minutes to prep and 25 minutes to cook. This makes it a great dish for a quick weeknight meal. You can use frozen eggplant, but fresh is best. Frozen eggplant may lose some texture. If using frozen, thaw it first and drain any excess moisture. This helps maintain the dish's taste and consistency. Serve this curry with cooked basmati rice or warm naan bread. Both options soak up the sauce well. You can also add a side of yogurt or a simple salad for freshness. Yes, this recipe is healthy. Eggplant is low in calories and high in fiber. Chickpeas provide protein and essential nutrients. Coconut milk adds healthy fats, making this dish both nutritious and satisfying. Yes, you can make this curry in a slow cooker. Start by sautéing the onion, garlic, and ginger in a pan. Then add all the ingredients to the slow cooker. Cook on low for 6-8 hours or high for 3-4 hours. Enjoy the rich flavors that develop over time. For the [Full Recipe], check the earlier sections. This blog post shared a simple recipe for eggplant and chickpea curry. You learned about key ingredients like eggplant, chickpeas, and spices. We walked through easy steps to cook and finish the dish. I offered tips for best flavor and common mistakes to avoid. You also found variations, storage tips, and answers to frequently asked questions. Enjoy your curry adventure, and feel free to tweak the recipe. Happy cooking!](https://dishtreats.com/wp-content/uploads/2025/06/d76b4beb-90df-44b1-93b9-0610964378a0-768x768.webp)

![- 1 cup frozen mixed berries (e.g., strawberries, blueberries, raspberries) - 1 ripe banana, peeled and sliced - 1/2 cup unsweetened almond milk (or preferred milk alternative) - 1 tablespoon chia seeds - Honey or maple syrup (to adjust sweetness) - Sliced fresh fruits (kiwi, strawberries) - Granola - Shredded coconut - Edible flowers for garnish For this berry smoothie bowl, I love using these main ingredients. The frozen mixed berries give a great flavor and color. The banana adds natural sweetness and creaminess. The almond milk brings it all together. If you want to boost nutrition, I suggest adding chia seeds. They are small but packed with nutrients. You can also add honey or maple syrup to sweeten your bowl. I often skip this step, as the fruits are sweet enough for me. Toppings are where you can really get creative. Fresh sliced fruits like kiwi or strawberries make it pop. Granola adds a nice crunch, while shredded coconut gives a fun texture. For a fancy touch, edible flowers look beautiful on top. Using this [Full Recipe], you can easily whip up a berry smoothie bowl that is both tasty and healthy. - Step 1: Combine ingredients in a blender. Add 1 cup of frozen mixed berries, 1 ripe banana, 1/2 cup of almond milk, and 1 tablespoon of chia seeds. This mix brings great taste and nutrition. - Step 2: Blend until smooth and creamy. Start on a low speed and then increase to high. Stop occasionally to scrape the sides. You want a thick, creamy blend. - Step 3: Adjust thickness with almond milk if needed. If it's too thick, add more almond milk slowly. Blend again until you reach your perfect texture. - Step 4: Pour smoothie into a bowl. Use a spoon to spread it evenly across the base. This makes a nice canvas for your toppings. - Step 5: Arrange toppings artistically. Layer your sliced fruits, sprinkle granola, and add shredded coconut. Be creative! Place a few edible flowers for a pop of color. - Step 6: Drizzle with honey or syrup if desired. This adds a lovely touch of sweetness. Enjoy every spoonful of your berry bliss smoothie bowl, a treat that's both refreshing and nutritious. For the full recipe, check out the Berry Bliss Smoothie Bowl. To make your smoothie bowl creamy, blend the ingredients well. Start with frozen mixed berries. They give a nice thick base. Add your ripe banana for extra creaminess. Blend on high speed. Stop to scrape down the sides with a spatula as needed. If the mix is too thick, slowly add almond milk. This helps you find your perfect texture. How you present your smoothie bowl matters. Use a wide, shallow bowl for a lovely look. Pour in your smoothie and spread it evenly. Get creative with toppings! You can layer sliced fruits in a fun pattern. Add granola for a nice crunch, and sprinkle shredded coconut on top. Edible flowers can make it pop. You can also serve it in a glass for a different vibe. Berries are packed with vitamins and antioxidants. They help keep your heart healthy and improve your skin. Chia seeds are tiny but mighty! They add fiber and omega-3 fatty acids. This helps with digestion and keeps you full. Both ingredients make your smoothie bowl tasty and good for you. Check out the Full Recipe for more delicious details. {{image_4}} You can switch up the berries for a fun twist. Try adding pineapple and mango for a tropical vibe. This mix adds sweetness and a bright flavor. You can also include spinach or kale. These greens boost the nutrition and keep the color vibrant. If you want a creamier texture, substitute almond milk with coconut milk. This adds a rich flavor and silkiness. Another great option is oat milk. It gives a smooth feel and works well with fruity flavors. For an extra layer of taste, add a splash of vanilla extract. This small change can make your bowl feel gourmet. You can also enhance it with nut butter. Almond or peanut butter gives a nutty taste and adds protein. Feel free to explore these variations to make your berry smoothie bowl your own. For the complete recipe, check out the full recipe. After enjoying your berry smoothie bowl, you might have leftovers. Store them in an airtight container in the fridge. Make sure to cover the bowl well. This keeps the smoothie fresh for up to 24 hours. To prevent browning, squeeze a little lemon juice on top. The acid helps keep the colors bright. You can freeze smoothie bowls for longer storage. Pour your extra smoothie into ice cube trays. Once frozen, transfer the cubes to a freezer bag. When you want to enjoy it again, just take out a few cubes. Let them thaw in the fridge overnight or blend them with a splash of milk for a quick treat. Preparing your smoothie ingredients ahead saves time. You can make smoothie packs by placing all the fruit in bags. Just add almond milk and blend when you’re ready. For batch-making, mix your berries and banana in a large bowl. Divide into smaller containers for easy access. This way, you can enjoy your berry bliss smoothie bowl anytime! For the full recipe, check out the Berry Bliss Smoothie Bowl section. To thicken your smoothie bowl, use frozen fruits. Frozen berries or bananas work best. You can also add less liquid. If you want more creaminess, add a scoop of Greek yogurt. Another trick is to use a small amount of oats or chia seeds. They absorb liquid and add thickness. Yes, you can use fresh fruits, but the texture changes. Fresh fruits make the smoothie thinner. Frozen fruits give a nice, thick texture. Plus, frozen fruits are often picked at peak ripeness. This means they can be sweeter and more flavorful. If you use fresh fruits, add ice to help thicken. For protein-rich toppings, try Greek yogurt or nut butter. You can also sprinkle on hemp seeds or chia seeds. Other great options include sliced almonds or granola with protein. These toppings not only add protein but also give extra flavor and crunch. To make your smoothie bowl vegan, swap dairy milk for almond milk or coconut milk. Use maple syrup instead of honey for sweetness. You can also add silken tofu for extra creaminess and protein. These swaps keep your smoothie bowl delicious and plant-based. Cleaning your blender is simple! Fill it halfway with warm water. Add a drop of dish soap. Blend for 30 seconds, then rinse. If there are tough spots, use a sponge to scrub them. Always unplug it before cleaning for safety. Regular cleaning keeps your blender fresh for every use. By blending frozen berries, banana, and almond milk, you craft a delicious smoothie bowl. Optional chia seeds add health benefits, while a mix of fresh toppings makes it visually appealing. Remember to adjust your blend for perfect creaminess and arrange your toppings artfully. In the end, a smoothie bowl offers both flavor and nutrition. Whether you add unique fruits or non-dairy milk, there are endless ways to make it your own. Enjoy the process and your tasty creation!](https://dishtreats.com/wp-content/uploads/2025/06/ca3318a7-4b20-4fec-bf86-7164735c42c6-768x768.webp)