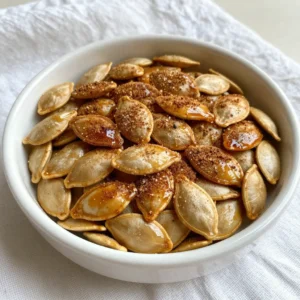
Cinnamon Sugar Pumpkin Seeds Crunchy and Flavorful Treat

If you’re looking for a crunchy and flavorful snack, look no further! Cinnamon Sugar Pumpkin Seeds are a delicious treat packed with warmth and sweetness. With just a few simple ingredients, you can make this delightful snack that’s perfect for sharing or enjoying solo. I’ll walk you through the easy steps to achieve that perfect crunch. Let’s dive into this tasty adventure!
Why I Love This Recipe
- Delicious Flavor: The combination of cinnamon and sugar creates a warm, comforting taste that perfectly complements the nutty pumpkin seeds.
- Simple Preparation: This recipe is easy to follow, making it perfect for both novice and experienced cooks looking for a quick snack.
- Healthy Snack Option: Pumpkin seeds are packed with nutrients, making this a guilt-free treat that you can enjoy anytime.
- Versatile Usage: These crispy pumpkin seeds can be enjoyed on their own, added to salads, or used as a topping for yogurt and desserts.
Ingredients
Main Ingredients
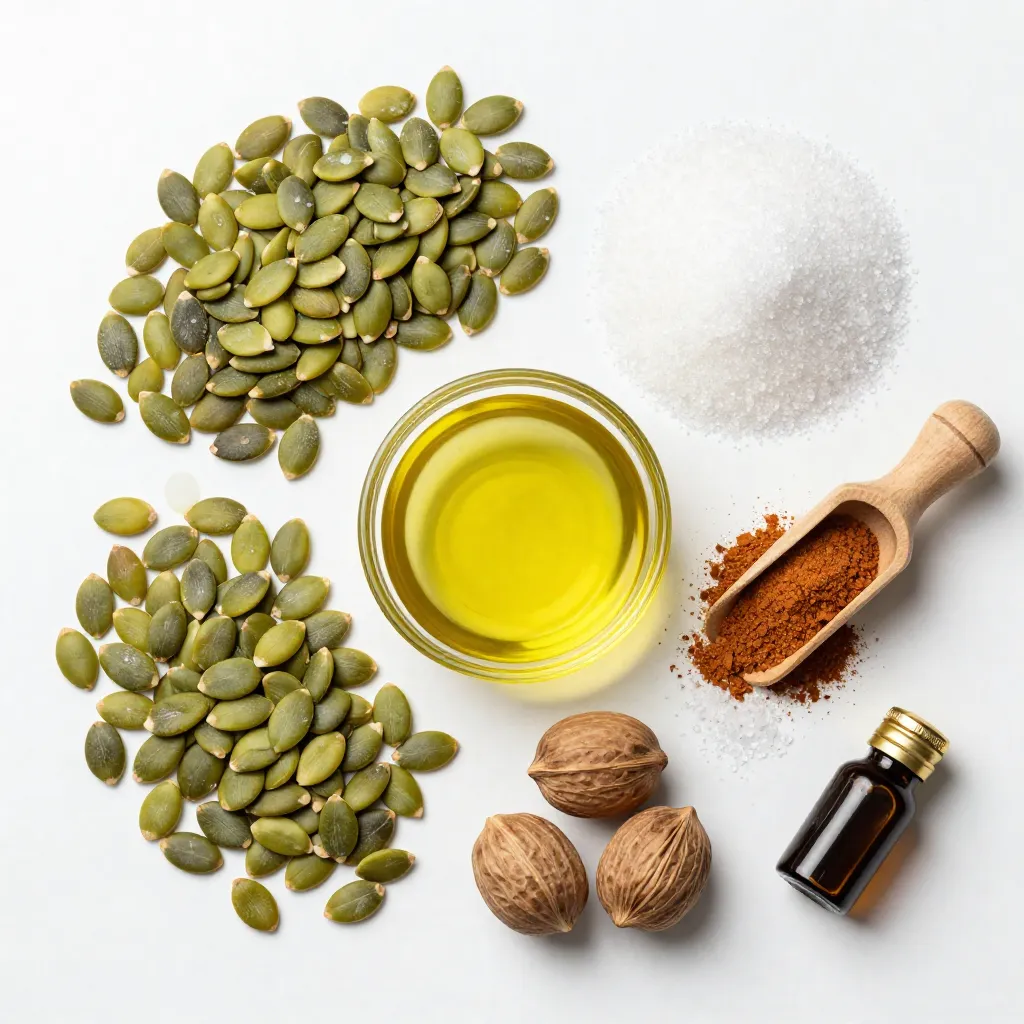
- 2 cups raw pumpkin seeds (pepitas)
- 2 tablespoons olive oil
- 1/2 cup granulated sugar
Optional Ingredients
- 1 tablespoon ground cinnamon
- 1/2 teaspoon salt
- 1/4 teaspoon nutmeg
- 1/4 teaspoon vanilla extract
Raw pumpkin seeds, or pepitas, are the star of this tasty treat. You will need two cups for this recipe. The olive oil helps the seeds crisp up nicely. You’ll add two tablespoons to coat them evenly.
Next, you’ll need granulated sugar, which gives the seeds their sweet flavor. Half a cup is perfect for balancing the spice.
If you want to kick it up a notch, consider adding ground cinnamon. One tablespoon offers a warm taste. A little salt, just half a teaspoon, helps enhance the sweetness. Nutmeg and vanilla extract are optional but great for extra flavor. Use a pinch of nutmeg and a splash of vanilla for a delightful twist.
These ingredients combine to create a crunchy and flavorful snack that is easy to make.
Step-by-Step Instructions
Preparation Steps
1. Preheat your oven to 350°F (175°C). This heat helps the seeds roast well.
2. Line a baking sheet with parchment paper. This step makes cleaning easy later.
3. Rinse 2 cups of raw pumpkin seeds under cold water. This removes bits of pumpkin.
4. Pat the seeds dry with a towel. Dry seeds roast better and get crunchier.
Mixing Ingredients
1. In a large mixing bowl, drizzle 2 tablespoons of olive oil over the dried seeds.
2. Toss the seeds until they are well coated in the oil. This keeps them crispy.
3. In another bowl, mix together 1/2 cup of granulated sugar, 1 tablespoon of cinnamon, and 1/2 teaspoon of salt.
4. If you like, add 1/4 teaspoon of nutmeg and vanilla extract for extra flavor.
5. Sprinkle the cinnamon-sugar mix evenly over the oil-coated seeds. Make sure every seed gets some!
Baking Instructions
1. Spread the seasoned pumpkin seeds in a single layer on the baking sheet. This helps them cook evenly.
2. Place the baking sheet in the preheated oven. Bake for 15-20 minutes.
3. Stir the seeds every 5 minutes to ensure they cook evenly. Look for a golden color.
4. Once baked, take the seeds out of the oven. Let them cool completely on the baking sheet. They will crisp up as they cool.
Tips & Tricks
Achieving the Perfect Crunch
To get that perfect crunch, start by drying the seeds well. After rinsing them, pat them dry with a towel. This step is key. If they are too wet, they won’t roast well.
While baking, stir the seeds every five minutes. This helps them cook evenly. You want them golden and crispy, not burnt on one side.
Serving Suggestions
For a fun presentation, serve your pumpkin seeds in a bright bowl or jar. They look great at parties and make a nice gift too.
You can pair these crunchy treats with other snacks. Try mixing them with popcorn or nuts for a tasty trail mix. They also add a fun crunch to salads or soups. Enjoy exploring different ways to serve them!
Pro Tips
- Dry Thoroughly: Ensure the pumpkin seeds are completely dry before roasting to achieve maximum crispiness.
- Watch the Oven: Keep an eye on the seeds while baking; they can go from golden to burnt quickly.
- Variation in Flavor: Experiment with different spices like cayenne pepper or cocoa powder for a unique twist.
- Storage Tips: Store cooled pumpkin seeds in an airtight container to maintain their crunch for longer.
Variations
Flavor Additions
Want to change things up? You can add spices to your cinnamon sugar pumpkin seeds. For a spicy kick, try cayenne or chili powder. Just a pinch will add warmth. If you like sweet, mix in extra spices like ginger or cloves. These spices will give your seeds a unique twist.
Alternative Uses
These pumpkin seeds are not just for snacking. You can add them to salads for a crunchy bite. They also work great in granola for added texture. Want to elevate your soups? Sprinkle them on top for a delightful crunch. You can even use them to top baked goods like muffins or breads. They add flavor and a fun crunch!
Storage Info
Proper Storage Methods
To keep your cinnamon sugar pumpkin seeds fresh, store them in airtight containers. Glass jars work great. If you don’t have those, use plastic bags with the air pressed out. This helps maintain their crunch and flavor.
For the best taste, eat them within two weeks. After that, they may lose their crispness. If you plan to keep them longer, consider freezing them. They can last up to three months in the freezer. Just remember to thaw them before enjoying!
Reheating Instructions
If your pumpkin seeds lose their crunch, don’t worry. You can easily reheat them to bring back that crispy texture. Preheat your oven to 350°F (175°C). Spread the seeds on a baking sheet in a single layer.
Heat them for about 5 to 10 minutes. Keep an eye on them to avoid burning. Once they are warm and crispy again, let them cool before serving. This method keeps them tasty and enjoyable!
FAQs
Can I use other seeds instead of pumpkin seeds?
Yes, you can use other seeds like sunflower or squash seeds. Just keep in mind that baking times may vary. Each seed has its own flavor and texture. So, test a small batch to find what you like best.
How do I make them less sweet?
To reduce sweetness, cut the sugar in half. You can also add more salt or spices. This balance can make the seeds taste more savory and less sugary.
What are the health benefits of pumpkin seeds?
Pumpkin seeds are packed with nutrients. They are high in protein, fiber, and healthy fats. They also contain magnesium, zinc, and antioxidants. Eating them can support heart health and improve sleep.
Can I make these ahead of time for events?
Absolutely! You can make these pumpkin seeds a few days in advance. Store them in an airtight container to keep them fresh. Just remember to let them cool completely before storing.
You learned how to make tasty baked pumpkin seeds. Start with fresh seeds and coat them in olive oil and sugar. You can add spices for more flavor. Remember to keep them crisp by drying them well and stirring while they bake. Store leftover seeds in airtight containers to enjoy later. With these tips, you can make a yummy snack for any occasion. I hope you try this fun recipe soo
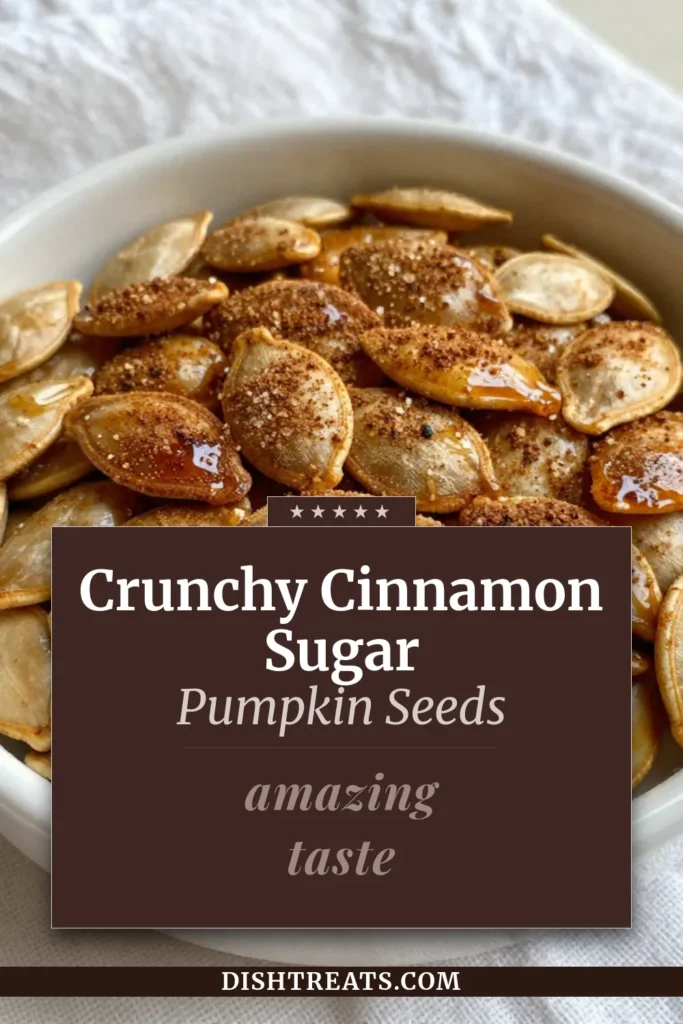
Crispy Cinnamon Sugar Pumpkin Seeds
Ingredients
- 2 cups raw pumpkin seeds (pepitas)
- 2 tablespoons olive oil
- 1 cup granulated sugar
- 1 tablespoon ground cinnamon
- 1 teaspoon salt
- 1 4 teaspoon nutmeg (optional)
- 1 4 teaspoon vanilla extract (optional)
Instructions
- Begin by preheating your oven to 350°F (175°C). Prepare a baking sheet by lining it with parchment paper.
- Carefully rinse the raw pumpkin seeds under cold water to remove any bits of pumpkin flesh or residue. Pat them dry thoroughly.
- In a mixing bowl, place the cleaned and dried pumpkin seeds. Drizzle the olive oil over them and toss until evenly coated.
- In another bowl, whisk together the granulated sugar, ground cinnamon, salt, and if desired, the nutmeg and vanilla extract.
- Evenly sprinkle the cinnamon-sugar blend over the oil-coated pumpkin seeds, stirring gently until fully covered.
- Spread the seasoned pumpkin seeds in a single layer on the prepared baking sheet.
- Place the baking sheet in the preheated oven and bake for 15-20 minutes, stirring every 5 minutes.
- Once baked, carefully remove the pumpkin seeds from the oven and allow them to cool completely on the baking sheet.
![To make delicious zucchini chocolate chip muffins, gather these simple ingredients: - 1 medium zucchini, grated (approximately 1 cup) - 1 cup all-purpose flour - 1/2 cup whole wheat flour - 1/2 teaspoon baking soda - 1 teaspoon baking powder - 1/2 teaspoon salt - 1/2 teaspoon ground cinnamon - 2 large eggs - 1/2 cup granulated sugar - 1/4 cup packed brown sugar - 1/3 cup vegetable oil - 1 teaspoon vanilla extract - 1/2 cup semi-sweet chocolate chips - 1/4 cup walnuts or pecans, chopped (optional for extra crunch) These ingredients blend well and create a moist muffin. The grated zucchini adds moisture while keeping the muffins healthy. The mix of flours gives a great texture. The sugars balance the chocolatey goodness. You can add nuts for crunch, or leave them out if you want a smoother bite. If you want the full details on how to put this all together, check out the Full Recipe. Start by preheating your oven to 350°F (175°C). This step is key for even baking. Prepare a muffin tin by lining it with paper liners or lightly greasing each cup. In a medium mixing bowl, whisk together the following dry ingredients: - 1 cup all-purpose flour - 1/2 cup whole wheat flour - 1/2 teaspoon baking soda - 1 teaspoon baking powder - 1/2 teaspoon salt - 1/2 teaspoon ground cinnamon Mix well to ensure they are evenly combined. This helps the muffins rise properly. In a larger bowl, crack two large eggs and beat them lightly. Add: - 1/2 cup granulated sugar - 1/4 cup packed brown sugar Mix these until smooth and slightly frothy. This gives the muffins a nice texture. Slowly add in: - 1/3 cup vegetable oil - 1 teaspoon vanilla extract Stir until fully combined. Next, gently fold in 1 cup of grated zucchini. Make sure it’s evenly distributed for great flavor. Gradually add the dry mixture to the wet ingredients. Use a spatula to fold them together gently. It’s okay if there are a few lumps. Next, divide the batter evenly among the prepared muffin cups, filling each about two-thirds full. Place the muffin tin in the preheated oven and bake for 18 to 20 minutes. To check if they are done, insert a toothpick into the center. It should come out clean or with a few moist crumbs. Once done, let the muffins cool in the pan for about 5 minutes before transferring them to a wire rack. This makes them easier to remove without breaking. For the full recipe, refer to the earlier sections. To make great muffins, follow these tips closely: - Use Fresh Ingredients: Fresh baking powder and soda give the best rise. - Room Temperature Eggs: Bring your eggs to room temperature for better mixing. - Preheat the Oven: Always preheat your oven to 350°F (175°C) before baking. - Fill Muffin Cups Evenly: Fill each cup about two-thirds full for a nice dome shape. Overmixing can lead to tough muffins, which we want to avoid. Here’s how: - Mix Dry and Wet Separately: Always mix dry and wet ingredients in separate bowls first. - Fold Gently: When combining, use a spatula to fold the mixture. Stop mixing when you see a few lumps. - Don’t Worry About Lumps: A few lumps are okay; they will bake out in the oven. Presentation is important for making your muffins look as good as they taste. Try these ideas: - Serve Warm: Serve your muffins warm from the oven for a cozy feel. - Use a Basket: Place muffins in a basket lined with a cloth napkin for a rustic touch. - Garnish: Lightly dust with powdered sugar or drizzle melted chocolate on top for flair. For the full recipe of Zucchini Chocolate Chip Muffins, check the earlier section. {{image_4}} You can make these muffins gluten-free easily. Just swap the all-purpose flour with gluten-free flour blend. Make sure it has xanthan gum to help with texture. This change keeps the muffins soft and tasty. You can also mix in other fun ingredients. Dried fruits like raisins or cranberries add sweetness. Chopped nuts like walnuts or pecans give a nice crunch. You can even add seeds for more texture. Just be sure to adjust the amount of chocolate chips if you add more. If you want a lower sugar treat, you have options. Use less granulated sugar or brown sugar. You can try sugar substitutes like stevia or monk fruit sweetener. These options can help keep the muffins sweet without the extra calories. Just remember to check the package for measurements. Check out the [Full Recipe] for more details! To keep your zucchini chocolate chip muffins fresh, store them in an airtight container. You can place them on the counter. They will stay tasty for about three days. If you want to keep them longer, consider freezing. Freezing muffins is easy and smart. First, let the muffins cool completely. Then, wrap each muffin in plastic wrap or aluminum foil. Place them in a freezer-safe bag or container. These muffins can last up to three months in the freezer. When you want one, just take it out and reheat. Reheating is quick and simple. You can use a microwave or an oven. For the microwave, heat one muffin for 15 to 20 seconds. For the oven, preheat to 350°F (175°C). Place the muffin on a baking sheet and warm it for about 5 to 10 minutes. Enjoy your warm muffin with a cup of coffee or tea! To make zucchini chocolate chip muffins from scratch, follow this simple recipe. Start by preheating your oven to 350°F (175°C). Prepare your muffin tin with liners or grease it. In one bowl, mix all-purpose flour, whole wheat flour, baking soda, baking powder, salt, and cinnamon. In another bowl, beat two eggs, then add granulated and brown sugar. Mix in vegetable oil and vanilla extract. Fold in grated zucchini, then combine the wet and dry ingredients. Lastly, add chocolate chips and any nuts if you want. Fill the muffin cups and bake them for 18 to 20 minutes. For the full recipe, check the instructions above. Yes, you can use frozen zucchini in this recipe. Just make sure to thaw it first. Drain any excess water to avoid soggy muffins. Frozen zucchini works well because it retains most of its flavor. It also provides moisture, just like fresh zucchini does. This option is great if you have leftover zucchini from last season. Zucchini offers several health benefits. It is low in calories and high in fiber. This can help keep you feeling full longer. Zucchini is also packed with vitamins like A and C. These vitamins support your immune system and skin health. Plus, adding veggies to your muffins makes them more nutritious. It’s a great way to sneak in some extra greens. Zucchini muffins can last up to a week when stored properly. Keep them in an airtight container at room temperature. If you want them to last longer, you can freeze them. Just make sure they are completely cooled before freezing. They can stay fresh in the freezer for about three months. Yes, you can substitute other types of flour in this recipe. Almond flour, oat flour, or coconut flour are all good options. Each type of flour can change the texture slightly, so keep that in mind. If you use a gluten-free flour blend, make sure it has a binding agent, like xanthan gum, for the best results. You now have a clear guide for making delicious zucchini chocolate chip muffins. We covered the ingredients and step-by-step instructions needed to bake them perfectly. Plus, I shared tips on avoiding common baking mistakes and ways to store your muffins. You can also explore tasty variations to suit your taste. Remember, these muffins are not just yummy; they bring the added health benefits of zucchini. Happy baking, and enjoy these treats!](https://dishtreats.com/wp-content/uploads/2025/06/0cde25ea-110a-42a8-bcb8-b8faa9becc28-768x768.webp)