Strawberries and Cream Popsicles Refreshing Summer Treat


Are you ready to dive into a cool treat that screams summer? Today, I’ll show you how to make delicious Strawberries and Cream Popsicles. With fresh strawberries, sweet honey, and creamy yogurt, these pops are easy to whip up. You don’t need fancy tools or skills, just a few simple ingredients. Let’s get started on this fun and tasty project to beat the heat!
Why I Love This Recipe
- Fresh and Fruity: The natural sweetness of fresh strawberries shines through in every bite, making these popsicles a refreshing treat for summer.
- Easy to Make: With just a few simple ingredients and steps, you can whip up a delicious homemade dessert that the whole family will love.
- Healthy Indulgence: Using Greek yogurt and fresh fruit, these popsicles are a healthier alternative to store-bought options, packed with protein and probiotics.
- Customizable Flavors: Feel free to experiment with different fruits or sweeteners, allowing you to create your own unique flavor combinations!
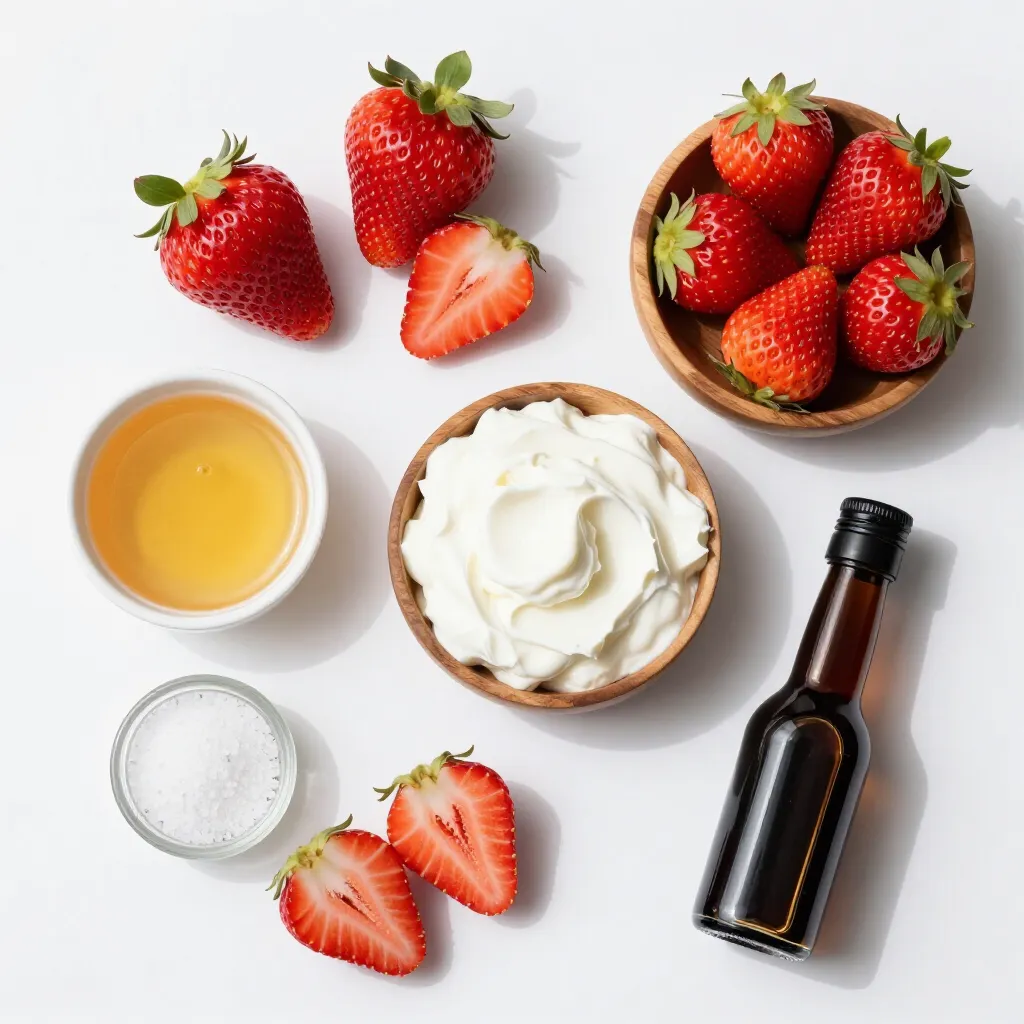
Ingredients
Fresh Strawberries
You need 2 cups of fresh strawberries. Make sure they are ripe and sweet. Hull them and cut them in half. This step helps release their natural juice.
Sweeteners: Honey or Maple Syrup
You’ll want 1/3 cup of honey or maple syrup. This adds sweetness to the popsicles. Adjust the amount based on your taste. If you prefer less sugar, use less sweetener.
Creamy Mixtures: Greek Yogurt and Heavy Cream
For creaminess, gather 1 cup of plain Greek yogurt and 1 cup of heavy cream. You can also use coconut cream for a dairy-free treat. Add 1 teaspoon of pure vanilla extract for flavor. A pinch of salt enhances the sweetness, balancing the flavors.
These ingredients blend well to create a refreshing and tasty popsicle.
Step-by-Step Instructions
Preparing the Strawberry Mixture
Start with two cups of fresh strawberries. Remove the green tops and cut them in half. Place the strawberries in a blender. Add one-third cup of honey or maple syrup for sweetness. Blend until smooth, but keep some texture. You want to see bits of strawberries in the mix. Once blended, set this mixture aside.
Making the Cream Mixture
In a separate bowl, combine one cup of plain Greek yogurt with one cup of heavy cream. If you want a dairy-free option, use coconut cream instead. Add one teaspoon of pure vanilla extract and a pinch of salt. Whisk these together until they blend well. The result should be creamy and smooth.
Filling the Popsicle Molds
Grab your popsicle molds and fill each one with the strawberry mixture. Start by filling them one-third of the way. Then, add the cream mixture until they are about two-thirds full. To create a pretty swirl, take a skewer or a small spoon. Gently swirl the strawberry into the cream. Be careful not to mix them fully. Next, add more strawberry mixture on top, leaving a little space at the top for freezing. Insert the popsicle sticks and place the molds in the freezer. Let them freeze for at least six hours. This will make them solid and ready to enjoy. To release the popsicles, run warm water over the molds for a few seconds. Enjoy your refreshing treat!
Tips & Tricks
Achieving the Perfect Swirl
To create the perfect swirl, you want to keep the layers separate but blended. After spooning in the strawberry mixture, add the cream mixture gently. Use a skewer or a small spoon to swirl them together. Aim for a marbled look, not a full mix. This step adds beauty and texture to your popsicles.
Preventing Popsicles from Sticking
Popsicles can stick to molds. To prevent this, use warm water before removing them. Run warm water over the outside of the molds for a few seconds. This helps loosen the popsicles, making it easy to pull them out without breaking.
Choosing the Right Popsicle Molds
Choosing the right molds is key. Look for silicone molds as they are flexible. They make it easier to pop out the frozen treats. If using plastic molds, ensure they have sturdy sticks. This way, you can hold the popsicles without worry.
Pro Tips
- Fresh is Best: Use ripe, fresh strawberries for the best flavor and sweetness in your popsicles.
- Sweetness Adjustment: Taste the strawberry mixture before blending in the yogurt and cream; adjust the sweetness if necessary.
- Cream Consistency: If using coconut cream, ensure it’s well mixed and smooth for a creamy texture.
- Storage Tips: Store popsicles in an airtight container in the freezer to prevent freezer burn and maintain freshness.
Variations
Dairy-Free Substitutes
You can easily make these popsicles dairy-free. Instead of heavy cream, use coconut cream. It gives a rich taste and works well with strawberries. For yogurt, opt for a dairy-free yogurt. Look for almond or cashew yogurt for a great texture. Both swaps keep the popsicles creamy and delicious.
Adding Other Fruits
These popsicles are a great base for other fruits. Try adding bananas, mangoes, or blueberries. Blend these fruits with the strawberries for a fun twist. You can layer different fruits in the molds too. This adds color and flavor, making each bite exciting and fresh.
Flavor Enhancements (Vanilla, Mint, etc.)
Adding different flavors can elevate your popsicles. A splash of pure vanilla extract enhances the creaminess. For a refreshing touch, add a few mint leaves. Blend them lightly to release their scent without overpowering the strawberry flavor. These small changes can make your popsicles even more delightful and unique!
Storage Info
How to Store Popsicles
Store your popsicles in an airtight container. This keeps them fresh and prevents freezer burns. You can use plastic bags or a dedicated popsicle box. Make sure to label them with the date. This helps you track freshness and enjoy them at their best.
Freezing Duration and Reusability
These popsicles freeze well for up to two months. After that, they may lose flavor and texture. If you want to reuse the molds, wash them with warm soapy water. Rinse well to avoid any leftover soap taste. Ensure they are completely dry before refilling.
Signs of Spoilage
Watch for ice crystals forming on the popsicles. This indicates they may not taste as good. If the color changes or they smell off, it’s time to throw them out. Always trust your senses when it comes to food safety. Enjoy your homemade treats at their best!
FAQs
Can I use frozen strawberries instead of fresh?
Yes, you can use frozen strawberries. They will work well in this recipe. However, they may make your popsicles a bit softer. To fix this, you can add a little more yogurt or cream. Just blend the frozen strawberries until smooth. This will still give you that sweet, fruity flavor you want.
How long do homemade popsicles last in the freezer?
Homemade popsicles can last up to two months in the freezer. After that, they may lose some flavor or texture. To keep them fresh, store them in an airtight container. This will help prevent ice crystals from forming. Always label the container with the date so you know when to use them.
What can I substitute for Greek yogurt?
If you need a substitute for Greek yogurt, consider using regular yogurt. You can also use dairy-free options like coconut yogurt. These will still give you a creamy texture. For a thicker option, try using sour cream. Each choice will add a different flavor, so pick one that you enjoy.
You learned how to make delicious homemade popsicles with fresh strawberries and creamy mixtures. You now have easy steps to prepare these treats and tips to make them perfect. Remember to try different fruits and flavors as you make your own. Store your popsicles correctly to enjoy them longer. Enjoying fun recipes like this fills your days with tasty excitement and creativity. Now, it’s time for you to grab your ingredients and start making cool treats at hom
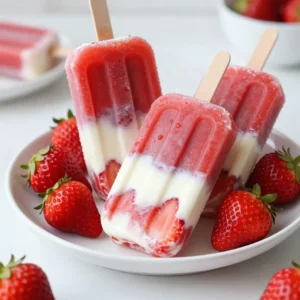
Strawberries and Cream Popsicles
Ingredients
- 2 cups fresh strawberries, hulled and halved
- 1/3 cup honey or maple syrup
- 1 cup plain Greek yogurt
- 1 cup heavy cream or coconut cream
- 1 teaspoon pure vanilla extract
- a pinch salt
Instructions
- Begin by placing the hulled and halved strawberries in a blender. Add the honey or maple syrup and blend together until the mixture is smooth but retains some texture from the strawberries. Set the blended mixture aside.
- In a separate mixing bowl, combine the Greek yogurt, heavy cream (or coconut cream), pure vanilla extract, and a pinch of salt. Whisk these ingredients together until they are well combined and achieve a smooth consistency.
- Take your popsicle molds and carefully spoon in the strawberry mixture to fill each mold approximately one-third of the way.
- Following that, add the cream mixture into each mold, filling them to about two-thirds full.
- To create a beautiful marbled effect, use a skewer or a small spoon to gently swirl the strawberry mixture into the cream mixture, being careful not to fully blend them together.
- Finish filling the molds by adding more of the strawberry mixture on top, but be sure to leave a small gap at the top to allow for expansion as they freeze.
- Insert the popsicle sticks into the molds and transfer them to the freezer. Allow them to freeze for at least 6 hours, or until they are completely solid.
- When you’re ready to enjoy your popsicles, run warm water over the outer sides of the molds for a few seconds. This will help to release the popsicles, making it easy to gently pull them out.

![To make tasty chicken gyros, you need fresh and simple ingredients. Here’s what you will need: - 500g chicken breast, thinly sliced - 2 tablespoons olive oil - 1 tablespoon dried oregano - 1 teaspoon garlic powder - 1 teaspoon onion powder - 1 teaspoon smoked paprika - Salt and freshly ground black pepper, to taste - 4 pita breads - 1 cup Greek yogurt - 1 tablespoon fresh lemon juice - 1 cucumber, finely diced - 1 ripe tomato, finely diced - 1 small red onion, thinly sliced - Fresh parsley, chopped, for garnish These ingredients work together to create a rich flavor for your gyros. The chicken pairs well with the spices. The tzatziki adds a creamy texture that balances the dish. Feel free to add more flavors to your gyros. Here are some optional ingredients: - Feta cheese, crumbled - Bell peppers, thinly sliced - Hot sauce or chili flakes for spice These extras can personalize your gyros. They can boost the taste and make your meal even more exciting. Garnishes make your gyros look pretty and add flavor. Here are some great ideas: - Extra tzatziki sauce on the side - Sliced olives for a briny kick - Fresh mint or dill for added freshness Serve your gyros with a side of simple salad or roasted potatoes. This adds to the fun and makes a complete meal. For the full recipe, check the earlier section! To start, you need to make the chicken marinade. In a big bowl, mix the chicken breast with olive oil, dried oregano, garlic powder, onion powder, smoked paprika, salt, and pepper. Ensure every piece is coated well. Cover the bowl with plastic wrap or a lid. Let it sit in the fridge for at least 30 minutes. You can even marinate it for up to 2 hours. This step helps the chicken soak up all the flavors. Next, heat your grill or skillet over medium-high heat. When it's hot, add the marinated chicken slices. Cook them for about 6 to 8 minutes. Make sure to turn them occasionally. You want them golden brown and fully cooked. Use a meat thermometer to check the chicken's internal temperature. It should reach 75°C (165°F) to be safe to eat. While the chicken cooks, prepare the tzatziki sauce. In a medium bowl, mix Greek yogurt, fresh lemon juice, finely diced cucumber, salt, and pepper. Stir it well and set it aside. Letting it sit helps the flavors blend together nicely. This sauce adds a cool taste to your gyros. It's a perfect match for the warm chicken. For the full recipe including all ingredients and steps, see [Full Recipe]. When making chicken gyros, many people make simple errors. Here are some to watch for: - Not marinating long enough: Marinate your chicken for at least 30 minutes. Longer gives better flavor. - Overcrowding the grill: Give each piece space. This helps the chicken cook evenly. - Skipping the meat thermometer: Always check if chicken is at 75°C (165°F). This keeps it safe to eat. You can easily change the recipe to fit your needs. Here are some ideas: - Gluten-free: Use gluten-free pita or lettuce wraps instead of pita bread. - Dairy-free: Swap Greek yogurt with a non-dairy yogurt for the tzatziki sauce. - Low-carb: Serve the chicken on a salad instead of using pita bread. Grilling chicken gyros can be easy with a few tips: - Heat control: Make sure your grill is hot before adding chicken. This gives nice grill marks. - Avoid pressing down: Don’t press the chicken with a spatula. This releases juices and dries it out. - Let it rest: Always let the chicken rest after cooking. This keeps it juicy when you slice it. Using these tips will help you craft great homemade chicken gyros. For the complete recipe, check out the Full Recipe section. {{image_4}} You can swap chicken with other meats. Try beef, lamb, or pork. Each protein brings its own taste. Marinate them the same way as chicken. This gives you tasty options for your gyros. For example, beef adds a rich flavor. Lamb has a unique zest. Pork is juicy and tender. All these variations keep your meals exciting. If you prefer plant-based meals, there are great choices. Use marinated mushrooms or eggplant as your base. Grilled zucchini or bell peppers work well too. For protein, try chickpeas or lentils. These options are filling and tasty. You can still make a delicious tzatziki sauce with vegan yogurt. This lets everyone join in on the fun. Want to change up the flavor? Add spices like cumin or coriander to the marinade. This gives your gyros a warm, earthy taste. You can also try different herbs, like mint or dill. They add a fresh twist. For a kick, include hot sauce or chili flakes. Each tweak can create a new flavor experience. Enjoy creating your own unique version of homemade chicken gyros. For the full recipe, check the earlier section. To keep your leftover gyros fresh, wrap them tightly. I recommend using plastic wrap or aluminum foil. This helps prevent air from getting in and keeps the flavors locked in. Place the wrapped gyros in an airtight container or a resealable bag. Store them in the fridge for up to three days. If you notice any extra moisture, you can add a paper towel inside to absorb it. Reheating gyros can be easy. To maintain their taste and texture, use a skillet or grill. Heat it over medium heat. Place the gyros in the skillet for about 3-4 minutes. Turn them halfway through so they warm evenly. If you prefer, you can also use a microwave. Just remember to wrap them in a damp paper towel. This keeps them from drying out. Heat for 30 seconds, then check. If they need more time, heat in 10-second bursts. If you want to save gyros for later, freezing is a great option. Start by letting the cooked chicken cool completely. Then, wrap the chicken in plastic wrap. Place it in a freezer-safe bag or container. You can freeze the chicken for up to three months. When you are ready to eat, thaw it in the fridge overnight. Reheat it as mentioned earlier. You can also freeze the tzatziki sauce separately. Just remember to stir it well after thawing. To make tzatziki sauce, mix Greek yogurt, fresh lemon juice, and diced cucumber. Add salt and pepper for taste. This sauce adds a cool, creamy touch to your gyros. It’s simple and fresh. Let it sit for a few minutes to blend the flavors. Yes, you can use store-bought pita bread. It saves time and works well. Just warm the pita on the grill or in a skillet. This makes it soft and ready to hold your tasty filling. Homemade pita is great, but store-bought is quick and easy. Serve chicken gyros with a side of Greek salad or roasted veggies. You can also add extra tzatziki for dipping. For drinks, try a refreshing lemonade or some iced tea. These sides enhance your meal and bring more flavor to the table. For the full recipe, check out the complete guide on making Homemade Chicken Gyros. Homemade chicken gyros are easy and fun to make. We covered key ingredients, cooking steps, and tips to avoid mistakes. You can add your own twist by using different proteins or flavors. Storing leftovers or prepping meals ahead keeps dinner simple. With all this info, you can create a tasty meal your whole family will love. Enjoy making gyros that bring great joy to your table!](https://dishtreats.com/wp-content/uploads/2025/06/a33d49ac-ff2d-4809-8657-a37e258bd1fd-768x768.webp)