
Cherry Cheesecake Dip Irresistible Dessert Treat

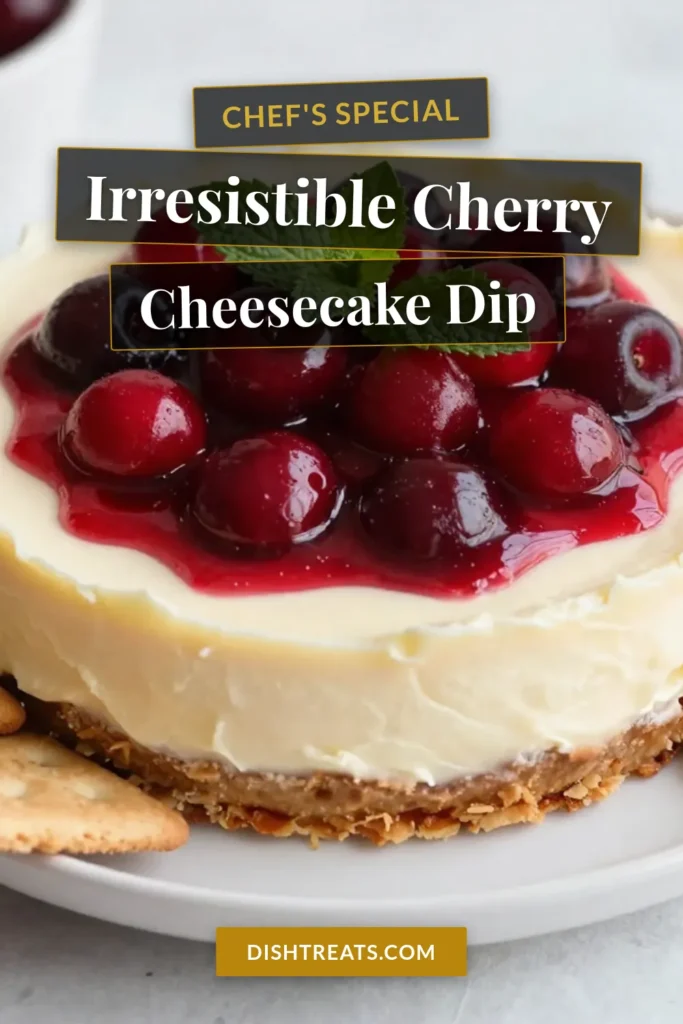
If you’re looking for a fun, sweet treat that everyone loves, try my Cherry Cheesecake Dip! It’s creamy, delicious, and super easy to make. With just a few simple ingredients, you’ll create a dessert that’s perfect for any gathering. Grab your graham crackers or vanilla wafers—this dip will have everyone coming back for more. Ready to impress your friends and family? Let’s dive in!
Why I Love This Recipe
- Easy to Make: This dip comes together in just 10 minutes, making it a quick and hassle-free dessert option for any occasion.
- Creamy and Delicious: The combination of cream cheese and whipped topping creates a luxuriously creamy texture that everyone loves.
- Perfect for Sharing: Serve it at parties, gatherings, or picnics, and it’s sure to be a crowd-pleaser that brings people together.
- Customizable: You can easily switch up the toppings or add different flavors to suit your taste preferences!
Ingredients
List of Required Ingredients
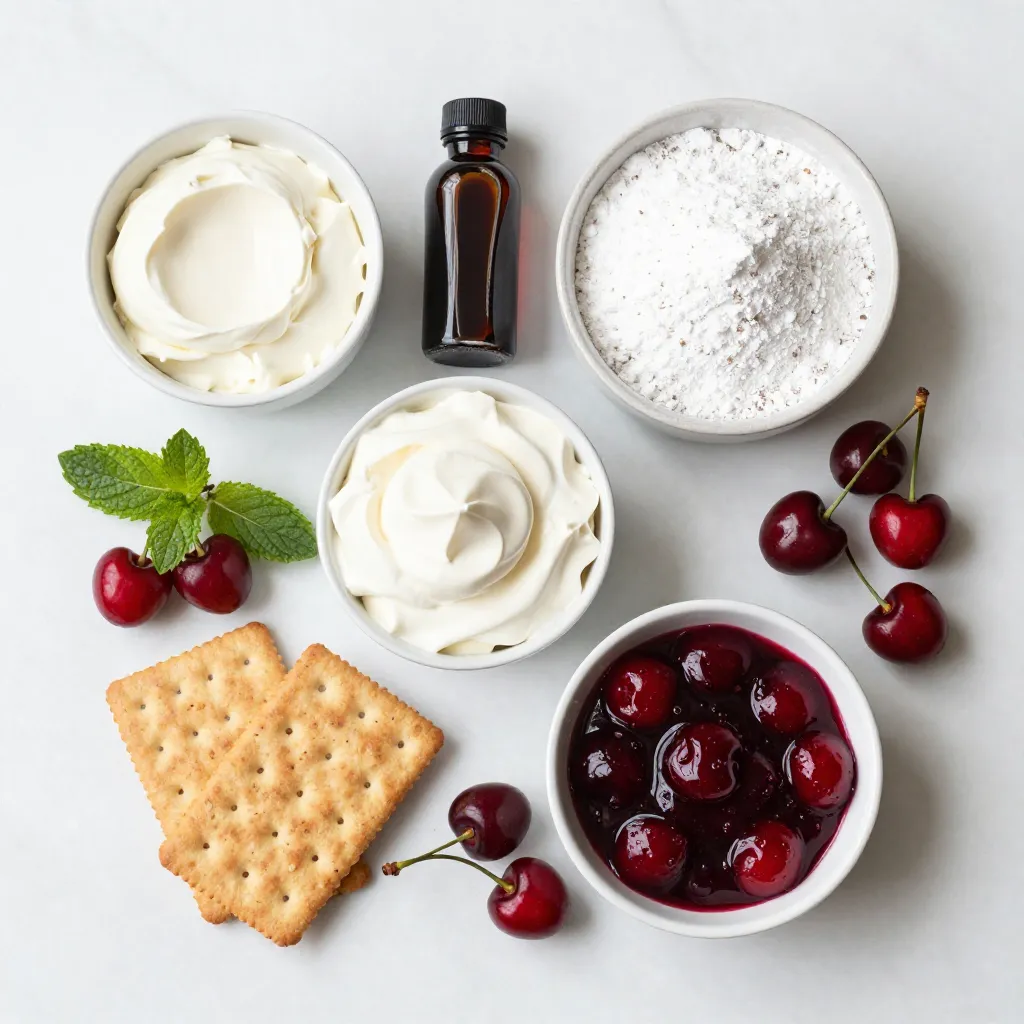
- 8 oz cream cheese (softened)
- 1 cup powdered sugar (sifted)
- 1 tsp pure vanilla extract
- 1 cup whipped topping (e.g., Cool Whip)
- 1 cup cherry pie filling
- Graham crackers or vanilla wafers for dipping
- Optional garnishes: fresh cherries, mint leaves
To make Cherry Cheesecake Dip, you need a few simple ingredients. Start with 8 ounces of softened cream cheese. This gives your dip a rich base. Next, grab 1 cup of powdered sugar, sifted for smoothness. This adds sweetness without lumps.
You will also need 1 teaspoon of pure vanilla extract. It enhances the flavor and adds warmth. For that fluffy texture, use 1 cup of whipped topping like Cool Whip. The whipped topping makes your dip light and airy.
Don’t forget the star of the show: 1 cup of cherry pie filling. You can use homemade or store-bought. It adds a fruity burst. Lastly, gather graham crackers or vanilla wafers for dipping. They make every bite fun!
If you want to dress it up, use fresh cherries and mint leaves as optional garnishes. These add a pop of color and freshness. Enjoy making this easy and delicious dessert!
Step-by-Step Instructions
Preparation Process
- Step 1: Beat cream cheese to smooth consistency
In a medium bowl, take 8 ounces of softened cream cheese. Use an electric mixer. Beat it for about 2-3 minutes until it is creamy and smooth.
- Step 2: Incorporate powdered sugar
Gradually add 1 cup of sifted powdered sugar to the bowl. Start mixing on low speed. Once combined, increase to medium speed. Mix until the mixture is light and fluffy, which takes about 2 more minutes.
- Step 3: Add vanilla extract and mix
Pour in 1 teaspoon of pure vanilla extract. Mix until fully blended. Scrape the bowl’s sides to make sure everything combines well.
Folding in Whipped Topping
- Step 4: Gently fold in whipped topping
Take 1 cup of whipped topping, like Cool Whip. Use a spatula to fold it into the cream cheese mixture. Be gentle to keep it airy and light.
- Step 5: Transfer to serving dish
Use the spatula to transfer the fluffy dip into your serving dish. Spread it evenly across the bottom for a nice look.
Topping and Refrigeration
- Step 6: Add cherry pie filling
Take 1 cup of cherry pie filling and pour it over the cream cheese layer. Spread it gently to cover the dip fully.
- Step 7: Create marbled effect (optional)
For a fun touch, take a knife and swirl it through the cherry filling. This creates a beautiful marbled look with the cream cheese dip.
- Step 8: Refrigerate before serving
Cover the dish with plastic wrap. Place it in the fridge for about 30 minutes. This helps the flavors mix and makes the dip a bit firmer.
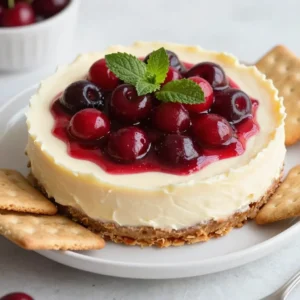
Now, your Cherry Cheesecake Dip is ready to enjoy with graham crackers or vanilla wafers!
Tips & Tricks
Achieving the Perfect Consistency
To get the best texture in your dip, start with softened cream cheese. Cold cream cheese is hard to blend. Let it sit out for about 30 minutes before mixing. This will help it whip up smooth and creamy.
When you add the whipped topping, be gentle. Use a spatula to fold it in slowly. If you mix too fast, it can lose air and become flat. You want it light and fluffy for that perfect dip.
Enhancing Flavor
Want to boost the flavor? Add a pinch of salt to balance the sweetness. You can also try almond extract for a nutty twist. A bit of lemon juice adds a nice zing as well.
For the cherry pie filling, homemade is best if you have time. It tastes fresh and bright. If you’re short on time, choose a quality store-bought brand. Just make sure it has real fruit for the best taste.
Pro Tips
- Use Room Temperature Cream Cheese: This helps achieve a smooth and creamy texture, making the dip easier to mix and blend.
- Sift the Powdered Sugar: Sifting the sugar before adding it to the mixture ensures a lump-free and silky smooth dip.
- Chill Before Serving: Refrigerating the dip for at least 30 minutes allows the flavors to meld and the texture to firm up, enhancing the overall taste.
- Customize Your Toppings: Feel free to add crushed nuts, chocolate chips, or additional fruit on top for extra flavor and texture variations.
Variations
Flavor Variations
You can switch things up with different flavors. Try a chocolate cherry cheesecake dip. Just add cocoa powder to the cream cheese mix. This adds a rich chocolate flavor that pairs well with the cherries.
Another great option is the strawberry cheesecake dip. Simply swap the cherry pie filling for strawberry. You can also add fresh strawberries for a bright twist. Both flavors offer a fun take on the classic dip.
Ingredient Swaps
If you need to change things, there are easy swaps. You can use mascarpone cheese instead of cream cheese. It gives a creamy texture and a different taste. You can also try Greek yogurt for a lighter option. It still tastes great and adds some protein.
For whipped topping, you might choose heavy cream. Just whip it until you see soft peaks. This keeps it light and fluffy. Coconut whipped cream is another fun swap for a dairy-free option. It adds a nice coconut flavor that can complement the cherries.
Storage Info
Refrigeration Guidelines
To keep your Cherry Cheesecake Dip fresh, store it in an airtight container. This helps keep the flavors rich and the dip creamy. You can refrigerate leftovers for up to 3 days. Just make sure to check for any changes in texture or smell before serving again. If it looks good, it should taste great!
Freezing Instructions
You can freeze Cherry Cheesecake Dip for later. To do this, place the dip in a freezer-safe container. Try to remove as much air as possible. It will stay good for up to 2 months. When you are ready to eat it, let it thaw in the fridge overnight. After thawing, stir it gently to restore its creamy texture. Enjoy your dip without losing any of that delicious flavor!
FAQs
Common Questions
How long does Cherry Cheesecake Dip last?
Cherry Cheesecake Dip lasts about 3-5 days in the fridge. Keep it covered well. This dip tastes best fresh, but it can hold up in storage.
Can I make this dip ahead of time?
Yes, you can make this dip a day before. Just cover it and chill in the fridge. This gives the flavors time to mix together nicely.
What can I serve with Cherry Cheesecake Dip?
Serve this dip with graham crackers or vanilla wafers. You can also use fresh fruit like apple slices or strawberries for dipping.
How do I make this dip vegan or dairy-free?
To make this dip vegan, use dairy-free cream cheese and whipped topping. You can also use maple syrup instead of powdered sugar for sweetness.
Can I use fresh cherries instead of cherry pie filling?
Yes, you can use fresh cherries! Just chop them up and mix them with a bit of sugar. This adds a nice, fresh taste to your dip.
This blog post covered all you need to make Cherry Cheesecake Dip. You learned about key ingredients and step-by-step instructions to create a delicious treat. I shared tips for a smooth texture and flavor boosts. You can also explore fun variations and storage tips.
This dip is easy and fun for any occasion. With practice, you will impress friends and family. Enjoy making your Cherry Cheesecake Dip and feel free to get creativ
Cherry Cheesecake Dip Delight
Ingredients
- 8 oz cream cheese, softened to room temperature
- 1 cup powdered sugar, sifted
- 1 tsp pure vanilla extract
- 1 cup whipped topping (such as Cool Whip)
- 1 cup cherry pie filling
- None for dipping Graham crackers or vanilla wafers
- None for garnish Fresh cherries and mint leaves (optional)
Instructions
- In a medium mixing bowl, use an electric mixer to beat the softened cream cheese until it reaches a smooth and creamy consistency, about 2-3 minutes.
- Gradually sift in the powdered sugar, mixing on low speed until the sugar is fully incorporated, then increase to medium speed until the mixture becomes light and fluffy, approximately 2 more minutes.
- Add the pure vanilla extract and mix until fully combined, scraping down the sides of the bowl as needed.
- Carefully fold in the whipped topping with a spatula until the dip is completely smooth and airy, being cautious not to over-mix which could deflate the whipped topping.
- Transfer the fluffy cream cheese mixture to a serving dish, using a spatula to spread it evenly across the bottom.
- Pour the cherry pie filling over the cream cheese layer, gently spreading it to cover the entire surface.
- For an artistic touch, optionally swirl a knife through the cherry filling to create a beautiful marbled effect with the cream cheese dip.
- Cover the dish with plastic wrap and refrigerate for about 30 minutes to allow the flavors to meld and the dip to firm up slightly.
- Serve your delightful dip with graham crackers or vanilla wafers, perfect for dipping and enjoying!

![When making peach streusel muffins, the right ingredients make all the difference. Here’s what you need: - 1 ½ cups all-purpose flour - 1 tsp baking powder - ½ tsp baking soda - ¼ tsp salt - ½ cup granulated sugar - ¼ cup packed brown sugar - ⅓ cup unsalted butter, melted - 1 large egg - 1 tsp vanilla extract - ½ cup buttermilk - 1 ½ cups fresh peaches, peeled and diced - ⅓ cup rolled oats - 1 tsp ground cinnamon These ingredients create a lovely balance of flavors. The fresh peaches add sweetness and moisture. The streusel topping gives a nice crunch. This recipe is simple and uses common items. I love how easy it is to find these ingredients at any store. For the full recipe, check out [Full Recipe]. It's a delightful way to enjoy seasonal peaches in a warm muffin. First, preheat your oven to 375°F (190°C). This step warms the oven, helping the muffins bake evenly. Next, prepare your muffin tin. You can line it with muffin liners or grease it lightly with some non-stick spray or butter. This will keep the muffins from sticking. In a medium bowl, whisk together the dry ingredients. Combine 1 ½ cups of all-purpose flour, 1 teaspoon of baking powder, ½ teaspoon of baking soda, and ¼ teaspoon of salt. Mix well until everything is blended. Set this bowl aside for now. In a large mixing bowl, combine the sugars and melted butter. Use ½ cup of granulated sugar and ¼ cup of brown sugar. Mix them well until they blend together. Then, add 1 large egg and 1 teaspoon of vanilla extract. Beat the mixture until it looks fluffy. Next, pour in ½ cup of buttermilk and stir gently. Now, it’s time to add the dry ingredients. Gradually fold the flour mixture into the wet ingredients. Be gentle and avoid overmixing. It’s okay if the batter has a few lumps. Finally, fold in 1 ½ cups of diced peaches. Make sure they are evenly spread throughout the batter. In a small bowl, mix together ⅓ cup of rolled oats, 1 teaspoon of ground cinnamon, and a pinch of sugar for the streusel topping. This mix will add a crunchy texture to your muffins. Using a scooper or a spoon, fill each muffin liner with the batter. Aim to fill them about two-thirds full. This gives your muffins room to rise. Once filled, sprinkle a generous amount of the streusel topping over each muffin. This adds that crispy layer on top. Place the muffin tin in your preheated oven. Bake for 18 to 20 minutes. Check for doneness by inserting a toothpick into the center of a muffin. If it comes out clean, your muffins are ready. After baking, let the muffins cool in the pan for about 5 minutes. Then, transfer them to a wire rack to cool completely. For a complete recipe and detailed instructions, check out the Full Recipe. To make great muffins, avoid overmixing the batter. When you mix too much, muffins can turn tough and dry. Gently fold the dry ingredients into the wet. Leave some lumps; they are okay! The batter should feel thick but not dry. Aim for a smooth mix with small bits of flour still visible. This keeps the muffins soft and fluffy. To keep your muffins fresh, store them in an airtight container at room temperature. They will stay good for up to three days. If you want to keep them longer, freeze them. Wrap each muffin in plastic wrap, then put them in a freezer bag. When ready to eat, thaw them in the fridge overnight or microwave them for about 20 seconds. This keeps them soft and tasty. These peach streusel muffins pair well with coffee or tea. They also taste great with a glass of milk. For a nice touch, dust the muffins with powdered sugar before serving. You can also add a slice of fresh peach on the side. This extra step makes your muffins look fancy and adds more peach flavor. Enjoy the delightful mix of tastes! {{image_4}} You can switch the peaches for other fruits. Blueberries and raspberries work great! They add a nice burst of flavor. You can even mix fruits, like peaches and blueberries, for a fun twist. Remember to adjust the amount of fruit based on what you use. Keep it around 1 ½ cups to fill the muffins well. Need a gluten-free option? Use a gluten-free flour blend instead of all-purpose flour. For a dairy-free version, replace buttermilk with almond milk or coconut milk. You can also use a flax egg instead of a regular egg. Just mix 1 tablespoon of flaxseed meal with 2.5 tablespoons of water. Let it sit for a few minutes to thicken. This will keep your muffins tasty and friendly for different diets. Want to kick up the flavor? Try adding nuts like walnuts or pecans to the batter. They give a nice crunch. You can also sprinkle some cinnamon or nutmeg in the batter for warmth. For a little zing, add a splash of lemon juice or zest. These small changes can make your muffins more exciting and tasty. For the full recipe, look for the Peach Streusel Muffins instructions above! You can store Peach Streusel Muffins at room temperature. Place them in an airtight container. This helps keep them fresh and soft. They will stay tasty for up to three days. If you want to keep them longer, consider freezing. Freezing is a great way to save these muffins for later. Wrap each muffin in plastic wrap. Then, place them in a freezer bag or container. This keeps them from getting freezer burn. You can freeze them for up to three months. To enjoy them later, thaw your muffins. Take them out of the freezer and let them sit at room temperature. This usually takes about an hour. You can also warm them in the oven at low heat for a fresh-baked taste. For the best experience, try the Full Recipe to make these delightful muffins again! Yes, you can use canned peaches. Look for peaches packed in juice or water. Drain them well and pat them dry to remove excess moisture. This step helps avoid soggy muffins. Cut the peaches into small pieces, similar to fresh ones. Canned peaches can be sweeter, so reduce the sugar in the recipe by a tablespoon. This keeps your muffins balanced. If your batter is thick, add a splash of milk or buttermilk. Mix well until you reach a smooth texture. Thick batter can lead to dry muffins. You want a batter that can easily drop from a spoon but is not runny. Another tip is to gently fold in a bit more diced peaches. This adds moisture and flavor. Check for doneness by inserting a toothpick into the center of a muffin. If it comes out clean or with a few crumbs, your muffins are ready. Look for a golden-brown top and a slight spring when you touch the surface. If the muffins still look wet or jiggly, bake them a few more minutes. Yes, you can prepare the batter ahead. Store it in the fridge for up to 2 hours. Mix the wet and dry ingredients separately. Combine them just before baking. This helps keep the muffins light and fluffy. If you plan to store longer, consider freezing the batter in muffin tins. This way, you can bake fresh muffins anytime. For the full recipe, check above. These peach muffins are easy to make and full of flavor. We covered the ingredients, step-by-step instructions, and tips to improve texture and taste. From using fresh peaches to adding oats, each detail counts. You can experiment with flavors and storage methods. Enjoy these muffins fresh or store them for later. Happy baking!](https://dishtreats.com/wp-content/uploads/2025/07/b62cebd8-d26b-48c0-b1ab-fab18f37a599-768x768.webp)
![To make a delicious strawberry banana smoothie, you need fresh ingredients. Here’s what to gather: - 1 cup fresh strawberries, hulled - 1 ripe banana, sliced into rounds - 1 cup Greek yogurt (can be plain or flavored) - 1 cup almond milk (or any milk of your choice) - 1 tablespoon honey (optional, can be adjusted to taste) - 1 tablespoon chia seeds - 1 teaspoon pure vanilla extract - A handful of ice cubes These ingredients pack a punch of flavor and nutrients. The strawberries give a sweet and tangy taste. The banana adds creaminess and natural sweetness. Greek yogurt provides protein and a smooth texture. Almond milk keeps it light. You can customize your smoothie with optional add-ins. Here are a few ideas: - Spinach or kale for added greens - Protein powder for an extra boost - Nut butter for richness and healthy fats - Flax seeds for more fiber - Coconut flakes for tropical flavor Feel free to mix and match these to fit your taste. Each add-in changes the flavor and nutrition a bit. To make your smoothie, you don't need much. Here’s what I recommend: - A high-speed blender for a smooth mix - A measuring cup for accurate amounts - A knife for slicing the banana - A cutting board for easy prep This simple equipment makes the process quick and fun. You’ll enjoy making your strawberry banana smoothie with these tools! For the full recipe, check out the Berry Bliss Banana Smoothie section. First, rinse your strawberries under cold water. This removes any dirt. Next, hull the strawberries by taking off the green tops. This step makes them sweet and tasty. Slice your banana into small rounds. The smaller pieces make blending easier. They also help release more sweetness. Grab a high-speed blender. Add the hulled strawberries and banana slices. Next, include Greek yogurt and almond milk. If you want extra sweetness, add honey. Don't forget your chia seeds and vanilla extract. Measure everything well for the best taste. Now, toss in a handful of ice cubes. This will chill your smoothie and make it refreshing. Blend on high until smooth and creamy. If it’s too thick, add a little more almond milk. Taste your smoothie and adjust the honey if you like it sweeter. Pour it into your favorite glasses. For a great look, add a fresh strawberry slice on the rim. You can also sprinkle some chia seeds on top. Enjoy your drink with colorful straws for a fun touch! To get the best smoothie texture, start with ripe fruit. Ripe strawberries and bananas blend smoothly and taste sweeter. Use a high-speed blender to mix all ingredients well. If your smoothie is too thick, add more almond milk slowly. Keep blending until it’s creamy and smooth. This ensures no chunks remain, giving you that perfect sip. Many people make simple mistakes when making smoothies. One common error is not measuring ingredients. Accurate measurements give a balanced flavor. Another mistake is adding too much ice. Ice is great for chill, but too much can make it watery. Always blend your smoothie long enough to mix all ingredients well. If you skip this step, you might end up with a grainy texture. You can boost the flavor and nutrition of your smoothie easily. Add a spoonful of nut butter for richness and protein. A sprinkle of cinnamon can add warmth and depth. If you want more nutrients, try adding spinach or kale. These greens blend well and don’t change the taste much. For sweetness, adjust the honey to your liking. Following these tips can make your drink even more enjoyable while keeping it healthy. For the complete recipe, check the Full Recipe section. {{image_4}} You can switch up the fruits in your smoothie for fun. If you want, try mango or blueberries instead. These fruits add new flavors and colors. You can also mix in some spinach or kale. This adds nutrients without changing the taste much. Just remember to keep the same amount of fruit for balance. If you want a dairy-free smoothie, it's easy! Use coconut yogurt instead of Greek yogurt. Almond milk works great too, but you can choose oat or soy milk as well. These options keep your smoothie creamy while being kind to your tummy. Check the labels for any added sugars if you're watching your intake. Want to boost your smoothie’s health? Add a scoop of protein powder for energy. You can also toss in flax seeds or hemp seeds for omega-3s. For fiber, try adding oats. They blend well and keep you full longer. You can find these extras at local stores or online. Just remember, keep your total additions balanced to maintain that delicious taste from the [Full Recipe]. If you have leftover smoothie, pour it into a container. Seal it tightly. Refrigerate the smoothie. It stays fresh for up to 24 hours. Just remember, smoothies can separate. Give it a good shake before you drink it again. Freezing smoothies is easy and smart! Pour your smoothie into ice cube trays. Once frozen, pop the cubes into a freezer bag. They last for about three months. You can blend them later with a bit of milk for a quick treat. Use glass jars or BPA-free plastic containers for storage. They help keep the smoothie fresh. Choose containers with tight lids to prevent spills. Make sure they are easy to clean for hassle-free use. Yes, you can use frozen strawberries and bananas. They make the smoothie colder and creamier. Frozen fruit also lasts longer and is easy to keep on hand. Just remember to adjust the amount of almond milk if it gets too thick. To make a thicker smoothie, use less liquid. You can also add more yogurt or fruit. Frozen bananas work well for thickness. If you want a creamier texture, try adding avocado or a scoop of nut butter. This smoothie packs many health benefits. Strawberries are rich in vitamin C and antioxidants. Bananas provide potassium and fiber, which is good for digestion. Greek yogurt adds protein, making it filling. Chia seeds are great for omega-3s and help keep you full longer. Enjoy this smoothie as a tasty way to fuel your day! For the complete recipe, check out the Full Recipe section above. In this blog post, we explored how to make a great smoothie. We discussed fresh ingredients, optional add-ins, and the tools you need. I gave step-by-step instructions on preparing fruits, blending, and adding final touches. You learned tips to get the best texture and how to avoid common mistakes. I shared variations and storage tips for smoothies too. Smoothies are fun, easy, and healthy. With the right steps, you can create flavors you love!](https://dishtreats.com/wp-content/uploads/2025/06/52d7bf2d-2fe9-4d4d-9d05-04ba55bebe58-768x768.webp)
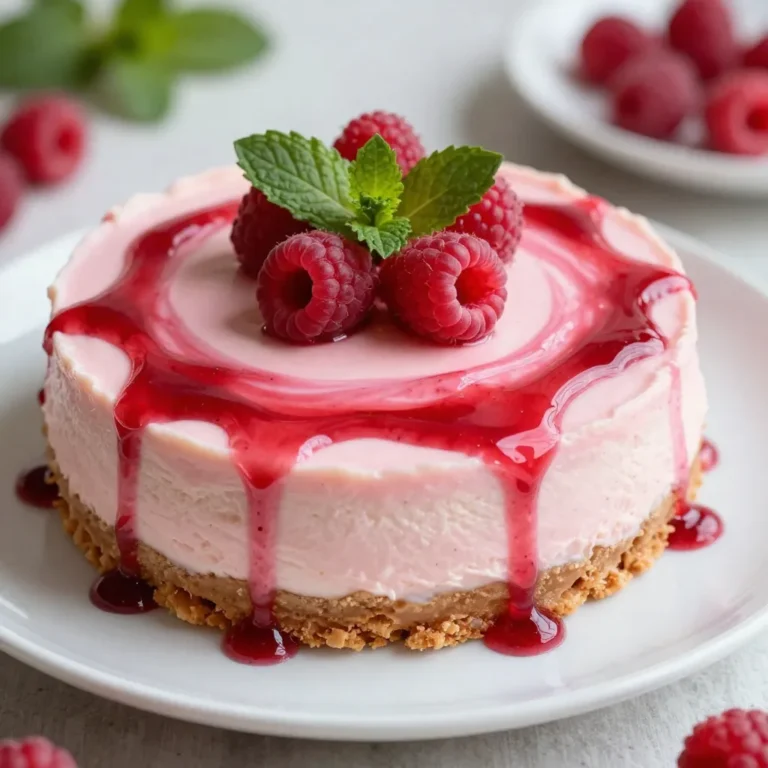
. Enjoy your delightful no bake lemon cheesecake! No Bake Lemon Cheesecake is simple and fun to make. We covered the ingredients, preparation, and storage tips. Remember to mix your filling gently for a light texture. Experiment with flavors or garnishes to make it your own. With this guide, you can impress your friends and family. Enjoy each slice and share this delightful dessert. It’s a tasty treat that everyone will love!](https://dishtreats.com/wp-content/uploads/2025/06/ce75718b-0697-4914-b5ee-7870880d7685-768x768.webp)