
Spicy Cajun Chicken Bites Flavorful and Crispy Treat
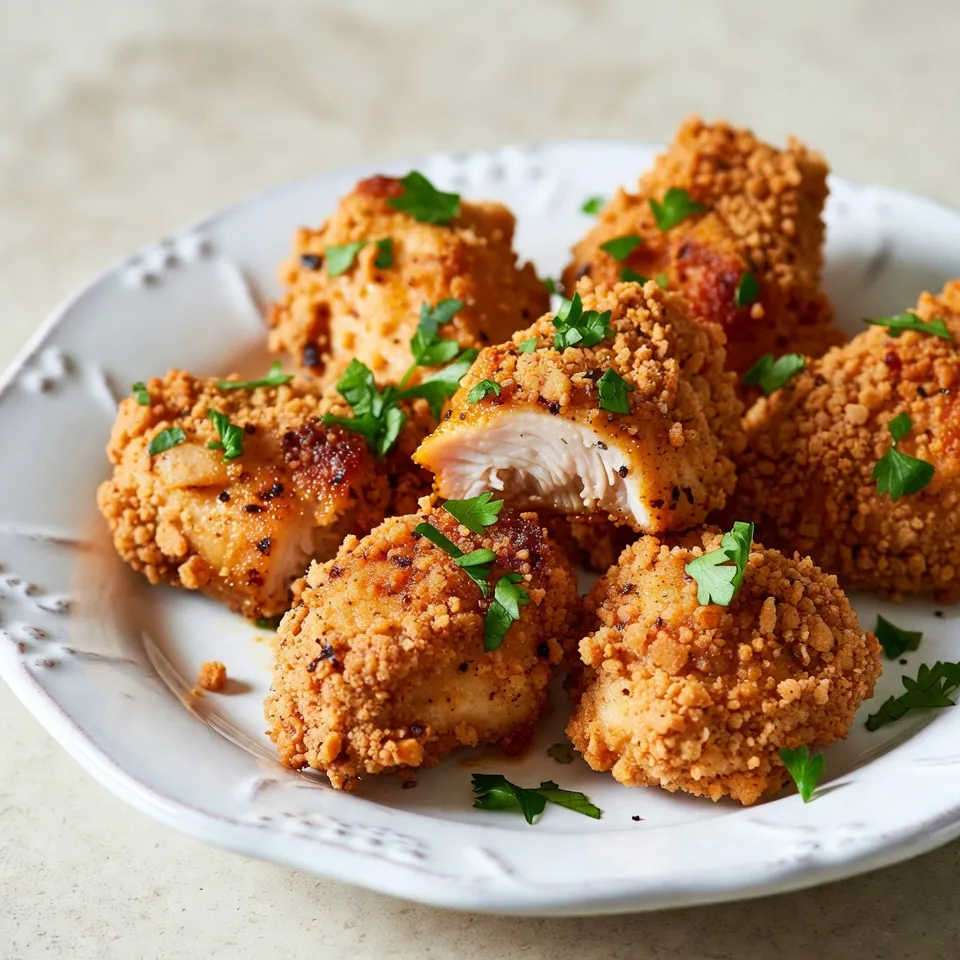

Get ready to spice up your snacking game with my Spicy Cajun Chicken Bites! These crispy, flavorful treats pack a punch and are perfect for any gathering. I’ll guide you through all the steps, from marinating the chicken in creamy buttermilk to achieving that perfect golden crunch. Whether you’re hosting friends or just craving something delicious, these bites are sure to impress. Let’s dive into the tasty details!
Why I Love This Recipe
- Bold Flavor: The Cajun seasoning adds an incredible depth of flavor that tantalizes your taste buds.
- Quick and Easy: This recipe is simple to follow and can be prepared in just over an hour, making it perfect for busy weeknights.
- Versatile Snack: These chicken bites are great as an appetizer, party snack, or even a main dish when served with sides.
- Customizable Spice Level: You can easily adjust the spice by modifying the amount of cayenne pepper to suit your preference.
Ingredients
Main Ingredients
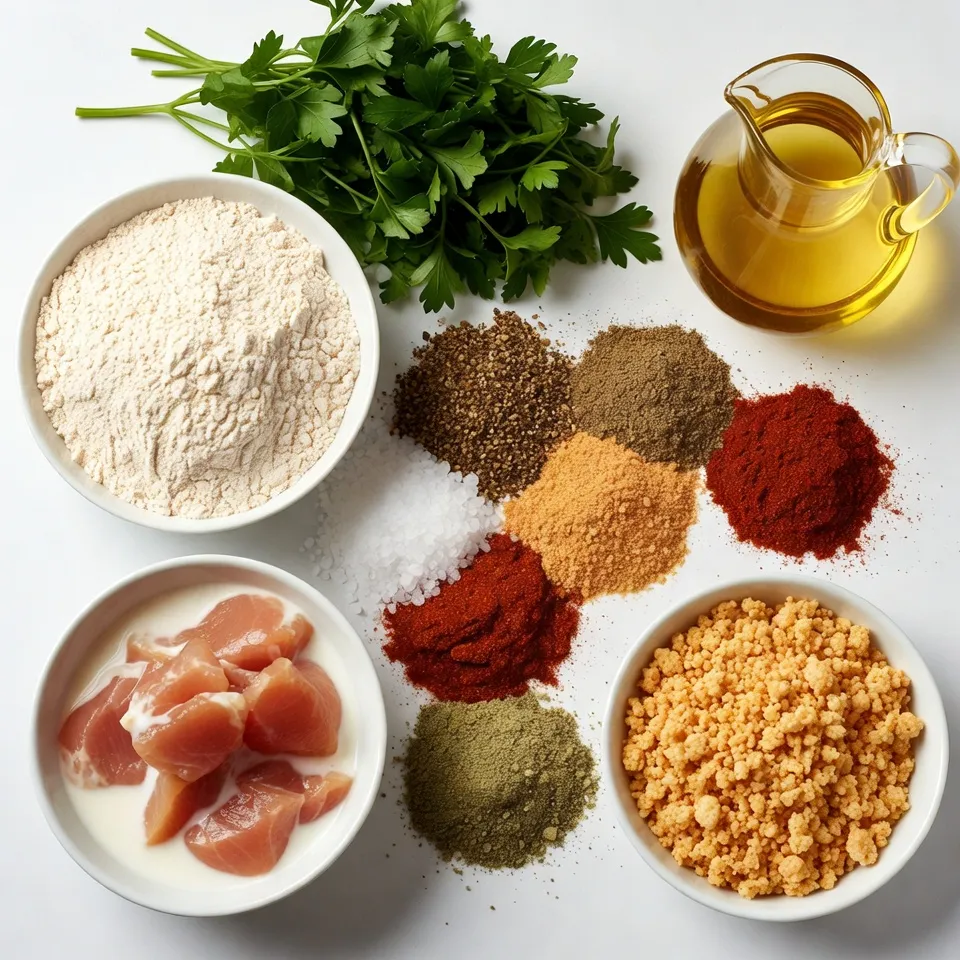
- 1 lb boneless, skinless chicken breasts
- 2 tablespoons Cajun seasoning
- 1 cup buttermilk
To start, you need chicken breasts. Cut them into bite-sized cubes. This makes them easy to cook and eat. Next, use Cajun seasoning. It adds a nice kick. Buttermilk is also key. It helps the chicken stay moist and adds flavor.
Coating and Frying Elements
- 1 cup all-purpose flour
- ½ cup breadcrumbs (panko recommended)
- ¼ cup vegetable oil
For the coating, you need flour. This helps the spices stick. Breadcrumbs give a crunchy texture. I recommend using panko. It makes the bites extra crispy. You will also need vegetable oil for frying. It needs to be hot to get that golden color.
Garnish and Extras
- Fresh parsley
- Optional: Additional Cajun seasoning
Fresh parsley adds a pop of color. It also brightens the dish. You can sprinkle more Cajun seasoning on top. This gives an extra burst of flavor. Enjoy these spicy bites warm and garnished for a great look!
Step-by-Step Instructions
Marinating the Chicken
Marinating in buttermilk is key for great flavor and tenderness. The acid in buttermilk helps the chicken stay juicy. I suggest marinating for at least 1 hour. If you can, let it sit overnight. That gives the spices time to soak in.
Preparing the Seasoning Mix
For the seasoning, you need a few simple items. Gather 2 tablespoons of Cajun seasoning, 1 teaspoon of smoked paprika, and ½ teaspoon each of garlic powder, onion powder, and cayenne pepper. Add a pinch of salt and black pepper too. Mix these in a bowl until well combined. A good blend ensures a burst of flavor in every bite.
Setting Up the Coating Station
Now, let’s set up for coating the chicken. You need three bowls. In the first bowl, put all-purpose flour. The second bowl should have beaten eggs. This step is optional, but it adds a nice crunch. The third bowl gets the breadcrumbs. I recommend using panko for an extra crunchy texture. Each bowl plays a role in making your bites crispy.
Coating the Chicken Bites
When you’re ready to coat, take the marinated chicken from the fridge. Let the excess buttermilk drip off. Start with the flour bowl. Dredge each piece of chicken well. Next, dip it into the egg if you’re using it. Finally, coat it with breadcrumbs. Press down gently so the crumbs stick well. This step is vital for that crunchy finish.
Frying the Chicken Bites
For frying, heat vegetable oil in a large skillet over medium-high heat. The oil should shimmer, showing it’s ready. Fry the chicken bites in batches. Avoid overcrowding the pan. Cook each side for about 4-5 minutes. You want them golden brown. Make sure the inside reaches 165°F (75°C) for safety.
Draining and Seasoning
Once the chicken is cooked, transfer it to a plate lined with paper towels. This helps drain any excess oil. While they are still hot, sprinkle a bit more Cajun seasoning on top. This extra touch gives a flavorful kick. Enjoy your crispy, spicy bites!
Tips & Tricks
Perfecting the Spice Level
To make your Spicy Cajun Chicken Bites just right, adjust the cayenne pepper. Start with ½ teaspoon. If you love heat, add more. If you prefer milder bites, cut back. You can also try other spices like chili powder or smoked paprika. Both can give a great flavor without too much heat.
Achieving Crunchy Texture
Panko breadcrumbs play a big role in achieving that perfect crunch. They are lighter and crispier than regular breadcrumbs. They soak up less oil and fry better. When frying, do it in batches. This helps the chicken cook evenly and stay crispy. Overcrowding the pan can lead to soggy bites.
Presentation Ideas
Serve your chicken bites warm on a colorful platter. Garnish with freshly chopped parsley for a pop of color. Pair them with different dipping sauces like creamy ranch or zesty spicy aioli. This adds flavor and makes the dish visually appealing. Enjoy the crispy bites with your favorite dips for a fun experience!
Pro Tips
- Marinate for Maximum Flavor: Allowing the chicken to marinate overnight in buttermilk not only tenderizes the meat but also infuses it with a rich flavor that enhances the overall dish.
- Choose the Right Oil: For frying, opt for oil with a high smoke point, such as vegetable or canola oil, to achieve a crispy texture without burning the coating.
- Control the Heat: Fry the chicken bites in batches and maintain a consistent medium-high heat to ensure they cook evenly and develop a perfect golden crust.
- Experiment with Dips: Serve these chicken bites with a variety of dipping sauces such as honey mustard, buffalo sauce, or a creamy blue cheese dressing to enhance the flavor experience.

Variations
Flavor Substitutions
You can easily change the spices in your spicy Cajun chicken bites. For a milder flavor, try using smoked paprika or Italian seasoning. If you want to spice things up, mix in some chili powder or even a bit of black pepper.
You can also swap the chicken for shrimp or tofu. Shrimp cooks fast and adds a nice twist. Tofu is a great choice for a vegetarian option. Just make sure to press it to remove extra moisture for better flavor.
Cooking Methods
You can bake or fry your chicken bites. Baking is healthier but may not be as crispy. Frying gives a nice crunch, but you must manage the oil.
If you prefer an air fryer, it’s simple! Set it to 400°F (200°C) and cook for about 10-12 minutes. Shake the basket halfway through for even cooking. This method uses less oil and still keeps the bites crispy.
Serving Ideas
These spicy Cajun chicken bites pair well with side dishes like coleslaw, rice, or fries. Coleslaw adds a cool crunch, while rice soaks up the spice.
For dipping sauces, try creamy ranch for a cool contrast. Zesty spicy aioli works well too, adding a kick. You can also serve them with honey mustard for a sweet twist!
Storage Info
Leftover Storage
Store your spicy Cajun chicken bites in an airtight container. This keeps them fresh and tasty. Place them in the refrigerator within two hours of cooking. They can last about 3 to 4 days in the fridge. If you want to keep them longer, freezing is a great option.
Reheating Instructions
To reheat chicken bites, use an oven or an air fryer. Preheat the oven to 375°F (190°C). Place the bites on a baking sheet in a single layer. Heat for about 10 to 15 minutes or until hot. If using an air fryer, set it to 375°F (190°C) for about 5 to 7 minutes. This will help keep them crispy.
Freezing Options
To freeze chicken bites, let them cool completely first. Then, place them in a freezer-safe bag or container. Make sure to remove as much air as possible. They can be frozen for up to 3 months. When you are ready to eat them, thaw in the refrigerator overnight. Reheat as mentioned above for best results.
FAQs
Can I make Spicy Cajun Chicken Bites without buttermilk?
Yes, you can! If you don’t have buttermilk, try using regular milk. Add a splash of vinegar or lemon juice to sour it. This mix works well for marinating chicken. You can also use yogurt for a thicker coat. Both options keep your chicken juicy and tender.
What can I substitute for Cajun seasoning?
You can make your own Cajun seasoning easily. Mix these spices for a great flavor:
- 1 tablespoon paprika
- 1 teaspoon garlic powder
- 1 teaspoon onion powder
- ½ teaspoon cayenne pepper
- ½ teaspoon dried thyme
- ½ teaspoon black pepper
- ½ teaspoon salt
Feel free to adjust the amounts to fit your taste!
How can I reduce the spice level?
To make the bites milder, cut back on cayenne pepper. You can also use sweet paprika instead of spicy. Another tip is to add more buttermilk to the marinade. This helps tone down the heat while keeping the chicken moist and flavorful.
Can I prepare the chicken bites ahead of time?
Yes, you can! Marinate the chicken bites up to 24 hours in advance. After marinating, coat them and store them in the fridge until ready to fry. This makes it easy to serve fresh chicken bites at your next gathering.
What are some good dipping sauces?
A few great dipping sauces include:
- Creamy ranch dressing
- Spicy aioli made with mayonnaise and hot sauce
- Honey mustard for a sweet touch
- Zesty BBQ sauce for a smoky flavor
These options will add even more flavor to your spicy chicken bites!
To recap, we explored how to create spicy Cajun chicken bites. We covered ingredients, marinating, and frying techniques. Remember, using buttermilk makes your chicken tender and tasty. We also shared tips on spice adjustment and presentation suggestions.
In the end, you can customize these bites with different flavors or cooking methods. Whether you bake or fry, these bites promise delight. Enjoy experimenting in the kitchen with your newfound skill

Zesty Cajun Chicken Bites
Ingredients
- 1 lb boneless, skinless chicken breasts, cut into bite-sized cubes
- 2 tablespoons Cajun seasoning (plus extra for garnish)
- 1 teaspoon smoked paprika
- 0.5 teaspoon garlic powder
- 0.5 teaspoon onion powder
- 0.5 teaspoon cayenne pepper (adjust based on your spice preference)
- to taste Salt and freshly ground black pepper
- 1 cup buttermilk
- 1 cup all-purpose flour
- 0.5 cup breadcrumbs (use panko for added crunchiness)
- 0.25 cup vegetable oil (for frying)
- to taste Fresh parsley, chopped (for garnish)
Instructions
- In a large mixing bowl, place the diced chicken pieces and cover them with buttermilk. Ensure all chicken is submerged. Cover the bowl with plastic wrap and refrigerate for at least 1 hour, though marinating overnight will enhance the flavors profoundly.
- In a medium bowl, whisk together the Cajun seasoning, smoked paprika, garlic powder, onion powder, cayenne pepper, a pinch of salt, and black pepper until well combined.
- Create a three-bowl coating station: Fill the first bowl with flour, the second bowl with beaten eggs (optional but recommended for a crispier finish), and the third bowl with breadcrumbs.
- Remove the marinated chicken from the fridge and allow excess buttermilk to drip off. Starting with the flour, dredge each chicken piece thoroughly, then dip into the egg (if using), and finally coat with breadcrumbs. Press down gently so the breadcrumbs adhere well.
- In a large skillet, heat the vegetable oil over medium-high heat until it shimmers. Working in batches to avoid overcrowding, fry the chicken bites for about 4-5 minutes on each side, or until they are golden brown and their internal temperature reaches 165°F (75°C).
- Once cooked, transfer the chicken bites to a plate lined with paper towels to absorb any excess oil. While they are still hot, sprinkle with a bit more Cajun seasoning for an extra flavor punch.
![- 1 can (15 oz) of chickpeas - 2 tablespoons extra virgin olive oil - Spice seasoning options: smoked paprika, garlic powder, ground cumin Crispy air fryer chickpeas need just a few simple ingredients. First, grab a can of chickpeas. They provide protein and fiber. Next, use extra virgin olive oil for richness. This oil helps the spices stick and adds flavor. For seasoning, I love smoked paprika, garlic powder, and ground cumin. These spices add depth and warmth to the dish. - Chopped fresh parsley or cilantro for garnishing - Alternative spices for flavor enhancement You can add fresh herbs like parsley or cilantro to make it pop. They add a burst of color and freshness. Feel free to play with spices. Try cayenne for heat or even cinnamon for a sweet twist. The options are endless! If you want to see the full recipe, check it out [Full Recipe]. - Preheat air fryer to 400°F (200°C). - Rinse and dry chickpeas thoroughly. Start by preheating your air fryer. Set it to 400°F (200°C) and let it heat for about five minutes. While it warms up, rinse the chickpeas well. It’s key to remove all the canning liquid. After rinsing, spread the chickpeas on a kitchen towel. Pat them dry gently. This step helps them get that perfect crisp. - Mix chickpeas with olive oil and spices. - Transfer to air fryer basket. In a large bowl, add the dried chickpeas. Pour in two tablespoons of olive oil. Sprinkle in smoked paprika, garlic powder, ground cumin, sea salt, and black pepper. Mix well so every chickpea gets coated. Next, transfer the seasoned chickpeas to the air fryer basket. Make sure they are in a single layer. Crowding the basket can lead to uneven cooking. - Set cooking time for 15–20 minutes. - Shake basket every 7 minutes for even cooking. Set the timer for 15 to 20 minutes. It’s important to shake the basket every seven minutes. This ensures all sides get crispy. Look for a nice golden-brown color and a satisfying crunch. When they’re done, let them cool for a few minutes. They will crisp up even more as they cool. If you like, garnish with chopped parsley or cilantro for a fresh touch before serving. To get the best crunch, drying chickpeas is key. Start by rinsing them well. Then, spread them on a clean kitchen towel and gently pat them dry. This step removes excess moisture, which helps them crisp up nicely in the air fryer. Next, set your air fryer to 400°F (200°C). Preheat it for about 5 minutes. This heat is crucial for achieving that perfect texture. When you place the chickpeas in the basket, make sure they are in a single layer. Overcrowding can lead to soggy chickpeas. Crispy chickpeas pair well with many dips. Hummus and tzatziki are two of my favorites. They add creaminess that balances the crunch. You can also toss them into salads for an extra crunch or use them to top soups. If you want to get creative, try using crispy chickpeas as a snack on their own. They make a great addition to trail mixes or can be sprinkled on popcorn for a fun twist. Chickpeas are not just tasty; they're nutritious too. They are high in protein and fiber. This makes them a filling snack that can help you feel satisfied. Air frying reduces the amount of oil needed, so you get a low-calorie snack option without sacrificing flavor. These crispy chickpeas are a great way to enjoy a healthy snack without the guilt. You can feel good about munching on them anytime! For the full recipe, check the section above. {{image_4}} You can change the flavor of your crispy air fryer chickpeas. One fun option is to add spice. Try cayenne or chili powder for a spicy kick. Just mix in a little with your other spices before cooking. If you prefer sweet snacks, go for cinnamon and sugar. This will give your chickpeas a unique twist that's fun and tasty. These chickpeas are healthy and fit many diets. They are naturally gluten-free and vegan-friendly. This means everyone can enjoy them! For those watching their salt intake, you can lower the sodium. Simply reduce or skip the sea salt in the recipe for a low-sodium version. If you're hosting a party, you might want more chickpeas. To increase the batch size, just double or triple the ingredients. The cooking time may stay the same, but keep an eye on them. You can also swap chickpeas for other legumes like black beans or lentils. They will work well in the air fryer and offer different flavors. Each option can give you a fun new snack! Check out the [Full Recipe](#) for detailed steps on making these crispy delights! To store your crispy chickpeas, use an airtight container. This will help them stay crunchy. A glass jar or a plastic container with a tight lid works well. Make sure to let them cool completely before sealing. This step prevents moisture buildup. You can easily reheat chickpeas in an air fryer. Set it to 350°F (175°C) and heat for about 5 minutes. This method keeps them crispy. If you prefer the oven, place them on a baking sheet at the same temperature. Check often to avoid sogginess. Crispy chickpeas last for about 3 days at room temperature. If you store them in the fridge, they may last a bit longer, but they can lose some crispiness. For best results, enjoy them fresh! To make air fryer chickpeas crispy, first dry them well. After rinsing, spread them on a clean towel and pat them dry. Removing moisture is key for that perfect crunch. Next, toss the chickpeas with olive oil and spices. The oil helps them crisp up in the air fryer. Set your air fryer to 400°F (200°C). Cook them for 15 to 20 minutes, shaking the basket every 7 minutes. This ensures even cooking and a nice, golden-brown color. Keep an ear out for a satisfying crunch as they cook. Let them cool for a few minutes after frying. They will get even crunchier as they cool. Yes, you can use dried chickpeas, but they require more prep. Start by soaking the dried chickpeas overnight. This softens them and reduces cooking time. After soaking, rinse and boil them until tender, about 1 to 2 hours. Once cooked, follow the same steps to dry and season them. Air frying time may be longer, as dried chickpeas need to lose more moisture. Pay close attention to their texture for that perfect crunch. Crispy chickpeas pair well with many dips. Try hummus for a classic touch. Tzatziki offers a cool contrast. You can also serve them with guacamole for a creamy twist. For a spicy kick, mix them with a sriracha mayo. These dips enhance the flavors of the chickpeas. They make for a fun and tasty snack or appetizer. Enjoy exploring different combinations to find your favorite! For the full recipe, check out the [Full Recipe]. Crispy air fryer chickpeas are easy and fun to make. We covered the main ingredients, like chickpeas and olive oil, and talked about spices for extra flavor. You learned preparation steps, tips for crispiness, and fun ways to enjoy this snack. Try different spices or dips to keep it exciting. Crispy chickpeas are a tasty, healthy option for any event. Enjoy your cooking and happy snacking!](https://dishtreats.com/wp-content/uploads/2025/07/61bc6060-fad3-40a7-be2f-ccc6788a1d37-768x768.webp)

![- 1 can (15 oz) black beans, thoroughly rinsed and drained - 1 cup sweet corn (use fresh, frozen, or canned) - 1 large red bell pepper, diced into bite-sized pieces - 1 ripe avocado, diced - 1/2 medium red onion, finely chopped for a milder flavor - 1 cup cherry tomatoes, halved for bursts of sweetness - 1/4 cup fresh cilantro, finely chopped for an aromatic touch The foundation of my zesty black bean salad lies in the fresh ingredients. Black beans serve as the protein-packed base. They add a creamy texture and earthy flavor. Sweet corn brings a pop of sweetness, balancing the dish. A red bell pepper adds crunch and color. Diced avocado gives a rich, buttery taste. Finely chopped red onion adds a mild bite, while halved cherry tomatoes provide juicy bursts. Finally, fresh cilantro adds a bright finish, tying all the flavors together. - 2 tablespoons freshly squeezed lime juice - 1 tablespoon high-quality olive oil - 1 teaspoon ground cumin for warmth - 1 teaspoon garlic powder for depth - Salt and freshly cracked black pepper to taste The dressing is key to making the salad come alive. Fresh lime juice adds a zesty kick. Olive oil brings richness and ties the salad together. Ground cumin adds a warm, earthy note. Garlic powder deepens the flavor profile. Finally, salt and black pepper enhance all the tastes, making each bite delightful. - Portion size and garnishes - Optional accompaniments For serving, I like to present the salad in a large, colorful bowl. This makes it inviting and fun. You can also portion it into individual cups for a neat look. Garnish with extra cilantro leaves and lime wedges for a fresh touch. This salad pairs well with grilled chicken or fish. It also makes a great filling for wraps or tacos. Enjoy the zesty flavors and vibrant colors! For the full recipe, check out the details above. To start, grab a big mixing bowl. Add the rinsed black beans, sweet corn, diced red bell pepper, diced avocado, finely chopped red onion, halved cherry tomatoes, and chopped cilantro. Mix them all together well. Make sure each ingredient spreads out. This ensures every bite is full of flavor. Next, take a small bowl. In it, whisk together the freshly squeezed lime juice, olive oil, ground cumin, garlic powder, and a good pinch of salt and black pepper. Keep whisking until the dressing is smooth and well mixed. This mixture will bring out the best in the salad. Now, drizzle the dressing over your salad mixture. Using a large spoon or spatula, gently toss everything together. You want each piece coated with that zesty dressing. After tossing, taste the salad. You can add more lime juice or salt if needed. Let the salad sit for 10-15 minutes at room temperature. This resting time helps all the flavors blend nicely before you serve it. Check out the Full Recipe to see all the details! To make your Zesty Black Bean Salad shine, adjust the seasoning to suit your taste. Start with a little salt and pepper, then taste. If it needs more, add gradually until it’s perfect. You can also squeeze in a splash of extra lime juice. This adds brightness and makes the flavors pop. Using canned ingredients can save you time. Canned black beans and corn are quick and easy. Just rinse and drain them well. If you prefer fresh, that’s great too! Prepping ingredients in advance can also help. Chop your veggies the day before. Store them in the fridge until you’re ready to mix. Serving style can make your salad more appealing. Use a large, colorful bowl to showcase the bright ingredients. You can also serve it in cups for individual portions. Garnish with extra cilantro leaves and lime wedges. This adds a fresh look and invites guests to enjoy your creation. For the full recipe, check the details above! {{image_4}} You can easily swap beans in this salad. Try pinto beans or kidney beans for a different taste. Each bean brings its own flavor and texture. Adding or substituting vegetables can change the salad’s vibe. Consider diced cucumber for crunch or chopped jalapeño for heat. Roasted red peppers can add a smoky note. Use what you like! This salad is vegan and gluten-free. It fits well into many diets. If you want more protein, add grilled chicken or shrimp. Both options pair great with the zesty flavors. You can also use tofu or tempeh for a plant-based protein boost. Both options add texture while keeping it healthy. Want to mix up the dressing? Try a simple vinaigrette with balsamic vinegar instead of lime juice. It adds a sweet tang. You could also use a creamy dressing, like ranch or avocado dressing. This change can make the salad richer and more filling. For a spicy kick, add some hot sauce to your dressing. Experiment to find your favorite combination! For the full recipe and more ideas, check the [Full Recipe]. Store Zesty Black Bean Salad in an airtight container. Glass containers work best, but plastic ones are fine too. Make sure everything is sealed tight. This keeps the flavors fresh. Keep the salad in the fridge for the best taste. To batch prepare, mix all ingredients except avocado. Add avocado just before serving. This keeps it from browning. You can store the salad for up to three days. After that, it may lose its crunch and flavor. You can freeze black bean salad, but I don’t recommend it. Freezing changes the texture of the ingredients. If you decide to freeze it, do so without avocado. To thaw, place the salad in the fridge overnight. This helps it retain some freshness. Yes, you can make this salad ahead of time. It tastes even better after resting. To prep, mix all the salad ingredients in a bowl. Keep the dressing separate until you're ready to serve. This keeps the salad fresh and crunchy. Store the salad in a sealed container in the fridge. It can last up to two days. Just remember to add the dressing just before serving. This salad pairs well with many dishes. Try serving it with grilled chicken or fish for a complete meal. You can also enjoy it with tacos or burritos for a fun twist. It works great as a side dish for barbecues. If you want a lighter meal, serve it with whole-grain pita bread. The flavors blend well with many cuisines. Yes, this salad is very healthy! Black beans are rich in protein and fiber, which help you feel full. They also support heart health and digestion. The fresh veggies add vitamins and minerals. Avocado provides healthy fats that are good for your skin. The lime juice boosts your vitamin C intake. Overall, this salad is a great choice for a nutritious meal. For the full recipe, check out the vibrant Zesty Black Bean Salad! This blog post covered the essentials for making a delicious black bean salad. We explored fresh ingredients, dressings, serving ideas, and tips for great flavor. You can customize it to fit your taste and dietary needs, too. Remember to store your salad properly for freshness. A well-made salad can be a healthy, tasty dish that fits into your meal plans. Enjoy your cooking and delight in each bite of your Zesty Black Bean Salad!](https://dishtreats.com/wp-content/uploads/2025/07/dc2c0f53-4615-45f1-afed-f531318cc377-768x768.webp)
![To make loaded Greek fries, you need fresh and tasty ingredients. Here’s what you need: - 4 large Russet potatoes - 1/4 cup olive oil - 1 teaspoon garlic powder - 1 teaspoon paprika - Salt and pepper to taste - 1 cup crumbled feta cheese - 1 cup cherry tomatoes, halved - 1/2 cup Kalamata olives, pitted and sliced - 1/2 cucumber, diced - 1/4 red onion, finely chopped - Fresh parsley, chopped for garnish - 1/2 cup tzatziki sauce You can get creative with your fries! Here are some tasty toppings to try: - Sliced jalapeños for heat - Chopped bell peppers for crunch - Grilled chicken or lamb for protein - Avocado for creaminess Season your fries to boost flavor! Here are some ideas: - Oregano adds a nice herbal flavor. - Lemon zest gives a fresh, zesty touch. - Red pepper flakes can spice things up. - Dill pairs well with tzatziki and adds brightness. These ingredients and toppings make loaded Greek fries a fun and easy dish. You can mix and match to fit your taste. Enjoy cooking with this Full Recipe! To start, wash four large Russet potatoes. Make sure to scrub them well. Next, cut the potatoes into thin fries, about 1/4 inch thick. This size helps them cook evenly. Place the cut fries in a large bowl. Drizzle 1/4 cup of olive oil over them. Add 1 teaspoon of garlic powder and 1 teaspoon of paprika. Sprinkle salt and pepper to taste. Toss the fries. Make sure every fry gets coated well. Now it's time to bake. Preheat your oven to 425°F (220°C). Spread the seasoned fries on a baking sheet lined with parchment paper. Try to keep them in one layer. This helps them get crispy. Bake for 25 to 30 minutes. Remember to flip them halfway through. Look for a golden brown color when they are done. While the fries bake, prepare the toppings. In a medium bowl, mix 1 cup of halved cherry tomatoes, 1/2 cup of sliced Kalamata olives, 1/2 diced cucumber, and 1/4 cup of finely chopped red onion. Drizzle a bit of olive oil over this mix. Add salt and pepper to taste, then gently combine. When the fries are ready, pull them out of the oven. Immediately sprinkle 1 cup of crumbled feta cheese on top. Next, add your prepared veggie mix. Finally, add a generous dollop of tzatziki sauce on top. For a nice finish, sprinkle chopped fresh parsley for color. Enjoy your Loaded Greek Fries! You can find the full recipe [here]. To make the best fries, start with the right potatoes. I prefer Russet potatoes for their starchiness. Cut your fries thin, around 1/4 inch thick. This helps them cook evenly and get crispy. Soak the cut fries in cold water for at least 30 minutes. This removes extra starch and aids crispiness. After soaking, dry them well with a towel. Coat the fries with olive oil and seasonings. Bake at 425°F (220°C) for 25-30 minutes. Remember to flip them halfway through for an even crunch. Great flavor makes all the difference. I love using garlic powder and paprika for a warm, savory taste. Add salt and pepper to taste. You can also try adding dried oregano or thyme for a Greek touch. Don't be afraid to experiment! Mix your favorite spices into the oil before coating the fries. This will infuse flavor right into the fries. For an extra kick, add some chili powder or cayenne pepper. Presentation matters when serving Loaded Greek Fries. Serve them on a large platter for a fun look. Drizzle extra Tzatziki sauce over the top for a creamy touch. Use fresh parsley to add color and freshness. You can also add slices of lemon for a pop of brightness. For easy serving, provide toothpicks or small forks. This makes it fun for guests to enjoy! For the full recipe, check out the detailed instructions above. {{image_4}} You can make Loaded Greek Fries vegetarian by skipping the meat toppings. The base is already rich with flavor. Use extra toppings like roasted red peppers or artichoke hearts. You can also add a variety of cheeses, like goat cheese or mozzarella, for a creamy twist. These options keep the dish hearty and satisfying. If you want to add protein, consider grilled chicken or shrimp. Both pair well with the Greek flavors. Gyro meat is another great choice. Cook it until it's crispy and flavorful. You can also try chickpeas for a plant-based protein. They add a nice crunch and boost the nutrition. Different regions of Greece offer unique flavors. From the island of Crete, you can add capers and mint for a fresh taste. In the north, try adding smoked paprika for depth. From the Peloponnese, olives and citrus zest can give a bright flavor. Mix and match these ingredients for your own twist on Loaded Greek Fries. For the full recipe, check out the complete guide on Loaded Greek Fries. To keep your loaded Greek fries fresh, let them cool first. Place them in an airtight container. If you have toppings like tomatoes or cucumbers, store them separately. This keeps everything crisp. When you want to enjoy your leftovers, preheat your oven to 375°F (190°C). Spread the fries on a baking sheet. Heat for about 10-15 minutes until hot and crispy. Avoid microwaving them, as this can make them soggy. These loaded Greek fries last about 2-3 days in the fridge. Make sure they are in an airtight container. If you notice any change in smell or texture, it’s best to toss them. Enjoy them fresh for the best taste! I recommend using Russet potatoes for Loaded Greek Fries. They are starchy and fluffy, which gives you that nice, crispy texture when baked. Their skin adds a great crunch, too. Yukon Gold potatoes also work well. They are creamier, which can add a different taste. Yes, you can prepare the fries ahead of time! Cut the potatoes and soak them in water to keep them fresh. This step removes some starch and helps them crisp up better. When you are ready to cook, just dry them off and season them. Bake them fresh for the best taste. Loaded Greek Fries go well with many dishes. They are great alongside grilled meats like chicken or lamb. You can serve them with a fresh Greek salad for a light meal. They also pair nicely with tzatziki, which adds a cool contrast to the warm fries. Enjoy them as a fun snack at gatherings or parties! For a complete experience, check out the Full Recipe to guide you through making these tasty fries. Loaded Greek fries are a fun dish packed with flavors. We explored key ingredients, optional toppings, and tasty seasonings. I shared step-by-step instructions to prepare and bake your fries, then assemble them perfectly. I offered tips for crispy fries and smart presentation ideas. You can even customize your dish with vegetarian options or protein toppings from various Greek regions. Finally, I outlined storage tips to keep leftovers fresh. Enjoy making these fries; they are sure to impress everyone!](https://dishtreats.com/wp-content/uploads/2025/06/9c6541bd-b31d-423a-b196-3f6ab3dd7c20-768x768.webp)