Teriyaki Chicken Lettuce Cups Flavorful Light Meal


Looking for a light meal that’s bursting with flavor? You’ve found it! These Teriyaki Chicken Lettuce Cups are easy to make and perfect for any occasion. I’ll guide you through each step with tips on ingredients, cooking, and storage. Whether you’re looking for a quick family dinner or a fun dish for guests, this recipe won’t disappoint. Let’s dive into a tasty, healthy treat that’s sure to impress!
Why I Love This Recipe
- Flavorful Marinade: The combination of soy sauce, honey, and ginger creates a deliciously sweet and savory profile that perfectly complements the tender chicken.
- Healthy Option: Using lettuce cups instead of traditional wraps provides a fresh, low-carb alternative that doesn’t sacrifice flavor.
- Quick and Easy: This recipe comes together in under an hour, making it perfect for busy weeknight dinners or last-minute gatherings.
- Customizable: Feel free to add your favorite vegetables or adjust the sweetness to your taste, making this recipe versatile for any palate.
Ingredients
Complete List of Ingredients
To make Teriyaki Chicken Lettuce Cups, gather the following items:
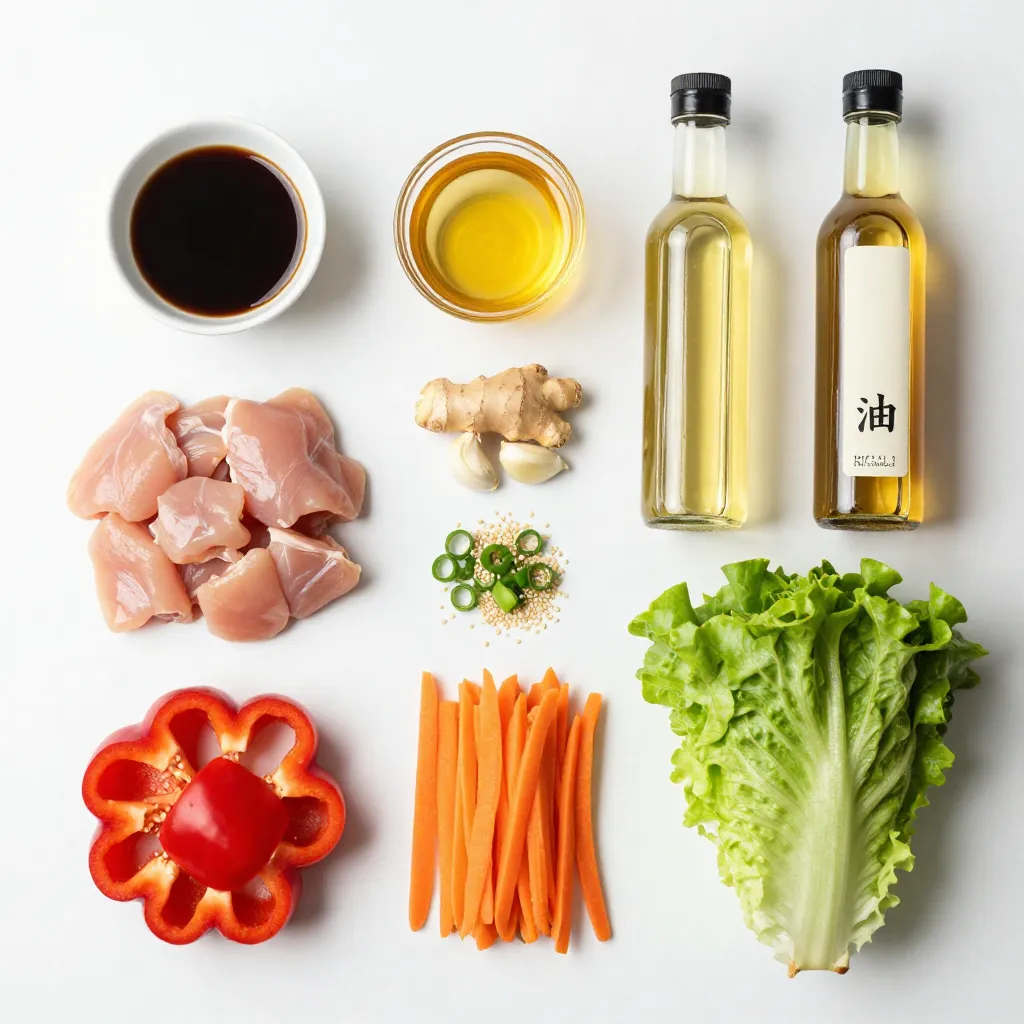
- 1 pound boneless, skinless chicken thighs, diced into bite-sized pieces
- 1/4 cup soy sauce (low-sodium recommended for a healthier option)
- 1/4 cup honey (use maple syrup for a vegan alternative)
- 2 tablespoons rice vinegar (or apple cider vinegar)
- 2 tablespoons sesame oil (adds a rich flavor)
- 1 tablespoon fresh ginger, finely grated
- 3 cloves garlic, minced
- 1 red bell pepper, diced into small cubes
- 1 medium carrot, shredded (you can use a peeler for thin strips)
- 3 green onions, thinly sliced (separate white and green parts)
- 1 tablespoon sesame seeds (toasting them enhances their flavor)
- 1 head of butter or iceberg lettuce, leaves gently separated for easy stuffing
- Salt and pepper to taste
Recommended Substitutions for Dietary Preferences
You can adjust this recipe to fit various diets:
- For a gluten-free option, use tamari instead of soy sauce.
- Maple syrup works as a vegan substitute for honey.
- If you prefer chicken breast, it can replace chicken thighs.
- For a lower-calorie dish, skip the sesame oil or use a light oil.
Optional Garnishes and Presentation Tips
Garnishes can make your dish pop. Here are some ideas:
- Sprinkle extra sesame seeds on top for added crunch.
- Add lime wedges on the side for a zesty flavor boost.
- Use the green parts of the green onions as a fresh topping.
- Serve on a colorful platter to make it visually appealing.
These tips can elevate your Teriyaki Chicken Lettuce Cups and impress your guests!
Step-by-Step Instructions
Detailed Cooking Instructions
1. Mix the sauce. In a medium bowl, combine 1/4 cup soy sauce, 1/4 cup honey, 2 tablespoons rice vinegar, and 2 tablespoons sesame oil. Add 1 tablespoon fresh ginger and 3 cloves minced garlic. Whisk until smooth.
2. Marinate the chicken. Add 1 pound diced chicken thighs to the bowl. Make sure each piece is coated well. Cover the bowl. Let it sit for 30 minutes at room temperature, or refrigerate for up to 2 hours.
3. Heat the skillet. Get a large skillet hot over medium-high heat. Carefully add the marinated chicken and the marinade to the skillet.
4. Cook the chicken. Stir occasionally for about 8-10 minutes. The chicken should be cooked through and caramelized.
5. Add veggies. Toss in 1 diced red bell pepper and 1 shredded medium carrot. Sauté for 3-4 minutes until tender but crisp.
6. Finish the dish. Remove the skillet from heat. Fold in 3 sliced green onions and 1 tablespoon sesame seeds. Season with salt and pepper to taste.
7. Serve. Arrange lettuce leaves on a platter. Spoon the chicken mixture into each leaf. Top with the reserved green onion tops.
Tips for Marinating Chicken for Optimal Flavor
- Use fresh ingredients. Fresh ginger and garlic provide a stronger flavor.
- Marinate longer. For the best taste, let chicken marinate for 2 hours.
- Keep it covered. Cover your bowl to prevent contamination and enhance flavor absorption.
Cooking Tips for Achieving Caramelization
- High heat is key. Make sure your skillet is hot before adding chicken.
- Do not overcrowd. Cook the chicken in batches if needed. This helps with browning.
- Stir gently. Stirring too much can prevent the chicken from getting a nice crust.
By following these steps and tips, you will create a delicious and light meal that everyone will enjoy!
Tips & Tricks
Essential Tips for Perfect Teriyaki Sauce
To make the best teriyaki sauce, you need balance. Use low-sodium soy sauce to keep it light. Honey adds sweetness, while rice vinegar gives it a tangy kick. Sesame oil brings a rich flavor that makes the sauce shine. Always whisk well to combine these ingredients. Letting the sauce sit for a while helps the flavors meld.
Common Mistakes to Avoid
One common mistake is not marinating long enough. Marinate chicken for at least 30 minutes. This step is key for flavor. Another mistake is overcooking the chicken. Keep an eye on it to prevent dryness. Lastly, don’t forget to season your mixture with salt and pepper at the end. This final touch enhances the flavors.
Customization Options for Different Taste Preferences
You can easily customize this dish. For a spicier kick, add some red pepper flakes to the sauce. If you prefer a sweeter taste, increase the honey or use maple syrup. Want to make it vegan? Replace chicken with tofu or chickpeas. Feel free to swap in your favorite veggies too, like zucchini or snap peas.
Pro Tips
- Marinate for Flavor: Allow the chicken to marinate for at least 2 hours in the refrigerator to enhance the teriyaki flavor. The longer it marinates, the more flavorful the dish will be.
- Use Fresh Ingredients: Fresh ginger and garlic will provide a more vibrant taste compared to dried alternatives. Use them if possible for the best results.
- Customize Your Veggies: Feel free to add or substitute with other vegetables like snap peas, mushrooms, or shredded cabbage for added texture and flavor.
- Serving Size Matters: To keep the lettuce cups intact, avoid overfilling them. Serve the teriyaki mixture on the side for guests to add as they like.
Variations
Vegan and Vegetarian Alternatives
You can easily make teriyaki chicken lettuce cups vegan. Use tofu or tempeh instead of chicken. Press the tofu to remove excess water. Cut it into small cubes and marinate just like the chicken. Cook it until it’s golden and crispy. For a flavorful twist, try using jackfruit. Its texture mimics shredded chicken well and absorbs flavors nicely.
Gluten-Free Teriyaki Chicken Lettuce Cups
To make gluten-free teriyaki chicken lettuce cups, simply switch the soy sauce. Use tamari, which is gluten-free. This keeps the dish tasty while being safe for those who avoid gluten. Check that all other ingredients, like honey and rice vinegar, are also gluten-free.
Alternative Vegetables and Add-ins
Feel free to mix in other vegetables. Shredded cabbage adds crunch, while sliced cucumbers bring freshness. You can also add sliced mushrooms for an earthy flavor. If you like some spice, try adding diced jalapeños or sriracha. These additions make the dish even more vibrant and fun!
Storage Info
How to Store Leftover Lettuce Cups
To store leftover lettuce cups, first, separate the filling from the lettuce leaves. This keeps the lettuce fresh and crisp. Place the chicken mixture in an airtight container. You can keep it in the fridge for up to three days. For the lettuce leaves, wrap them in a damp paper towel. Then, store them in a plastic bag in the fridge. This helps maintain their crunch.
Reheating Suggestions for Best Results
When reheating the chicken filling, use a skillet over medium heat. This method warms the chicken evenly and keeps it juicy. Stir occasionally until it’s heated through. You can also microwave it in a bowl covered with a damp paper towel. This technique adds steam and prevents drying out. Avoid reheating the lettuce leaves; serve them fresh for best texture.
Freezing Guidelines and Duration
If you want to freeze the chicken filling, it works well. Use a freezer-safe container or a zip-top bag. Remove as much air as possible before sealing. The filling can stay frozen for up to three months. When ready to eat, thaw it overnight in the fridge. Reheat it on the stove for great flavor. Do not freeze the lettuce; it won’t hold up well.
FAQs
Can I use chicken breast instead of thighs?
Yes, you can use chicken breast. Chicken breast is leaner than thighs. It will still taste great with the teriyaki sauce. Just keep in mind that chicken breast can dry out faster. So, watch the cooking time. Aim for about 6-8 minutes of cooking. Check the chicken for doneness; it should be white and juicy.
What are the best types of lettuce for this recipe?
I recommend butter or iceberg lettuce. They have soft, sturdy leaves. These types hold the filling well. You can also try romaine or even bok choy. Each one adds a different crunch. Just pick the freshest leaves for a crisp bite.
How can I make this dish spicier?
To add heat, include chili flakes or sriracha in the marinade. You can also use fresh jalapeños. Another option is to add a dash of hot sauce when serving. Adjust the spice to your taste. Enjoy the kick!
In this blog post, we explored the key ingredients for teriyaki chicken, including substitution tips and presentation ideas. I shared step-by-step instructions for cooking and marinating chicken for the best flavor. We also covered essential tips for sauce perfection and common mistakes to avoid. You learned about delicious variations, storage methods, and answered FAQs.
Incorporating these insights will help you create a tasty dish that suits your needs. Enjoy experimenting with flavors and make teriyaki your ow

Teriyaki Chicken Lettuce Cups
Ingredients
- 1 pound boneless, skinless chicken thighs, diced into bite-sized pieces
- 1 cup soy sauce
- 1 cup honey
- 2 tablespoons rice vinegar
- 2 tablespoons sesame oil
- 1 tablespoon fresh ginger, finely grated
- 3 cloves garlic, minced
- 1 red bell pepper diced into small cubes
- 1 medium carrot, shredded
- 3 green onions thinly sliced
- 1 tablespoon sesame seeds
- 1 head butter or iceberg lettuce, leaves gently separated
- to taste salt and pepper
Instructions
- In a medium mixing bowl, combine the soy sauce, honey, rice vinegar, sesame oil, freshly grated ginger, and minced garlic. Whisk together until well blended to create your delicious teriyaki marinade.
- Add the diced chicken thighs into the marinade, ensuring each piece is thoroughly coated. Cover the bowl and let the chicken marinate for at least 30 minutes at room temperature, or place it in the refrigerator for up to 2 hours for deeper flavor.
- Heat a large skillet over medium-high heat until hot. Carefully add the marinated chicken along with the marinade to the skillet. Cook, stirring occasionally, for about 8-10 minutes, or until the chicken is cooked through and has achieved a lovely caramelized texture.
- Toss in the diced red bell pepper and shredded carrot to the skillet. Sauté for an additional 3-4 minutes until the vegetables become tender but still crisp.
- Remove the skillet from heat and fold in the sliced green onions (reserve the green parts for garnish) and sesame seeds. Season the mixture with salt and pepper according to your taste preferences.
- To serve, elegantly arrange the lettuce leaves on a large platter. Generously spoon the savory teriyaki chicken mixture into each leaf, making sure they are filled nicely. Top with the reserved green onion tops for an added crunch and freshness.


![To make avocado chocolate chip cookies, gather these simple items: - 1 ripe avocado, thoroughly mashed - 1/2 cup packed brown sugar - 1/4 cup granulated sugar - 1/4 cup unsalted butter, melted and slightly cooled - 1 teaspoon pure vanilla extract - 1 large egg, room temperature - 1 cup all-purpose flour - 1/2 teaspoon baking soda - 1/4 teaspoon fine sea salt - 1 cup semisweet chocolate chips These ingredients create a tasty cookie with a twist. If you don’t have some items, here are good swaps: - Avocado: Use 1/2 cup unsweetened applesauce. This keeps it moist. - Butter: Coconut oil works well. It adds a hint of flavor. - Brown Sugar: Use coconut sugar for a lower glycemic option. - All-purpose flour: Try oat flour for a gluten-free choice. These substitutes can change the flavor and texture but still taste great. These cookies are not just yummy; they also pack some nutrition. Here’s a quick look: - Calories: About 120 per cookie - Fat: 6g (mostly healthy fats from avocado) - Carbohydrates: 16g - Protein: 1g - Fiber: 1g Using avocado adds healthy fats and fiber. You can enjoy a treat without feeling guilty. For the full recipe, check out my detailed guide. 1. Preheat your oven to 350°F (175°C). This is key for even baking. 2. Line a baking sheet with parchment paper. This makes cleanup easy and prevents sticking. 3. In a large bowl, mash one ripe avocado until smooth. It should be creamy. 4. Add 1/2 cup brown sugar, 1/4 cup granulated sugar, 1/4 cup melted butter, and 1 teaspoon vanilla extract. Mix until smooth and creamy. 5. Crack one large egg into the bowl. Whisk until the mix is fluffy and well combined. 6. In another bowl, mix 1 cup flour, 1/2 teaspoon baking soda, and 1/4 teaspoon salt. This helps the cookies rise. 7. Slowly add the dry mix to the wet mix. Stir gently until combined. A few lumps are fine. 8. Fold in 1 cup of chocolate chips with a spatula. Make sure they spread evenly in the dough. 1. Use a tablespoon or cookie scoop to place rounded dough on the baking sheet. Space them about 2 inches apart. 2. Bake in the preheated oven for 10-12 minutes. Look for golden edges and soft centers. 3. Once done, take the cookies out of the oven. Let them sit on the sheet for about 5 minutes. This helps them firm up. 1. Transfer the cookies to a wire rack to cool completely. 2. Serve the cookies in a jar or on a decorative plate. 3. For a special touch, sprinkle them with sea salt before serving. This enhances the chocolate flavor. Follow the [Full Recipe] to make these tasty avocado chocolate chip cookies! - Use a ripe avocado. It should feel soft to the touch. - Measure your ingredients accurately for the best results. - Mix the wet ingredients until creamy for a smooth dough. - Don’t overmix when adding dry ingredients; a few lumps are okay. - Space cookies at least 2 inches apart on the baking sheet. - Using unripe avocados can lead to a gritty texture. - Overbaking makes cookies hard instead of soft and chewy. - Forgetting to let the melted butter cool can change the dough. - Not cooling cookies on a wire rack can make them soggy. - Store cookies in an airtight container to keep them fresh. - For longer storage, freeze the cookies in a freezer bag. - To reheat, warm cookies in the oven at 300°F (150°C) for 5-7 minutes. - Enjoy them warm for that fresh-baked taste! For the full recipe, check out the details above. {{image_4}} You can make vegan avocado chocolate chip cookies easily. Replace the egg with a flax egg. To make a flax egg, mix 1 tablespoon of ground flaxseed with 2.5 tablespoons of water. Let it sit for 5 minutes until it thickens. Use the same method as the original recipe. The cookies will still be soft and tasty. If you want gluten-free cookies, swap all-purpose flour for almond or oat flour. Both options work well. Just ensure they are finely ground. Adjust the amount slightly, as these flours absorb moisture differently. The taste will change, but the cookies will remain delicious. Get creative with your cookies! You can add nuts like walnuts or pecans for crunch. Dried fruit, like cranberries or raisins, adds a sweet touch. For a fun twist, try adding a teaspoon of instant coffee or a pinch of cinnamon. Each choice adds a unique flavor to your cookies. To keep your avocado chocolate chip cookies fresh, use an airtight container. Place parchment paper between layers to prevent sticking. Store them at room temperature for up to three days. If you want to keep them longer, consider refrigerating them. Just let them warm up to room temp before eating. You can freeze the cookie dough for later use. Scoop the dough onto a baking sheet and freeze until firm. Once solid, transfer the dough balls to a zip-top bag. They will last in the freezer for up to three months. When you’re ready to bake, just take them out and let them thaw for about 30 minutes before baking. Baked cookies can last about a week in an airtight container at room temperature. If you notice them getting hard, pop them in the microwave for a few seconds. This will soften them up again. For the best taste, try to eat them within a few days. Enjoy your delicious treats from the Full Recipe! Yes, you can use ripe avocados for this recipe. Ripe avocados add a smooth texture and rich taste. Look for avocados that yield slightly when you press them. This softness means they are ready to mash. The ripeness helps make the cookies moist and flavorful. You can also mash the avocado with a fork or a blender for a creamy mix. To know when the cookies are done, check the edges. They should be golden brown. The centers may look soft and slightly undercooked. This is perfect! They will firm up as they cool. For best results, set a timer for 10-12 minutes. Keep an eye on them to avoid burning. If your cookies turn hard, you can soften them easily. Place a slice of bread in the container with the cookies. The moisture from the bread will help them soften. You can also microwave cookies for a few seconds. This will warm them up and make them soft again. Store leftover cookies in an airtight container to keep them fresh longer. This blog post covered key ingredients, step-by-step instructions, and tips for making cookies. You learned about ingredient substitutes and nutrition too. I shared variations like vegan and gluten-free options. Storing and reheating cookies is essential to enjoy them longer. Remember the common mistakes to avoid for perfect cookies every time. Use the FAQ section for quick answers. Try these tips and recipes to create delicious cookies that everyone loves. Enjoy your baking adventure and happy eating!](https://dishtreats.com/wp-content/uploads/2025/07/2a4aa59d-42b3-40d6-b422-d0063b121310-768x768.webp)

. First, preheat your oven to 400°F (200°C). This sets the perfect baking temp for our scones. While the oven heats up, line a baking sheet with parchment paper. This keeps the scones from sticking and makes cleanup easy. In a large bowl, mix the dry ingredients. Add 2 cups of flour, 1/3 cup of sugar, 1 tablespoon of baking powder, and 1/2 teaspoon of salt. Whisk these together until they are well blended. Next, add in 1/2 cup of cold, diced butter. Use your fingers or a pastry cutter to mix the butter in until it looks like coarse crumbs. Now, add 1 cup of blueberries and the zest of 1 lemon. Gently fold these into the mix without squishing the berries. In another bowl, prepare the wet ingredients. Whisk together 1/4 cup of heavy cream, 1 large egg, 1 teaspoon of vanilla extract, and 1 tablespoon of fresh lemon juice. Once mixed, pour this into the dry mix. Stir gently until the dough just comes together. It should feel a bit sticky. Turn the dough out onto a floured surface. Knead it gently a few times, just until it holds together. Pat the dough into a round shape about 1 inch thick. Use a sharp knife to cut the dough into 8 wedges. Place these on your lined baking sheet, leaving space between them. Now, they are ready for the oven. For the full recipe, check the details provided above. Enjoy making your lemon blueberry scones! To make your scones fluffy and flaky, keep your butter cold. When you mix the butter with the dry ingredients, it should stay in small chunks. This creates pockets of steam while baking, giving you that perfect texture. Also, avoid overmixing the dough. Mix just until everything comes together. A little stickiness is okay. One common mistake is using warm butter. Always use chilled butter for best results. Another mistake is overworking the dough. If you knead too much, your scones may become tough. Lastly, don’t skip chilling the dough before baking. This helps the scones hold their shape. You can boost the flavor of your scones easily. Try adding a pinch of cinnamon for warmth. Diced strawberries or raspberries can replace some blueberries for a twist. For more zing, add a teaspoon of lemon zest to the wet mix. You can also mix in some chopped nuts for crunch. These small changes can elevate your Lemon Blueberry scones and make them even more delightful. For the complete recipe, check out the Full Recipe section. {{image_4}} You can change the flavor by using other fruits. Raspberries, strawberries, or blackberries work well. Just swap them for the blueberries in the recipe. Each fruit adds a unique twist. For a mixed berry scone, combine different berries together. This gives you a colorful and tasty treat. If you need a gluten-free option, use a 1:1 gluten-free flour blend. Make sure it has xanthan gum for the right texture. The process stays the same, and you can enjoy scones that fit your diet. The taste will still be delightful and fresh. You can also spice things up with flavors. A pinch of cinnamon or nutmeg adds warmth to your scones. If you like nuts, try adding chopped walnuts or pecans. These add a nice crunch and depth of flavor. Mix these ingredients in when you add the blueberries and lemon zest. For more ideas, check the Full Recipe to explore how you can make these scones your own! To keep your leftover scones fresh, place them in an airtight container. This helps them stay soft and moist. You can add a slice of bread to the container. The bread helps keep the scones from drying out. If you want to freeze your scones, wrap each one tightly in plastic wrap. Then, place them in a freezer bag. Press out any extra air before sealing the bag. You can freeze them for up to three months. When you're ready to eat them, just thaw them in the fridge overnight. To reheat your scones, preheat your oven to 350°F (175°C). Place the scones on a baking sheet and warm them for about 5 to 10 minutes. This makes them soft and fresh again. You can also use a microwave. Heat them for about 15 to 20 seconds. Enjoy your warm lemon blueberry scones with a cup of tea! For the full recipe, check out the earlier section. Fluffy scones come from the right balance of dry and wet ingredients. You need to use cold butter and avoid overmixing. The butter creates air pockets as it melts, which helps the scones rise. Baking powder also plays a key role. It gives the scones lift during baking, making them light and airy. Yes, you can make these scones ahead. Prepare the dough and cut it into wedges. Then, wrap them well and place them in the fridge for up to 24 hours. When you're ready to bake, just pop them in the oven. If you want to freeze them, wrap the unbaked scones tightly and store them for up to three months. Bake straight from the freezer; they may need a few extra minutes. Serve these scones warm for the best taste. You can add a drizzle of glaze made with powdered sugar and lemon juice. Pair them with butter or clotted cream for a rich flavor. For a fun twist, enjoy them with fresh fruit or a dollop of jam. These scones shine as a breakfast treat or afternoon snack. Scones come from the UK, with roots in Scotland. People often served them with tea. The lemon blueberry version is a modern twist that adds bright flavor. This combination reflects a love for fresh fruit and citrus in baked goods. Now, you can find these scones in cafes and bakeries worldwide, making them a beloved treat for many. This blog post covers all you need for perfect lemon blueberry scones. We discussed ingredients, offering substitutes when needed. I shared steps for mixing and shaping your dough, plus tips for a flaky texture. You learned how to store and reheat your scones. Enjoy the flexibility of variations and try different fruits or gluten-free options. Baking should be fun, so don’t stress about mistakes. With practice, you’ll create sunny, delicious scones every time. Now, gather your ingredients and get baking!](https://dishtreats.com/wp-content/uploads/2025/06/d51723ca-834e-49ab-95e6-d1b73b522f9f-768x768.webp)