
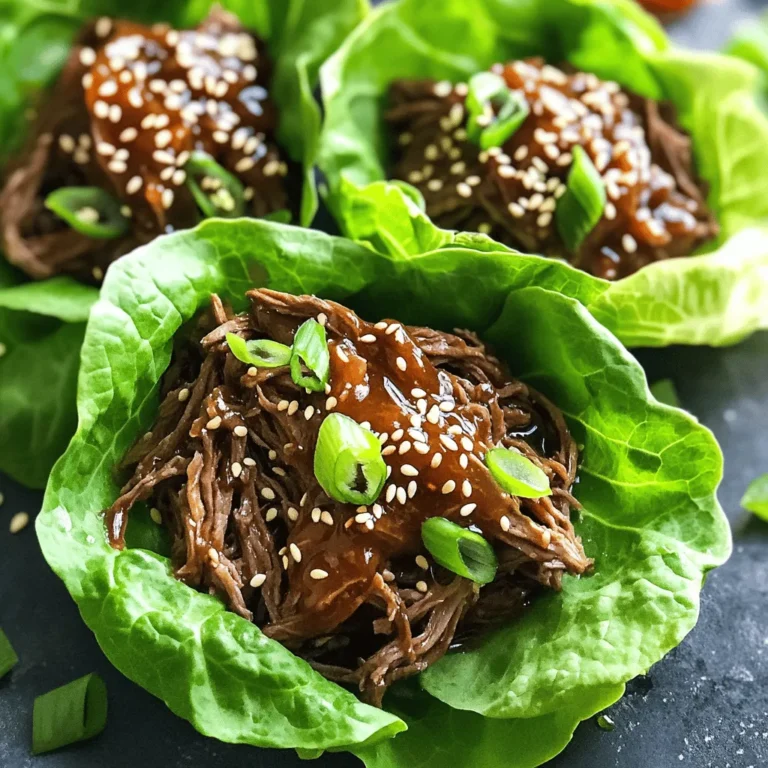
Ginger Lime Chicken Lettuce Wraps Flavorful Delight


If you crave a fresh, flavorful meal, look no further than Ginger Lime Chicken Lettuce Wraps. This tasty dish blends ground chicken with zesty ginger, garlic, and lime. I’ll guide you through every step, from selecting crisp veggies to perfecting the wrap assembly. Whether you prefer spicy or mild, these wraps are an easy way to enjoy a healthy dinner. Ready to dive in? Let’s get cooking!
Why I Love This Recipe
- Quick and Easy: This recipe comes together in just 25 minutes, making it perfect for busy weeknights.
- Fresh Ingredients: With a combination of ginger, lime, and fresh vegetables, these wraps are bursting with flavor and nutrition.
- Customizable: You can easily modify the toppings and vegetables to suit your taste preferences and dietary needs.
- Fun to Eat: Assembling and eating lettuce wraps is a delightful and interactive experience, perfect for family dinners or gatherings.
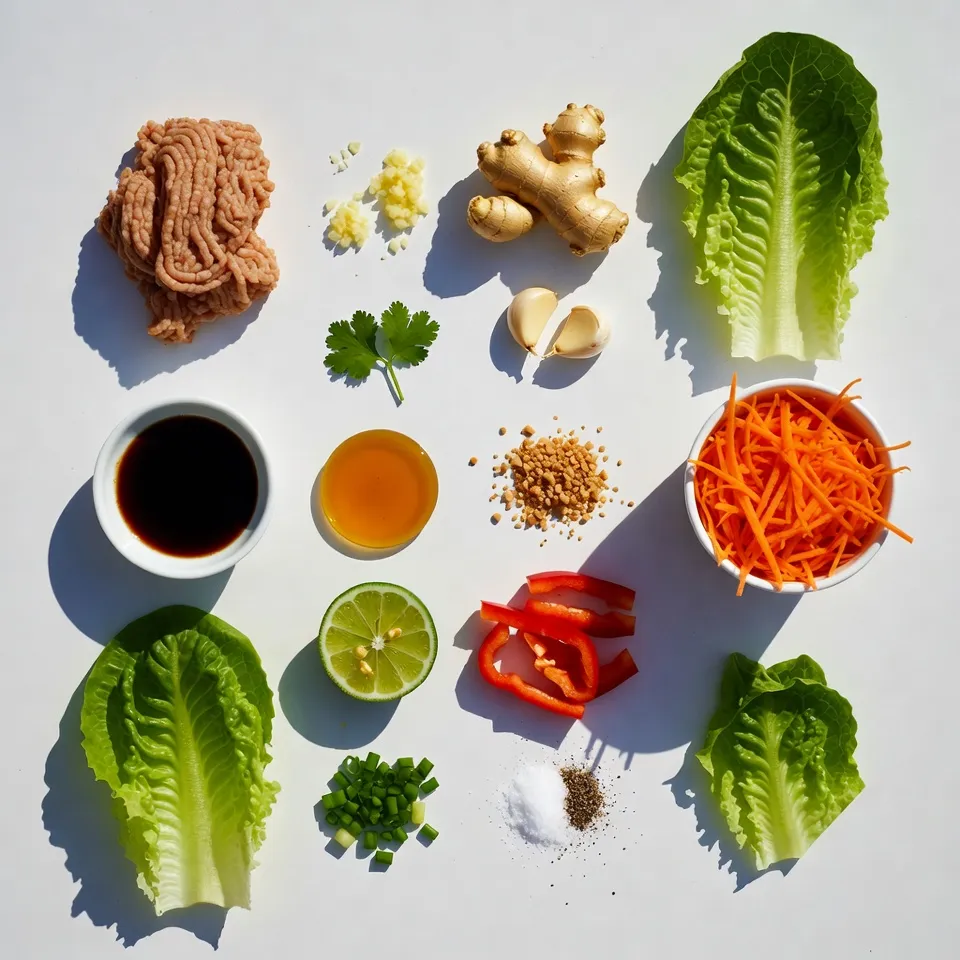
Ingredients
Main Ingredients
- 1 lb (450g) ground chicken
- 2 tablespoons fresh ginger, finely minced
- 2 cloves garlic, finely minced
- 2 tablespoons soy sauce
- 1 tablespoon fish sauce
- 1 tablespoon honey
- Fresh juice and zest of 1 lime
Vegetables and Garnishes
- 1 red bell pepper, finely diced
- 1 cup carrots, shredded
- 1 green onion, finely chopped
- Optional toppings: shredded cilantro, crushed peanuts, sesame seeds
Measuring and Preparing Ingredients
To make your ginger lime chicken wraps taste great, start with fresh ingredients. Here are some tips:
- Mincing ginger and garlic: Use a sharp knife. Slice the ginger into thin pieces. Then, chop those slices into tiny bits. For garlic, crush the clove slightly, then chop finely. This releases their strong flavors.
- Choosing fresh vegetables: Look for bright colors and firm textures. The red bell pepper should be shiny. The carrots should be crisp. Fresh vegetables add crunch to your wraps.
- Preparing lettuce: Choose butter or iceberg lettuce. Gently separate the leaves. Rinse them in cold water. Pat them dry with a towel. This way, they stay fresh and crisp for your wraps.
These steps ensure your ginger lime chicken lettuce wraps are full of flavor and fun to eat!
Step-by-Step Instructions
Cooking the Chicken Mixture
Start by heating a large skillet over medium heat. Add 1 lb of ground chicken. Cook it for about 5-7 minutes. Stir often to break the meat into small pieces. You want it fully browned.
Once the chicken is browned, add 2 tablespoons of finely minced ginger and 2 cloves of minced garlic. Mix well and cook for 2 minutes. This helps the flavors blend and makes the garlic smell great.
Now, pour in 2 tablespoons of soy sauce, 1 tablespoon of fish sauce, 1 tablespoon of honey, and the juice and zest of 1 lime. Stir to coat the chicken evenly. This mix gives the chicken a tangy kick.
Incorporating Vegetables
Next, take 1 red bell pepper and finely dice it. Add this to the skillet along with 1 cup of shredded carrots. Sauté these for about 3-4 minutes. You want them soft but still a bit crunchy.
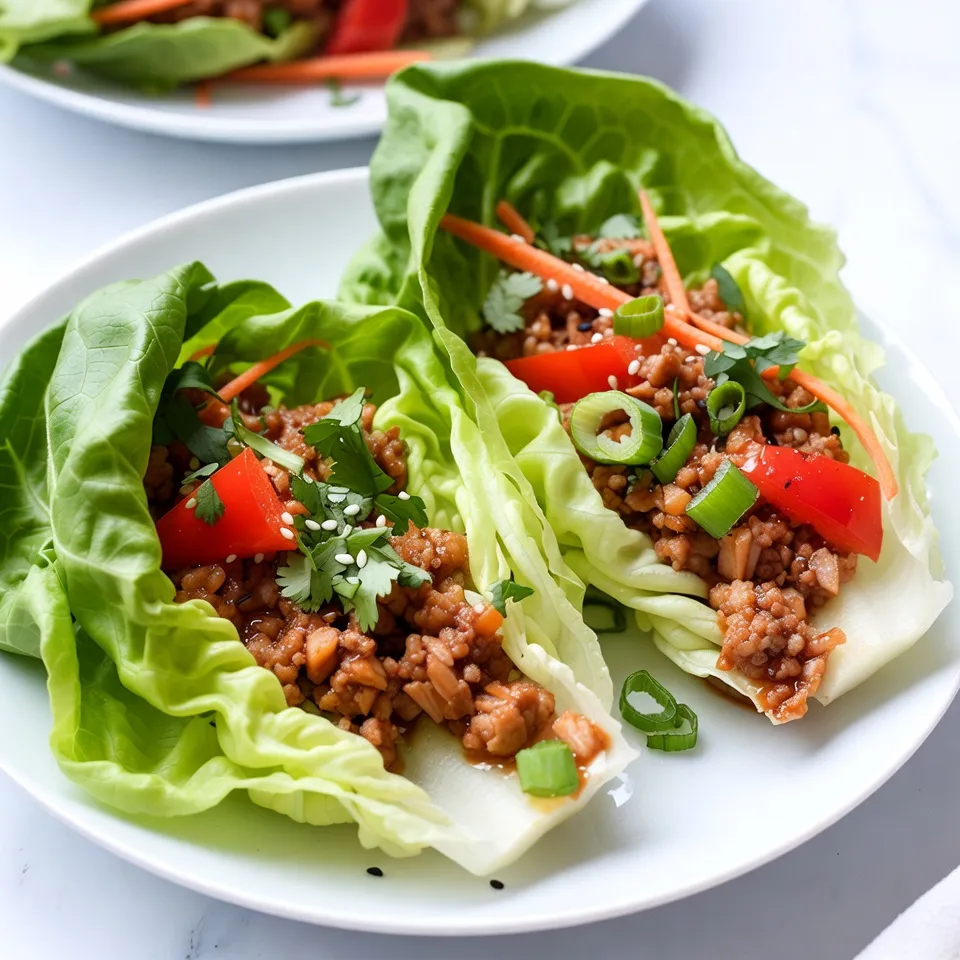
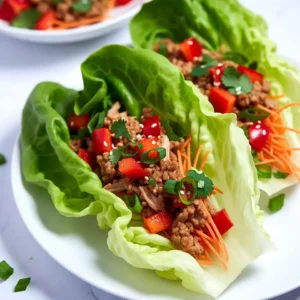
Assembling the Lettuce Wraps
To make the wraps, take a leaf of butter or iceberg lettuce. Spoon a generous amount of the chicken mixture into the center of the leaf.
Now, add some chopped green onions on top. If you like, sprinkle on shredded cilantro, crushed peanuts, or sesame seeds for extra flavor.
Carefully fold the lettuce leaf around the filling. This makes a delicious wrap. Enjoy your meal right away!
Tips & Tricks
Perfecting the Recipe
To make these wraps shine, balance the flavors. Use soy sauce for saltiness. Add fish sauce for depth. A touch of honey brings sweetness. Adjust with salt and pepper to taste. Always ensure your chicken is fully cooked. Brown it well for great flavor. Cook it to an internal temperature of 165°F (75°C) to keep it safe.
Presentation Tips
Serve the wraps on a large platter. Arrange them neatly to catch the eye. For added flair, include lime wedges on the side. This adds a pop of color and freshness. Guests can squeeze lime juice over their wraps for more zing.
Cooking and Preparation Tips
Meal prep can save time. Cook a double batch of the chicken mixture. Store leftovers in an airtight container. Use them for salads or grain bowls. You can even turn them into a stir-fry. The options are endless!
Pro Tips
- Fresh Ingredients Matter: Using fresh ginger and garlic will enhance the flavor profile significantly compared to dried versions.
- Texture is Key: Don’t overcook the vegetables; they should remain slightly crunchy for a delightful contrast to the tender chicken.
- Experiment with Wraps: Try using different types of lettuce such as romaine or even collard greens for a unique twist on the wraps.
- Customize Your Toppings: Feel free to add your favorite toppings like avocado or diced mango for an extra flavor kick and nutrition boost.
Variations
Alternative Proteins
You can switch the ground chicken for turkey or tofu. Turkey offers a similar taste with fewer calories. It cooks at the same time, so it’s easy to use. Tofu provides a vegetarian option. Just crumble it and sauté until golden. This change adds great texture and flavor.
Different Vegetables
Feel free to mix up the fillings with other vegetables. Use zucchini, mushrooms, or snap peas for a twist. Each option brings a unique crunch and flavor. You can also customize the taste with spices. Try adding chili flakes for heat or lime zest for brightness.
Dietary Adjustments
For gluten-free wraps, use tamari instead of soy sauce. This keeps the dish safe for those with gluten issues. If you want low-carb options, use more veggies and skip the honey. For a vegan version, swap the chicken for chickpeas or lentils. Both choices add protein and keep the meal filling.
Storage Info
Storing Leftovers
After enjoying your Ginger Lime Chicken Lettuce Wraps, store any leftovers in a tight container. This helps keep them fresh. You can keep them in the fridge for about three days. Make sure to separate the filling from the lettuce leaves. This prevents the leaves from getting soggy.
Reheating Instructions
To reheat, warm the chicken mixture in a skillet over medium heat. Stir it often to maintain flavor. Avoid reheating in the microwave, as it can make the chicken dry. You can freeze the chicken filling for later use. Just place it in a freezer-safe bag. It will last up to three months. When ready to eat, thaw it in the fridge overnight before reheating.
Serving Suggestions
These lettuce wraps are a great meal on their own. For a complete feast, pair them with rice or noodles. They also work well with a fresh salad on the side. For drinks, consider iced tea or a light beer. The sweetness of the honey and lime flavor complements these options well.
FAQs
What type of lettuce is best for wraps?
For wraps, I suggest using butter lettuce or iceberg lettuce. Butter lettuce has soft, pliable leaves. This texture helps hold the filling well. It also adds a mild flavor that does not overwhelm the dish. Iceberg lettuce is crisp and has a refreshing crunch. However, its leaves can be more rigid. If you prefer a crunchier bite, iceberg is a great choice. Both types work well, but I find that butter lettuce gives a better wrap experience.
Can I use ground beef instead of chicken?
Yes, you can use ground beef. The flavor will change, and beef has a richer taste. It can also be a bit greasier than chicken. Using beef may give your wraps a heartier feel. If you decide to switch, watch the cooking time. Beef often cooks faster than chicken. This means you need to adjust the sauté time to avoid overcooking the meat.
How can I make this recipe ahead of time?
To prep this recipe ahead, you can cook the chicken mixture. Store it in an airtight container in the fridge. This way, you save cooking time later. When ready to eat, just reheat it on the stove. For fresh lettuce, wash and separate the leaves ahead of time. Keep them in a damp paper towel in the fridge. This keeps them crisp. Assemble the wraps just before serving to keep everything fresh and crunchy.
In this blog post, we explored the basics of making delicious lettuce wraps. We discussed key ingredients like ground chicken, fresh ginger, and sauces that add flavor. You learned how to prepare your veggies and assemble the wraps step-by-step. Tips for cooking and presentation ensure your dish looks great. Finally, we covered storage and variations, like using different proteins or veggies.
These wraps are tasty, easy, and fun to make. Enjoy creating your own version
Ginger Lime Chicken Lettuce Wraps
Ingredients
- 1 lb ground chicken
- 2 tablespoons fresh ginger, finely minced
- 2 cloves garlic, finely minced
- 2 tablespoons soy sauce
- 1 tablespoon fish sauce
- 1 tablespoon honey
- 1 lime fresh juice and zest
- 1 medium red bell pepper, finely diced
- 1 cup carrots, shredded
- 1 green onion finely chopped
- to taste salt and pepper
- 1 head butter lettuce or iceberg lettuce, leaves gently separated
- optional shredded cilantro
- optional crushed peanuts
- optional sesame seeds
Instructions
- In a large skillet set over medium heat, add the ground chicken. Cook, stirring occasionally, for about 5-7 minutes or until fully browned, using a spatula to break the meat into smaller pieces.
- Once the chicken is browned, add the minced ginger and garlic to the skillet. Stir well to combine, and cook for an additional 2 minutes, allowing the flavors to meld and the garlic to become fragrant.
- Pour in the soy sauce, fish sauce, honey, lime juice, and lime zest. Mix thoroughly to ensure the chicken is evenly coated with the sauce.
- Next, incorporate the diced red bell pepper and shredded carrots into the skillet. Sauté for another 3-4 minutes, or until the vegetables soften but still retain some crispness.
- Taste the mixture and season with salt and pepper as needed, then remove from heat.
- To assemble the lettuce wraps, take a single leaf of lettuce and spoon a generous portion of the chicken mixture into the center of the leaf.
- Garnish with chopped green onions and sprinkle on any additional toppings you desire, such as cilantro, crushed peanuts, or sesame seeds for added flavor and texture.
- Carefully fold the lettuce leaf around the filling, forming a vibrant and healthy wrap. Enjoy immediately!
. It will guide you through each step with details and tips. Enjoy cooking! In summary, we explored how to make delicious Roasted Garlic Parmesan Brussels Sprouts. I shared a full list of ingredients and options for substitutions. Fresh ingredients elevate taste and nutrition. You learned step-by-step instructions for perfect roasting, along with tips for flavor and presentation. Variations and storage tips help you customize and save leftovers. Remember to check FAQs for any lingering questions. Enjoy this simple yet tasty dish at your next meal!](https://dishtreats.com/wp-content/uploads/2025/08/f224f6d0-5adb-4fa1-b176-de066c43a5f2-3-768x768.webp)
![To make Rainbow Fruit Skewers, you need a mix of fresh fruits. Here’s the list of what you’ll need: - Fresh strawberries (1 cup) - Juicy orange segments (1 cup) - Sweet pineapple chunks (1 cup) - Crisp green grapes (1 cup) - Plump blueberries (1 cup) - Deep purple grapes or blackberries (1 cup) - Optional: Honey (2 tbsp) for drizzling - Fresh mint leaves for garnish Each fruit brings a burst of color and taste. Fresh strawberries add a sweet tang. Juicy orange segments bring a citrusy pop. Sweet pineapple chunks add tropical flair. Crisp green grapes offer crunch. Plump blueberries add a mild sweetness. Deep purple grapes or blackberries provide a rich finish. Feel free to mix and match. Use your favorite fruits or whatever you have at home. The goal is to create a vibrant, tasty treat. You can also drizzle honey on top for added sweetness. Mint leaves add a nice touch. They make the dish look fancy and smell great. Remember, this is just a guide. You can adjust the amounts to fit your needs. For the full recipe, check out the complete instructions above. Enjoy your colorful creation! To start, wash all your fruits under cool running water. This step keeps them clean and safe to eat. For strawberries, remove the green tops. If they are big, slice them in half. Next, peel the oranges. Cut them into segments and toss out any seeds. Chop the pineapple into bite-sized chunks. Rinse the green grapes and blueberries to remove dirt and make them shine. Grab your wooden skewers. If you plan to grill them, soak the skewers in water for 10 minutes to prevent burning. Now, it’s time to thread the fruits onto the skewers! I like to start with one strawberry, then add one orange segment, a pineapple chunk, and a green grape. After that, toss on a few blueberries and finish with a purple grape or blackberry. This order gives you a bright, colorful look. Aim for a rainbow effect with every skewer! For a little extra sweetness, drizzle honey over the assembled skewers. This step is optional but adds a nice touch. If you want a chill treat, place the skewers in the fridge for about 30 minutes. Chilling helps the flavors pop and makes them extra refreshing. Enjoy these delicious Rainbow Fruit Skewers at your summer gatherings or as a fun snack! For the full recipe, check out [Full Recipe]. Picking ripe fruits is key for tasty skewers. Here are signs to watch for: - Strawberries: Look for bright red color without any green tops. - Oranges: Choose firm, heavy oranges with smooth skin. - Pineapple: Smell the bottom. A sweet aroma means it's ripe. - Green Grapes: Look for a vibrant green color and firm texture. - Blueberries: Pick plump blueberries with a deep blue hue. - Purple Grapes/Blackberries: Choose ones that are dark and slightly soft. Keep your fingers safe while making skewers. Here’s how: - Use wooden skewers that are at least 10 inches long. - Soak them in water for 10 minutes. This helps avoid burning. - Hold the fruit steady with one hand. Use the other to push it onto the skewer. - Start with firm fruits like strawberries. This helps stabilize softer fruits later. - Avoid using too much force. This can break the fruit apart. Make your skewers look as good as they taste. Try these tips: - Arrange skewers in a colorful pattern. Use a mix of all the fruits. - Place them on a bright platter. A white dish makes colors pop. - Garnish the platter with fresh mint leaves. They add a lovely aroma. - For extra flair, drizzle honey on top. It adds shine and sweetness. Explore more ideas in the [Full Recipe]. {{image_4}} You can switch up the fruits based on the season. In spring, use strawberries and blueberries for sweetness. In summer, opt for ripe peaches and cherries. Fall brings apples and pears, adding crunch. Winter is perfect for citrus like tangerines and pomegranates. Each season offers fresh flavors for your skewers. You can create fun themes for parties. For a summer BBQ, use red, white, and blue fruits for a patriotic look. For Halloween, add orange slices and blackberries for a spooky vibe. During the holidays, use red strawberries and green grapes for a festive feel. Matching colors makes your skewers pop! Adding protein can make your skewers more filling. You can thread cubes of cheese like cheddar or mozzarella between the fruits. Greek yogurt is another option—use it as a dip on the side. This adds taste and gives you energy for your summer fun. For the full recipe, check out Rainbow Fruit Skewers! To keep your rainbow fruit skewers fresh, store them in an airtight container. This helps keep moisture in and prevents the fruit from drying out. You can also cover them with plastic wrap if you don’t have a container. In the fridge, these skewers stay fresh for up to three days. After that, the fruit may start to lose its flavor and texture. You can make these skewers a few hours before your event. Just prepare the fruit and assemble the skewers. Store them in the fridge until you are ready to serve. If you want to save time, wash and cut the fruit a day ahead. Keep the pieces in separate containers. This way, you can quickly assemble your skewers when needed. Check out the Full Recipe for more tips on making and storing your rainbow fruit skewers! To scale this recipe, double or triple the ingredients. Use a mix of fruits to please all tastes. Prepare a large platter to display the skewers. Set up a fruit station where guests can make their own skewers. This way, everyone can choose their favorite fruits. You can use frozen fruit, but it may not look as good. Frozen fruit tends to be softer and can lose its shape. If using frozen fruit, let it thaw and drain any excess water. Fresh fruit gives a better texture and taste for skewers. Yes, Rainbow Fruit Skewers are very healthy! Each fruit offers vitamins and minerals. For instance, strawberries provide vitamin C. Oranges are high in fiber. Pineapple contains bromelain, which helps digestion. Grapes and blueberries are full of antioxidants. Enjoy these colorful treats guilt-free! If you want a vegan option, use maple syrup or agave nectar. You can also try yogurt or nut butter for creaminess. For a sugar-free choice, use a sugar-free syrup. These alternatives add sweetness and keep the skewers fun and tasty. To keep fruit fresh, soak apple or banana slices in lemon juice. This helps prevent browning. Store skewers in the fridge until serving. Keep them covered to avoid drying out. Fresh mint leaves also help keep everything looking bright and fresh. For a full recipe, check out the detailed steps in the earlier section! Rainbow fruit skewers combine fresh fruits for a colorful and tasty treat. We walked through selecting ripe fruits, skewering them, and adding sweet touches like honey. You can use fun themes for parties or add proteins for a snack. Keep them chilled and store them well to enjoy later. In the end, these skewers are fun to make and good for you. Enjoy creating your own rainbow of flavors!](https://dishtreats.com/wp-content/uploads/2025/06/1f4123b9-dd53-4d15-af26-e58167d567ef-768x768.webp)
![- Cooked chicken - Creamy mayonnaise - Dill pickle relish - Ranch seasoning mix - Green onions - Celery - Salt and black pepper - Buttery croissants - Lettuce leaves - Dill pickle slices To make the Pickle Ranch Chicken Salad Croissants, you need a few simple ingredients. Start with cooked chicken. Shredded chicken works best, and you can use leftover rotisserie chicken if you like. Next, grab creamy mayonnaise, which adds richness and binds everything together. You will also need some dill pickle relish. This gives the salad a tangy kick. For flavor, add a packet of ranch seasoning mix. It brings a burst of taste to the dish. Then, you will need green onions and celery. They add crunch and freshness to the chicken salad. Don’t forget salt and black pepper to season your salad to your liking. For the base, use buttery croissants. They are soft and flaky, perfect for holding the chicken salad. You’ll also need lettuce leaves to line the croissants and keep them from getting soggy. Lastly, you can add dill pickle slices on the side for extra crunch and flavor. You can find the full recipe [Full Recipe] in the next section. First, we mix the chicken salad. Start with two cups of cooked chicken, shredded. Add half a cup of creamy mayonnaise and a quarter cup of dill pickle relish. Then, mix in one tablespoon of ranch seasoning. Stir until everything is well combined. Next, we season the mixture. Taste your chicken salad and add salt and black pepper to your liking. This step is key for great flavor. Now, we assemble the croissants. Carefully slice each croissant in half. Place a lettuce leaf on the bottom half. This keeps the croissant from getting soggy. Let’s combine the base ingredients. In a large bowl, mix the chicken, mayonnaise, relish, and ranch seasoning. Use a spatula to blend well. Now, we add vegetables for crunch. Toss in a quarter cup of finely chopped green onions and celery. Mix until all the veggies are evenly spread throughout. Finally, we make the chicken salad shine. After seasoning, ensure everything is properly mixed. This is the moment when you can adjust the flavor if needed. For the finishing touch, scoop the chicken salad onto the lettuce-covered croissant halves. Pile it high for a tasty bite! Don't forget to garnish with extra dill pickle slices for added flavor. For the full recipe, refer to the beginning section. To get the best texture for your chicken salad, start with shredded chicken. It's key to keep the pieces small and evenly shredded. This helps each bite feel tender and smooth. Use cooked chicken that’s still warm, as it mixes better with the other ingredients. When it comes to seasoning, don’t hold back. The ranch seasoning mix adds a great taste. I always suggest starting with a tablespoon. You can adjust to your liking. Taste as you mix. Add salt and pepper, a little at a time, until it’s just right. Presentation can make your croissants stand out. Arrange them neatly on a platter. You can serve them whole or cut in half for easy grabbing. Place a small bowl of extra dill pickles next to them. This adds a nice touch and makes it easy for guests. For sides, consider serving fresh fruit or a light salad. A simple green salad pairs nicely. You can even add some crunchy chips for texture. This makes for a fun and tasty meal that everyone will enjoy. {{image_4}} You can change this recipe to suit your taste. Here are some ideas. - Alternative proteins to try: Instead of chicken, use turkey or canned tuna. Both work well and give a new twist. For a meat-free option, try chickpeas or tofu for a healthy plant-based salad. - Different seasoning blends: Swap the ranch mix for other blends, like garlic or lemon pepper. You can also add some hot sauce for a spicy kick. If you seek healthier choices, here are some easy swaps. - Low-calorie alternatives: Use Greek yogurt instead of mayonnaise. This keeps the creamy texture but cuts calories. You can also use less chicken or add more veggies to lighten it up. - Gluten-free options for croissants: Look for gluten-free croissants at your local store. You can also use lettuce wraps or gluten-free bread for a crunchy and satisfying meal. Explore these variations to make your Pickle Ranch Chicken Salad Croissants even more exciting. For the full recipe, check the recipe section above. To keep your pickle ranch chicken salad croissants fresh, store any leftovers in an airtight container. This helps prevent drying out. You can place a paper towel in the container to absorb moisture. The best time to eat them is within three days for optimal taste. After that, the croissants may become soggy or lose flavor. You might want to enjoy your croissants warm. To reheat them, use an oven or toaster oven. Heat at 350°F for about 5-7 minutes. This keeps the croissants crisp. Avoid using a microwave, as it can make them chewy. If you have extra chicken salad, you can use it in wraps or on a bed of greens. This way, you can create a new meal with the leftovers that is just as tasty! Can I use rotisserie chicken? Yes, rotisserie chicken works great in this recipe. It saves time and adds flavor. Simply shred the chicken and mix it in. How do I make this salad ahead of time? You can make the salad a day in advance. Store it in an airtight container in the fridge. Just assemble the croissants when you’re ready to serve. What are some good sides to serve with these croissants? Some tasty sides include fresh fruit, chips, or a simple green salad. These pair well and add color to your plate. Where can I buy ready-made chicken salad? You can find ready-made chicken salad at grocery stores or deli counters. Look for local options for the freshest taste. Can I substitute the croissants with other bread? Yes, you can use any bread you like. Try using bagels, pita, or even lettuce wraps for a low-carb option. This blog post covered how to make a tasty chicken salad for croissants. You learned the key ingredients and the steps for mixing and assembling. I shared tips to get the best flavors and textures. You can also try different proteins or seasonings to make it your own. Store any leftovers properly to keep them fresh. This dish is great for gatherings or a simple meal at home. Enjoy making your delicious chicken salad and impress your friends and family!](https://dishtreats.com/wp-content/uploads/2025/07/dff408d1-932c-47c7-977b-b0a9332b2143-768x768.webp)