Mexican Street Corn Salad Flavorful and Fresh Dish
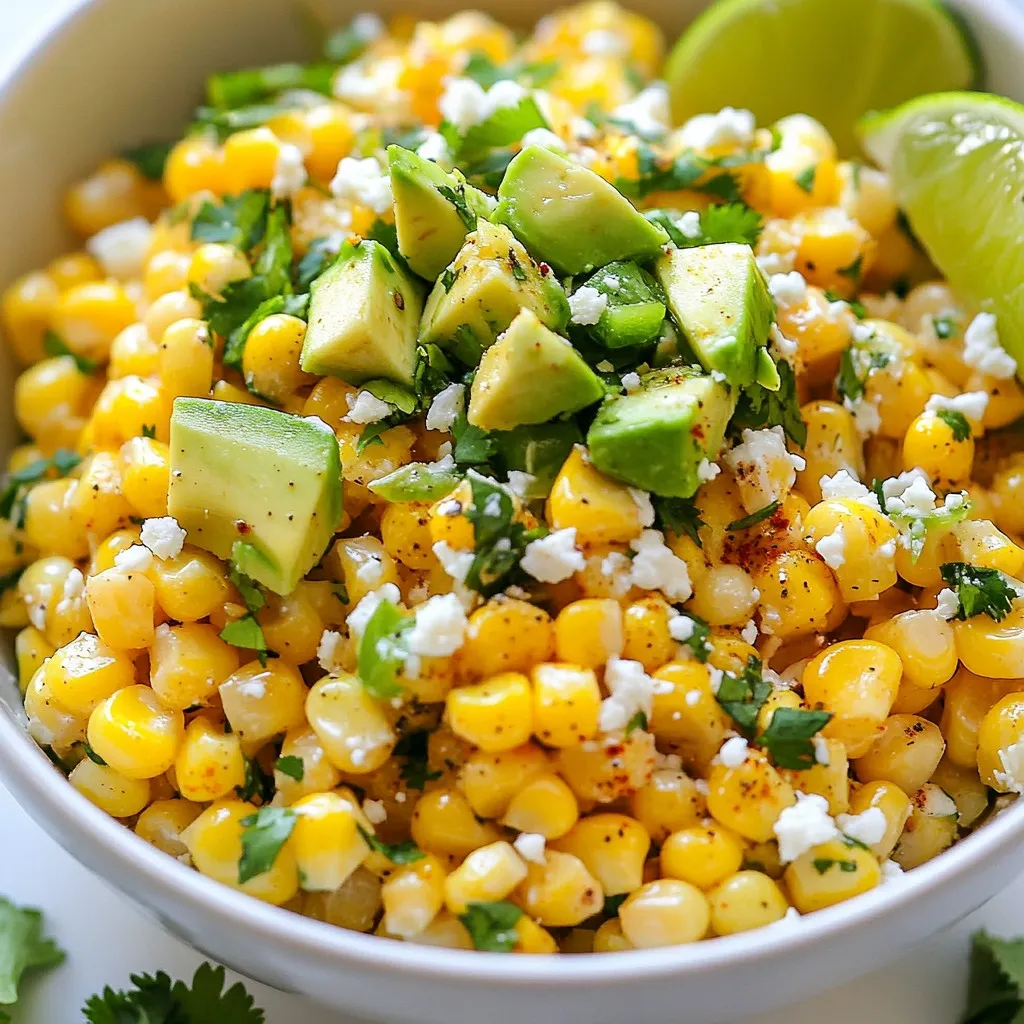
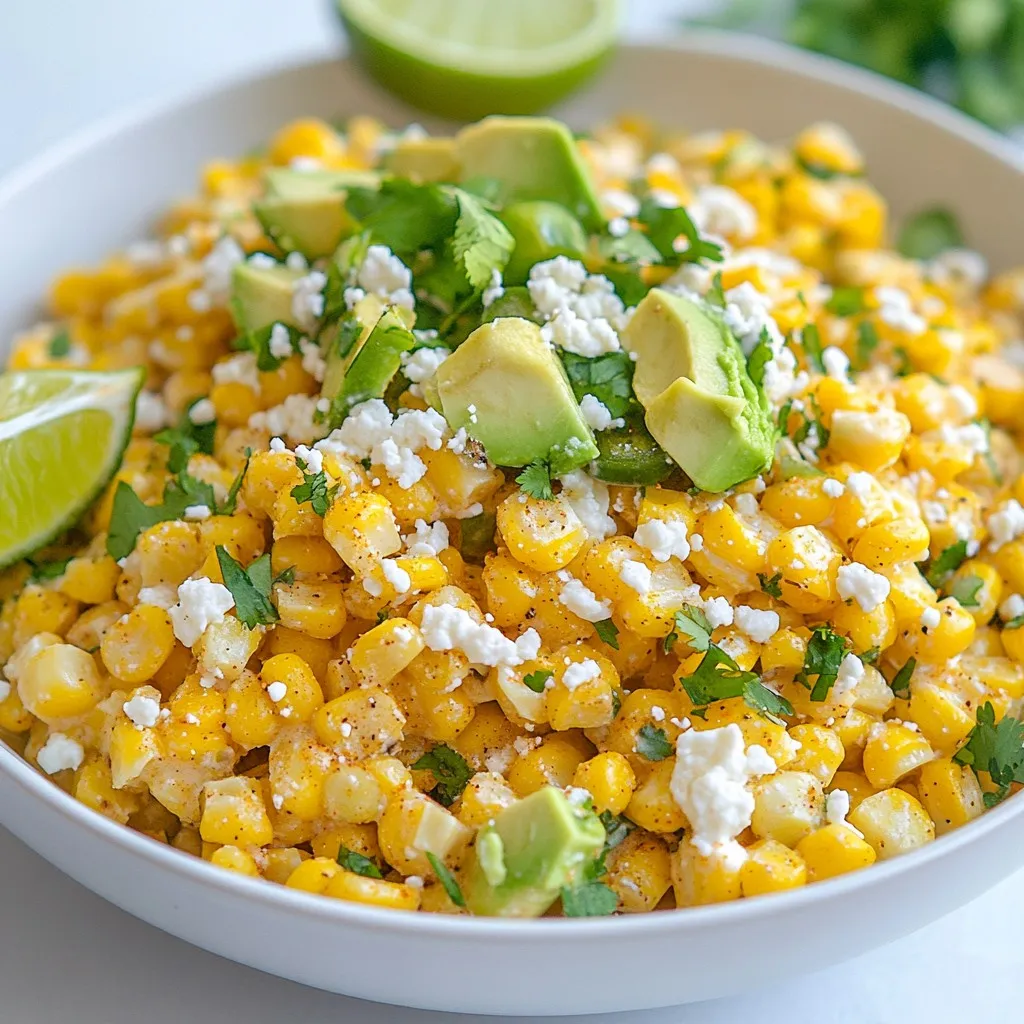
Are you craving a vibrant dish that bursts with flavor? Look no further than Mexican Street Corn Salad! This dish combines sweet, grilled corn with fresh herbs and zesty toppings. It’s perfect for summer cookouts or a quick weeknight meal. In this article, I’ll guide you through simple steps to create a delicious salad that will wow your friends and family. Let’s dive into the ingredients and get cooking!
Why I Love This Recipe
- Fresh Ingredients: This salad is made with fresh corn and vibrant vegetables, ensuring that every bite is bursting with flavor and nutrition.
- Easy Preparation: With simple steps and minimal cooking time, this recipe is perfect for quick weeknight dinners or last-minute gatherings.
- Customizable: You can adjust the heat level by changing the amount of jalapeño or adding other ingredients like black beans or bell peppers.
- Perfect for Sharing: This salad is a crowd-pleaser, making it an ideal dish for barbecues, potlucks, or any festive occasion.
Ingredients
List of Ingredients
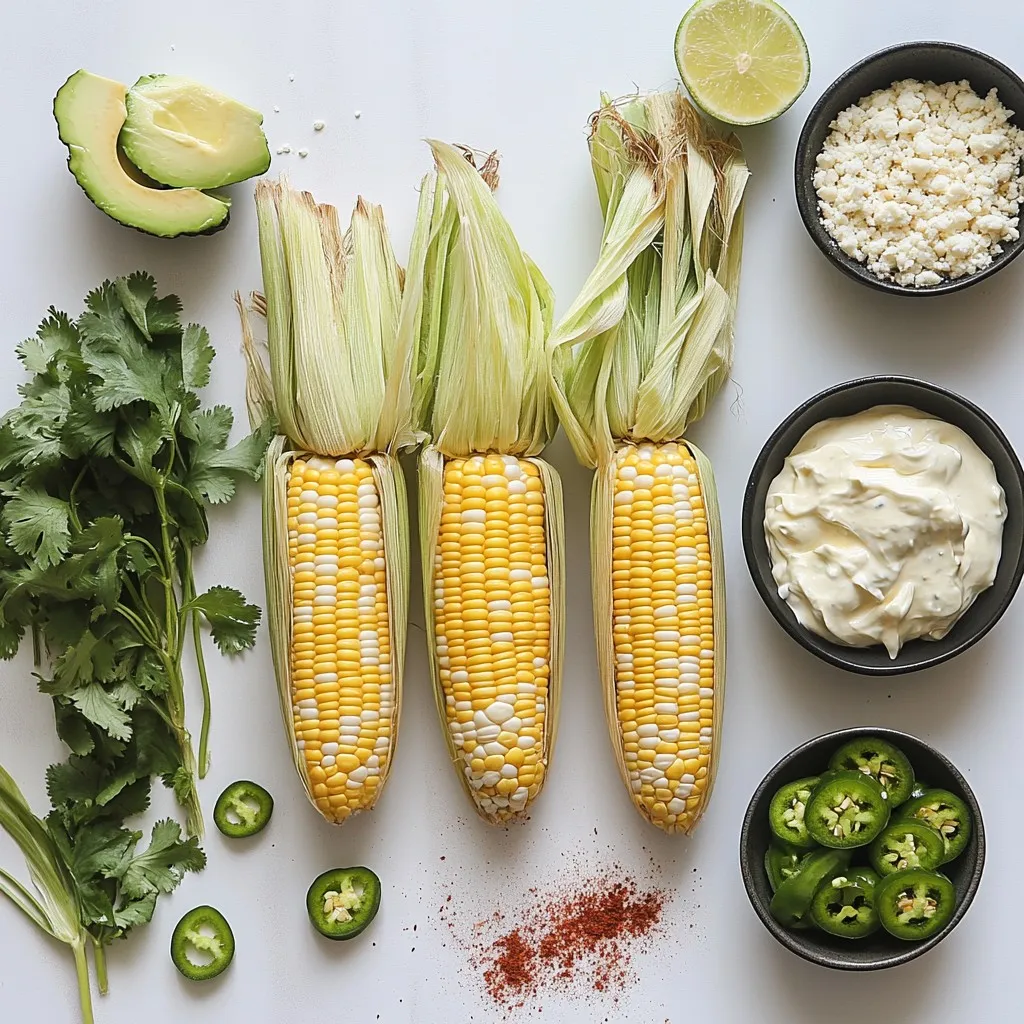
To make this tasty Mexican Street Corn Salad, gather these fresh ingredients:
- 4 ears of fresh corn, husked and cleaned
- 1/2 cup mayonnaise
- 1/2 cup sour cream
- 1 cup cotija cheese, crumbled (you can use feta cheese as a substitute)
- 1/4 cup fresh cilantro, finely chopped
- 1 jalapeño, finely diced (remove seeds for less heat)
- 2 tablespoons fresh lime juice
- 1 teaspoon chili powder
- Salt and pepper to taste
- 1 ripe avocado, diced (for topping)
- Lime wedges (for serving)
Recommended Substitutions
You might want to change a few ingredients based on what you have:
- Use Greek yogurt instead of sour cream for a tangy twist.
- Swap cotija cheese for feta if you can’t find it.
- For a vegan version, use plant-based mayo and yogurt.
Optional Toppings
Get creative with toppings to make your salad shine:
- Add more crumbled cotija cheese for extra flavor.
- A sprinkle of chili powder gives a nice kick.
- Fresh cilantro can add bright color and taste.
- Sliced radishes or diced tomatoes can add crunch and freshness.
These ingredients bring the vibrant flavors of Mexican street food to your table. Enjoy the process and feel free to tweak it to your liking!
Step-by-Step Instructions
Preparation of Ingredients
First, gather all your ingredients. You need fresh corn, mayonnaise, sour cream, and cotija cheese. Also, grab cilantro, a jalapeño, lime juice, chili powder, salt, and pepper. For a tasty finish, have an avocado and lime wedges ready. Make sure to finely chop the cilantro and dice the jalapeño. Removing the seeds from the jalapeño will help keep the heat mild.
Grilling the Corn
Now, preheat your grill or grill pan to medium-high heat. This step is key for even cooking. Place the husked corn directly on the hot grill. Grill each ear for about 10-12 minutes. Turn the corn every few minutes. You want to see a nice char on the kernels. Once done, take the corn off the grill and let it cool for a bit.
Mixing the Salad
Once the corn is cool, cut the kernels off the cobs. Place the kernels in a large mixing bowl. In another bowl, whisk together mayonnaise, sour cream, lime juice, chili powder, salt, and pepper until smooth. Pour this creamy dressing over the corn and gently fold in the cotija cheese, cilantro, and jalapeño. Mix well, so every kernel gets coated. Transfer the salad to a serving bowl and top it with diced avocado. Add extra cotija cheese or cilantro if you like. Serve with lime wedges for a zesty kick!
Tips & Tricks
Best Grilling Techniques
Grilling corn gives it a smoky flavor. Preheat your grill to medium-high heat. Place the corn directly on the grill. Turn the corn every few minutes. Grill for about 10 to 12 minutes. Look for a nice char. This char adds depth to the salad. If you prefer, use a grill pan on the stovetop.
How to Enhance Flavor
To boost flavor, use fresh ingredients. Fresh lime juice brightens the dish. Add cilantro for a burst of freshness. For heat, include jalapeño, but remove the seeds for less spice. You can also sprinkle chili powder for extra warmth. If you love cheese, cotija adds a creamy, salty touch.
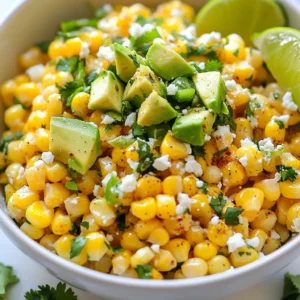
Presentation Suggestions
Serve the salad in a colorful bowl. Top it with diced avocado for creaminess. Crumble more cotija cheese on top for a beautiful finish. A sprinkle of cilantro adds a nice pop of green. Serve lime wedges on the side for extra zest. This salad is as pleasing to the eye as it is to the palate.
Pro Tips
- Grill for Flavor: Make sure to grill the corn until it’s nicely charred; this adds a smoky flavor that enhances the overall taste of the salad.
- Chill Your Ingredients: For a refreshing taste, chill the salad in the refrigerator for about 30 minutes before serving.
- Customize the Heat: Adjust the amount of jalapeño based on your spice preference. Removing the seeds will make it milder.
- Fresh Herbs Matter: Use fresh cilantro for the best flavor; dried herbs won’t provide the same vibrant taste.
Variations
Spicy Mexican Street Corn Salad
To make a spicy version of this salad, add more jalapeño. You can also mix in a dash of hot sauce. This gives the salad a nice kick. If you like it even hotter, try adding diced serrano peppers. The extra heat balances well with the creamy dressing.
Vegetarian/Vegan Adaptations
For a vegetarian or vegan option, substitute the mayonnaise and sour cream with cashew cream or vegan mayo. Use nutritional yeast for a cheesy flavor instead of cotija. This keeps the salad fresh and creamy without dairy. You still get that great taste and texture.
Regional Variations
In Mexico, some regions add different spices or herbs to the salad. For example, in some areas, they use fresh oregano. Others might include diced tomatoes or red onion for added flavor. These changes reflect local ingredients and tastes. Feel free to get creative and make it your own!
Storage Info
How to Store Leftovers
To store leftovers, place the salad in an airtight container. This keeps the flavors fresh. Make sure to cover it well. Store it in the fridge for up to three days. If you notice the salad looks dry, add a bit of lime juice or sour cream.
Reheating Suggestions
I recommend eating this salad cold for the best flavor. If you prefer it warm, heat it gently. Use a microwave on low power. Stir it every 30 seconds to heat evenly. Be careful not to overcook it. Overheating can change the texture.
Freezing Options
You can freeze this salad, but some ingredients may change. The corn and dressing freeze well. However, the avocado and fresh herbs may not look good after thawing. To freeze, place the salad in a freezer-safe bag. Remove as much air as possible. It can last for up to two months. When ready to eat, thaw it overnight in the fridge before serving.
FAQs
What is Mexican Street Corn Salad?
Mexican Street Corn Salad is a fresh and vibrant dish. It features grilled corn mixed with creamy dressing. The salad includes cotija cheese, cilantro, and jalapeño for flavor. Lime juice and chili powder add zesty notes. This dish is often served as a side, but it can shine as a main.
Can I use frozen corn?
Yes, you can use frozen corn. It’s a quick option if fresh corn is not available. Just thaw it and pat it dry before mixing. Note that grilling fresh corn gives a unique flavor.
How can I make it spicier?
To spice up your salad, add more jalapeño. You can also include red pepper flakes or hot sauce. Adjusting chili powder levels will enhance the heat too. Taste as you go to find your perfect spice level.
What can I serve with this salad?
This salad pairs well with grilled meats, like chicken or steak. It also works great with tacos or quesadillas. For a lighter meal, serve it with grilled shrimp or fish. You can even enjoy it as a dip with tortilla chips!
How long does it last in the fridge?
The salad lasts about 3 days in the fridge. Keep it in an airtight container to maintain freshness. If you topped it with avocado, that part may brown quickly. Consider adding avocado just before serving for the best taste.
In this post, we explored how to create a delicious Mexican Street Corn Salad. We covered key ingredients, tasty substitutions, and optional toppings. I shared easy, step-by-step instructions, from prepping the ingredients to grilling the corn. You learned tips for grilling, enhancing flavor, and great presentation ideas. Finally, we discussed variations, storage, and answered common questions.
Try making this salad your own with the tips given. Enjoy a fresh and fun dish that will impress everyon
Zesty Mexican Street Corn Salad
Ingredients
- 4 ears fresh corn, husked and cleaned
- 0.5 cup mayonnaise
- 0.5 cup sour cream
- 1 cup cotija cheese, crumbled
- 0.25 cup fresh cilantro, finely chopped
- 1 whole jalapeño, finely diced
- 2 tablespoons fresh lime juice
- 1 teaspoon chili powder
- to taste salt and pepper
- 1 ripe avocado, diced
- as needed lime wedges for serving
Instructions
- Begin by preheating your grill or grill pan to a medium-high heat.
- Once the grill is hot, place the corn directly on it and grill for approximately 10-12 minutes, turning occasionally.
- Remove the corn from the grill and set it aside to cool slightly.
- After the corn has cooled enough to handle, cut the kernels off the cobs and transfer them to a large mixing bowl.
- In a separate bowl, whisk together the mayonnaise, sour cream, lime juice, chili powder, salt, and pepper.
- Pour the creamy dressing over the corn kernels and gently fold in the crumbled cotija cheese, chopped cilantro, and diced jalapeño.
- Transfer the salad mixture to a serving bowl or plate, then top it with diced avocado.
- Garnish with more crumbled cotija cheese, a sprinkle of cilantro, or a dusting of chili powder if desired.
- Serve immediately with lime wedges on the side.

![To make a tasty and healthy crispy chickpea salad, you need these main ingredients: - 1 can (15 oz) chickpeas, drained and rinsed - 2 tablespoons olive oil - 1 teaspoon smoked paprika - 1/2 teaspoon garlic powder - 1/2 teaspoon ground cumin - Salt and freshly ground pepper to taste - 4 cups mixed greens (spinach, arugula, and lettuce blend) - 1 cup cherry tomatoes, halved - 1/2 cucumber, diced - 1/4 red onion, thinly sliced Add some optional ingredients to enhance the flavor and texture of your salad: - 1/4 cup feta cheese, crumbled (optional) - A handful of fresh parsley, chopped (for garnish) You will also need a few kitchen tools to make this salad: - A medium-sized mixing bowl for the chickpeas - A large bowl for the salad - A baking sheet lined with parchment paper - A whisk for the dressing - A separate small bowl for mixing the tahini dressing Using these ingredients and tools, you can create a delicious crispy chickpea salad. Try the full recipe for a step-by-step guide! First, preheat your oven to 400°F (200°C). This makes sure the chickpeas get crispy. Line a baking sheet with parchment paper. This helps with easy cleanup later. In a bowl, mix the drained chickpeas with olive oil. Add smoked paprika, garlic powder, ground cumin, salt, and pepper. Make sure each chickpea is well coated. This blend gives them a tasty kick. Spread the seasoned chickpeas evenly on the baking sheet. Don’t crowd them; they need space to get crispy. Bake for 25-30 minutes. Shake the pan halfway through to help them cook evenly. They should turn golden and crunchy. While the chickpeas bake, prepare the salad base. In a large bowl, toss together mixed greens, halved cherry tomatoes, diced cucumber, and thinly sliced red onion. Mixing them now lets the flavors combine as you assemble. In a small bowl, whisk tahini, fresh lemon juice, and a pinch of salt and pepper. If you want a thinner dressing, add a splash of water. This dressing ties the salad together, adding a rich flavor. Once the chickpeas are crispy, take them out and let them cool for a minute. Top your salad with these warm chickpeas. Drizzle the tahini dressing over everything. Add crumbled feta cheese for creaminess, if you like. Finish with fresh parsley for color. Enjoy your Crispy Chickpea Delight Salad! For the complete recipe, check the [Full Recipe]. To make your chickpeas extra crispy, dry them well before cooking. Drain and rinse the canned chickpeas, then lay them on a paper towel. Pat them gently to remove excess moisture. The drier the chickpeas, the crunchier they will be. Toss them with olive oil and spices right before baking. Spread them out on your baking sheet. Avoid crowding them; it helps with airflow and crispiness. Bake at 400°F for 25 to 30 minutes, shaking the pan halfway through. This step ensures even cooking and crispiness. If you have leftovers, store the salad and chickpeas separately. Place the salad in an airtight container in the fridge. Keep the chickpeas in another container. This will help prevent sogginess. When you want to eat the leftovers, reheat the chickpeas in the oven for a few minutes. This will revive their crisp texture. The salad will stay fresh for about two days in the fridge. For the best taste, serve the salad immediately after assembling. The warm chickpeas add a nice contrast to the cool greens. Drizzle the tahini dressing right before serving. This way, it coats the ingredients nicely. You can also sprinkle some feta cheese on top for extra creaminess. Fresh herbs like parsley can brighten the dish. Try adding avocado for creaminess or nuts for crunch. Each addition enhances the flavor and texture of your salad. Enjoy experimenting! {{image_4}} You can swap out greens to change the salad's taste. Try using kale for a hearty crunch. Baby spinach offers a soft, mild flavor. You can even mix in some crunchy cabbage for more texture. Each option adds its unique twist while still pairing well with crispy chickpeas. If you want to make the salad more filling, add protein. Grilled chicken works great with the chickpeas. You can also try adding sliced hard-boiled eggs for richness. For a vegetarian option, toss in some quinoa or black beans. These choices will help boost the meal's nutrients. While tahini dressing is fantastic, don’t be afraid to experiment. A lemon vinaigrette adds a bright zing. You could also try a yogurt-based dressing for creaminess. If you like a kick, a spicy harissa dressing works wonders too. Each dressing brings a new flavor that can change your salad experience. For the full recipe, check out the Crispy Chickpea Delight Salad 🥗. To store leftover salad, first, let it cool down. Place it in an airtight container. This keeps the salad fresh. Add the crispy chickpeas on top only when serving. This way, they stay crunchy. If you mix them in, they can get soggy. If you have leftover crispy chickpeas, you can reheat them. Preheat your oven to 350°F (175°C). Spread the chickpeas on a baking sheet. Bake them for about 10 minutes. This brings back their crunch. You can also use an air fryer for a quicker option. The salad can last up to three days in the fridge. Chickpeas stay good for about a week if stored well. Fresh veggies have a shorter shelf life. Use them within three to five days. Always check for freshness before eating. For a detailed recipe, refer to the Full Recipe. Yes, you can use dried chickpeas. They need soaking and cooking first. To prepare, soak them overnight in water. Cook them until they are tender. This can take about 1 to 2 hours. Then, follow the same steps as with canned chickpeas in the recipe. This salad is packed with nutrients. Chickpeas provide protein and fiber. Mixed greens bring vitamins A and C. Tomatoes offer antioxidants, while cucumbers add hydration. Olive oil is a healthy fat. Feta cheese, if used, adds calcium. Overall, it is a well-balanced meal. To make this salad vegan, skip the feta cheese. The rest of the ingredients are already plant-based. You can also add more veggies or nuts for extra flavor and nutrition. Try adding avocado for creaminess or nuts for crunch. Yes, you can prep it ahead of time. Store the crispy chickpeas in an airtight container. Keep the salad ingredients separate until you are ready to eat. This keeps everything fresh and crispy. Just assemble when you want to enjoy your meal. This salad pairs well with many dishes. Serve it alongside grilled chicken or fish for protein. It also goes great with a warm pita or flatbread. If you want a lighter meal, enjoy it as a stand-alone dish. You can find the Full Recipe for more details. In summary, this blog post covered how to make a crispy chickpea salad. We explored the main ingredients and added options to boost flavor. I shared step-by-step cooking instructions and tips for the perfect crunch. You learned about storage methods and how to customize the dish. Enjoy this salad any time for a tasty and healthy meal. With its simple steps, you can make it again and again!](https://dishtreats.com/wp-content/uploads/2025/06/a0161600-1d29-449f-a743-39fb8b2e717a-768x768.webp)
![- 2 cups cooked chicken, shredded - 1 cup shredded cheddar cheese - 1 cup shredded Monterey Jack cheese - 4 large flour tortillas - 1 small onion, diced - 1 bell pepper, diced - 2 tablespoons olive oil - 1 teaspoon ground cumin - 1 teaspoon smoked paprika - ½ teaspoon garlic powder - Salt and black pepper to taste - Fresh cilantro, chopped - Sour cream - Salsa To make the Chicken and Cheese Quesadilla Skillet, gather these simple ingredients. The chicken gives it a hearty base. Cheese adds that melty goodness we all love. Using flour tortillas helps hold everything together. You can pick your favorite bell pepper color to add a pop of brightness. The spices elevate the flavor. Ground cumin offers a warm, earthy taste. Smoked paprika adds a hint of smokiness. Garlic powder gives a nice kick. Don’t forget the salt and black pepper to enhance all the flavors. Finally, for garnishes, fresh cilantro provides a burst of freshness. Serving it with sour cream and salsa makes each bite even better. You can find the full recipe at the beginning of this article. Enjoy your cooking! - Heat the skillet with olive oil - Add diced onion and bell pepper First, grab a large skillet and set it over medium heat. Pour in two tablespoons of olive oil and let it warm up. You want the oil to shimmer, which shows it's ready. Next, toss in the diced onion and bell pepper. Sauté them for about five minutes. Stir occasionally until they are soft and fragrant. This step builds a great flavor base for your quesadilla. - Mix in shredded chicken - Season with spices and cook until heated Now it's time to add the star of our dish: shredded chicken. Stir it in with the veggies. Sprinkle in one teaspoon of ground cumin, one teaspoon of smoked paprika, and half a teaspoon of garlic powder. Add salt and black pepper to taste. This mix brings out all the flavors. Cook everything for another three to five minutes. You want the chicken to heat up and soak in those tasty spices. - Distribute cheese and layer tortillas - Cover and cook until golden brown, flipping carefully Next, lower the heat to a gentle simmer. Grab half of your shredded cheddar and Monterey Jack cheese. Spread it evenly over the chicken and veggies. Place two tortillas on top, pushing them down gently. Now, add the rest of the cheese, followed by the other two tortillas. Cover the skillet with a lid and let it cook for four to five minutes. This will make the bottom crispy and let the cheese melt. When the bottom turns golden brown, carefully flip the quesadilla with a spatula. Cook for another four to five minutes until the second side is also golden and the cheese is gooey. For the complete recipe, check out the Full Recipe section! To get crispy tortillas, heat your skillet well. Use medium heat and add enough olive oil. Let the oil shimmer before adding your tortillas. Cook until golden brown on each side, about 4-5 minutes. For gooey cheese, use a mix of cheddar and Monterey Jack. These cheeses melt nicely together. Layer the cheese between tortillas and cover the skillet. This helps the cheese melt evenly and creates a delicious pull when you slice. To boost flavors, add spices like chili powder or cayenne pepper. These spices add a nice kick. You can also mix in fresh herbs, such as cilantro or parsley, for freshness. Pair your quesadilla with sides like guacamole or pico de gallo. These add extra flavor and texture. A squeeze of lime juice brightens up the dish too. For the best results, use a non-stick skillet. This helps avoid sticking and makes flipping easier. Cast iron skillets are also great for even heat. Use a wide spatula for flipping the quesadilla. This helps keep it intact. A pizza cutter is perfect for slicing your quesadilla into wedges. For the full recipe, check out the detailed instructions above. {{image_4}} You can easily change up the protein in your quesadilla. If you want beef, use ground beef or steak strips. For a seafood twist, shrimp works great too. If you're feeling vegetarian, try black beans or mushrooms. These options keep the dish fresh and fun. Want more heat? Add sliced jalapeños or diced green chilies to bring spice. You can also change the cheese for different flavors. Try pepper jack for a kick or gouda for a smokier taste. Mixing cheeses adds depth and makes every bite exciting. You can serve quesadillas in stacks or as traditional wedges. Stacking them makes a fun dinner party dish. For dips, consider guacamole, ranch, or a zesty salsa. These enhance the meal and let everyone personalize their bites. Enjoy exploring these variations while making your own Chicken and Cheese Quesadilla Skillet Delight! For the full recipe, check out the [Full Recipe]. To store leftovers, let your quesadilla cool first. Then, wrap each piece tightly in plastic wrap. This keeps them fresh. Place the wrapped quesadillas in an airtight container. I recommend using glass or BPA-free plastic containers for safety. They can last in the fridge for about three days. For reheating quesadillas, the best method is using a skillet. Heat your skillet over medium heat. Place the quesadilla in the skillet and cover it with a lid. This will help the cheese melt evenly. You can also use an oven at 350°F (175°C) for about 10 minutes. This keeps the tortilla crispy. Avoid using a microwave, as it can make the quesadilla soggy. To freeze leftovers, wrap each quesadilla in plastic wrap. Then, place them in a freezer-safe bag or container. Make sure to remove as much air as possible. They can stay frozen for up to three months. When you are ready to eat, thaw them in the fridge overnight. Reheat as mentioned before to enjoy a tasty meal again. Making a Chicken and Cheese Quesadilla Skillet is quick and easy. It takes about 10 minutes to prep and around 20 minutes to cook. In total, you can enjoy this dish in about 30 minutes. Yes, you can make this dish gluten-free. Simply swap the flour tortillas for corn tortillas or gluten-free tortillas. Both options work well and keep the flavors intact. For sides, I suggest fresh guacamole, a light salad, or refried beans. These add a nice touch to your meal. For drinks, a cold lemonade or a light beer works well with the flavors. You could also try a refreshing iced tea. This blog post covered everything you need for a tasty Chicken and Cheese Quesadilla Skillet. I shared the key ingredients, step-by-step cooking tips, and even fun variations. Remember to store leftovers well and try reheating them for that crunch. With these tips, you can enjoy a delicious meal anytime. Experiment and make it your own! Make cooking fun and tasty with these simple ideas. Enjoy your next quesadilla adventure!](https://dishtreats.com/wp-content/uploads/2025/06/644c33a7-6eb8-49b0-b6be-df01f2332de8-768x768.webp)
![The Sun-Dried Tomato Chickpea Salad is simple to make and full of flavor. Here’s what you need: - 1 can (15 oz) chickpeas, thoroughly drained and rinsed - 1/2 cup sun-dried tomatoes, roughly chopped - 1/4 cup red onion, finely diced - 1/2 cucumber, peeled and diced - 1/4 cup feta cheese, crumbled into small pieces - 2 tablespoons fresh parsley, finely chopped - 2 tablespoons extra virgin olive oil - 1 tablespoon freshly squeezed lemon juice - 1 teaspoon dried oregano - Salt and freshly ground black pepper, to taste This mix of ingredients creates a bright, fresh dish. Chickpeas add protein and fiber. Sun-dried tomatoes give a sweet and tangy taste. The red onion adds a sharp bite, while cucumber brings crunch. Feta cheese adds creaminess to the salad. Fresh parsley brightens the flavors. Make sure to use high-quality extra virgin olive oil for the best taste. Fresh lemon juice adds a zesty kick. Dried oregano brings an earthy flavor that ties everything together. Adjust salt and pepper to your liking for a perfect balance. For the full recipe, follow the steps to enjoy this delightful salad. It's quick to prepare and great for lunch or dinner! To make this salad, start with a large mixing bowl. Combine the following ingredients: - 1 can (15 oz) chickpeas, thoroughly drained and rinsed - 1/2 cup sun-dried tomatoes, roughly chopped - 1/4 cup red onion, finely diced - 1/2 cucumber, peeled and diced - 1/4 cup feta cheese, crumbled into small pieces Gently stir the ingredients together. This ensures an even distribution of flavors and textures. In a separate small bowl, whisk together the dressing ingredients: - 2 tablespoons extra virgin olive oil - 1 tablespoon freshly squeezed lemon juice - 1 teaspoon dried oregano - Salt and freshly ground black pepper, to taste Mix until well combined. You want the oil and lemon juice to emulsify, meaning they blend into a smooth mixture. Drizzle the dressing over the salad base. Toss gently to coat everything evenly. Be careful not to break the chickpeas or feta cheese. After mixing, sprinkle the freshly chopped parsley on top. Give it one last gentle toss. Cover the salad and let it rest for at least 15 minutes. This time allows the flavors to meld together, enhancing the taste. You can serve it chilled or at room temperature for the best experience. For the full recipe, check the ingredients and instructions above. To make your Sun-Dried Tomato Chickpea Salad stand out, choose a nice serving bowl. A colorful bowl can catch the eye and add to the meal. You can layer the salad to show off its colors. Start with chickpeas at the bottom, then add layers of sun-dried tomatoes, cucumbers, and red onions. For garnishing, sprinkle extra parsley leaves on top. This adds a fresh touch. You can also add a few crumbles of feta cheese over the top. This gives a nice contrast to the vibrant colors of the salad. If you want to impress, serve it with crusty bread or pita on the side. You can make this salad ahead of time. Store it in the fridge for a quick meal later. After you mix it, cover the salad well. It stays fresh for 2 to 3 days. The flavors will deepen as it sits. For meal prepping, divide the salad into single-serving containers. This makes it easy to grab and go. Keep the dressing separate until you are ready to eat. This keeps the salad crisp and fresh. Enjoy your meal! For the full recipe, check out the details above. {{image_4}} You can switch out chickpeas for other beans. Black beans or kidney beans work well. They add a different taste and texture. If you want to try lentils, they can also be good. For a dairy-free option, use a vegan feta cheese. There are many brands available. You can also skip the cheese and add more vegetables. This keeps the salad fresh and tasty. To boost the flavor, add spices like cumin or paprika. These spices can take your salad to a new level. You could also add bell peppers or corn for a nice crunch. If you want more protein, add grilled chicken or tofu. These options make the salad heartier. You can even mix in some nuts or seeds for added texture. For the full recipe, check out the details above and create your own delicious twist! To keep your Sun-Dried Tomato Chickpea Salad fresh, use these tips: - Store in an airtight container. - Layer ingredients to prevent sogginess. - Keep dressing separate until serving. - Use glass containers for better preservation. Glass keeps the salad fresh longer. It also helps you see the colorful layers. Your salad lasts up to three days in the fridge. After that, it may lose its crunch. Watch for these signs of spoilage: - Change in smell or color. - Soft or mushy chickpeas. - Feta cheese that appears slimy. If you notice these signs, it's best to throw it away. Enjoy the salad while it's fresh for the best taste! For the full recipe, click [Full Recipe]. To make this salad, start by gathering your ingredients. You need chickpeas, sun-dried tomatoes, red onion, cucumber, feta cheese, parsley, olive oil, lemon juice, oregano, salt, and pepper. 1. In a large bowl, mix the chickpeas, sun-dried tomatoes, cucumber, onion, and feta. 2. In a small bowl, whisk olive oil, lemon juice, oregano, salt, and pepper together. 3. Pour the dressing over the salad and toss gently. 4. Add the parsley and mix lightly. 5. Let the salad rest for 15 minutes. This helps the flavors blend well. You can find the full recipe above for detailed steps. Yes! This salad is perfect for meal prep. You can prepare it a day in advance. Just store it in an airtight container in the fridge. The flavors will deepen, making it taste even better. Make sure to keep the salad covered to keep it fresh. This salad pairs well with many dishes. Here are some ideas: - Grilled chicken or fish for added protein. - Crusty bread or pita to scoop up the salad. - A light soup like tomato basil for a cozy meal. - Roasted vegetables for a colorful plate. These options will enhance your meal and make it even more enjoyable! This blog post detailed how to create a refreshing Sun-Dried Tomato Chickpea Salad. We covered the necessary ingredients, simple steps to prepare, and tips for presentation. You can enhance this salad with various substitutes or flavors. Proper storage ensures freshness and keeps meals tasty longer. Remember, this salad is not just easy to make—it's also adaptable. Enjoy making it your own, and delight your taste buds with every bite. Your next meal can be both fun and healthy!](https://dishtreats.com/wp-content/uploads/2025/07/f0fe0f85-1842-4358-ad7f-ac591425fdaf-768x768.webp)