Mexican Street Corn Salad Fresh and Flavorful Dish
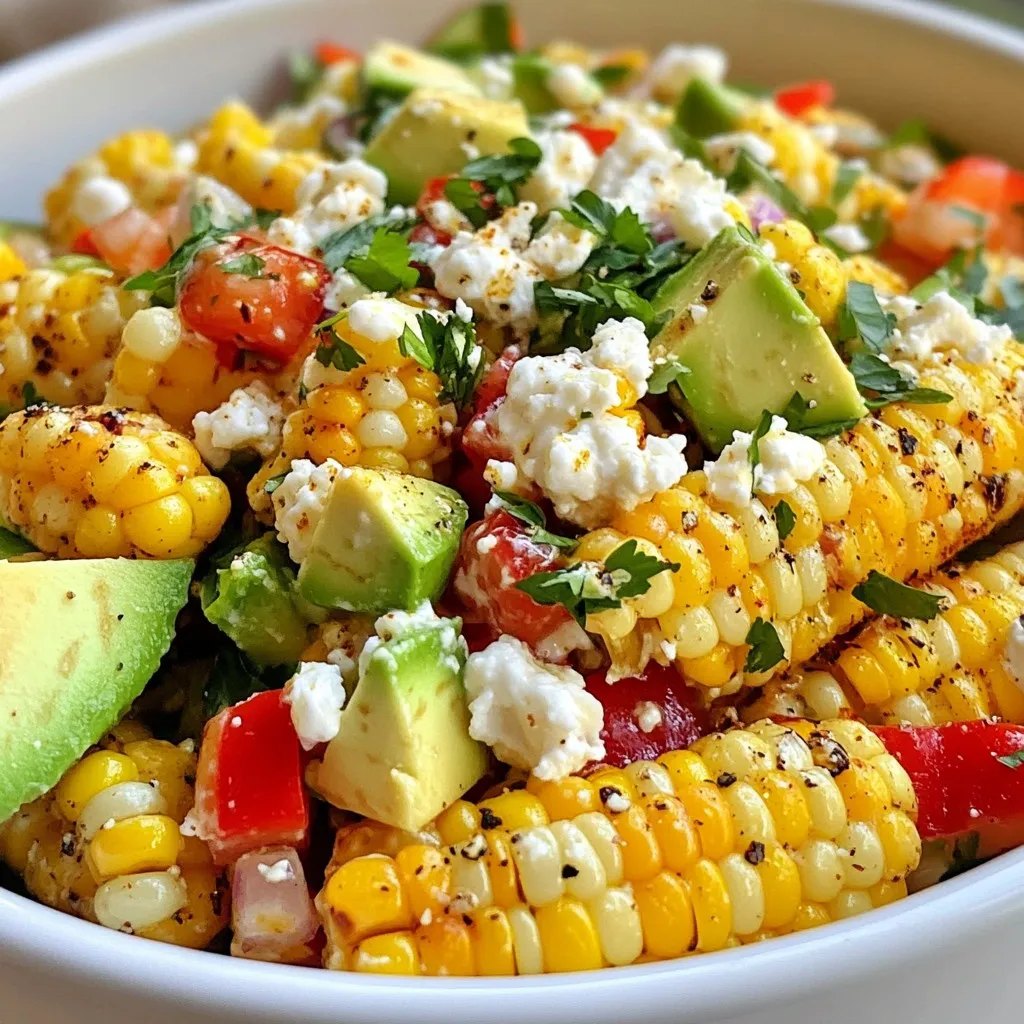

Are you ready to take your taste buds on a journey? This Mexican Street Corn Salad is a fresh and flavorful dish that bursts with vibrant colors and rich tastes. You’ll love how easy it is to prepare, and it features all the essential ingredients, from sweet corn to creamy queso fresco. In this article, I’ll guide you step by step, sharing tips to make your salad shine. Dive in and discover the joy of this delightful dish!
Why I Love This Recipe
- Fresh Ingredients: This salad is packed with fresh, vibrant ingredients that bring the taste of summer to your table.
- Easy to Make: With simple steps, this recipe can be prepared in just 30 minutes, making it perfect for quick meals or gatherings.
- Versatile Dish: This salad can be served as a side or main dish and pairs well with a variety of proteins like grilled chicken or shrimp.
- Flavor Explosion: The combination of zesty lime, creamy avocado, and smoky chili powder creates a delicious and unforgettable flavor profile.
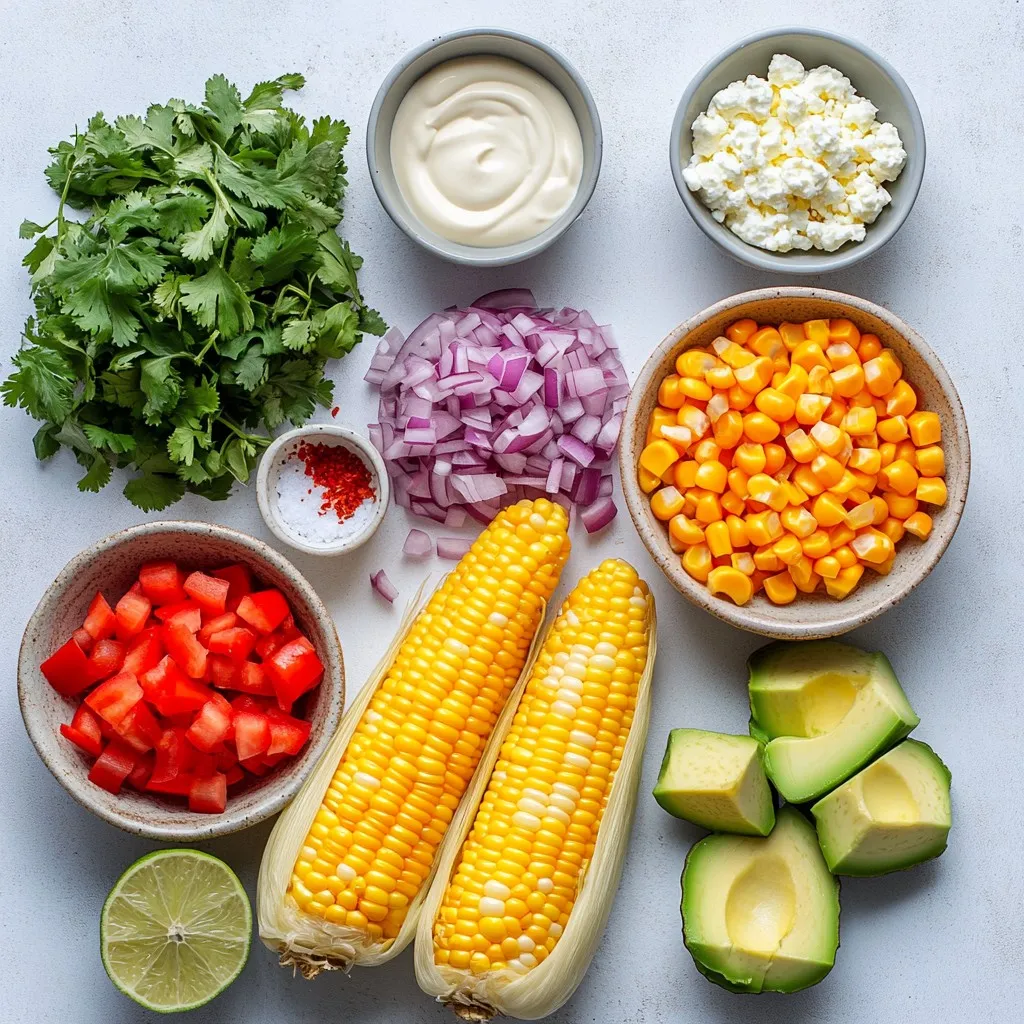
Ingredients
To make a tasty Mexican street corn salad, you need fresh, vibrant ingredients. Here’s what to gather:
- 4 ears of fresh corn, husked
- 1 red bell pepper, finely diced
- 1/4 cup red onion, finely chopped
- 1/2 cup queso fresco, crumbled
- 1/4 cup fresh cilantro, finely chopped
- 2 tablespoons mayonnaise
- 1 tablespoon sour cream
- 1 tablespoon freshly squeezed lime juice
- 1 teaspoon chili powder
- Salt and freshly ground black pepper, to taste
- 1 avocado, diced (optional for added creaminess)
These ingredients come together to create a colorful and zesty salad. Each one adds a unique flavor that makes the dish shine. The corn offers sweetness, while the red bell pepper gives a crisp bite. Queso fresco adds a creamy, salty touch, making it a true delight.
When you choose your ingredients, look for fresh corn with bright yellow kernels. A ripe avocado will enhance the creaminess of the salad. Trust me, these details matter!
Step-by-Step Instructions
Preparing the Corn
- Preheating the grill: Start by setting your grill to medium-high heat. This helps the corn cook evenly and get nice grill marks.
- Grilling the corn: Place the husked corn directly on the grill grates. Grill each ear for about 10 to 12 minutes. Turn the corn every few minutes to avoid burning. Look for a slight char; this adds a great flavor.
- Cooling and cutting the corn: Once done, take the corn off the grill. Let it cool for a few minutes. When it’s safe to handle, use a sharp knife to slice the kernels off the cob. Put the kernels in a large mixing bowl.
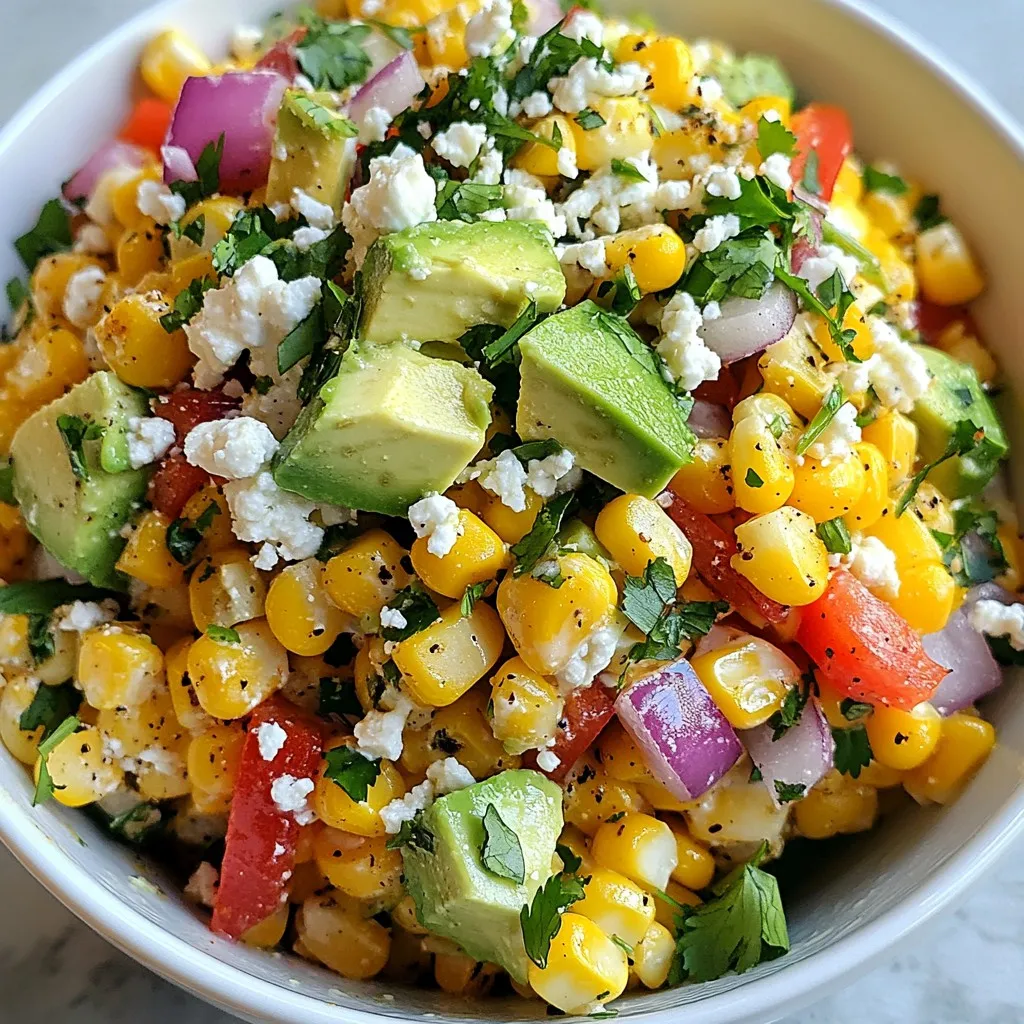
Mixing the Salad
- Combining fresh ingredients: In the bowl with the corn, add the finely diced red bell pepper, chopped red onion, and crumbled queso fresco. Gently mix these ingredients to evenly distribute them.
- Preparing the dressing: In a small bowl, whisk together the mayonnaise, sour cream, lime juice, chili powder, and a pinch of salt and pepper. Mix until smooth and creamy.
- Tossing the salad: Drizzle the dressing over the corn mixture. Toss everything together gently. Make sure every piece is well coated in that delicious dressing.
Final Steps
- Adding optional avocado: If you want a creamier texture, fold in the diced avocado now. It brings richness to the salad.
- Stirring in cilantro: Next, add the freshly chopped cilantro. This herb gives the salad a bright flavor and makes it more colorful.
- Adjusting seasoning to taste: Finally, taste the salad. Add more salt and black pepper if needed, to suit your taste buds.
Tips & Tricks
Sourcing Authentic Ingredients
For the best Mexican street corn salad, start with fresh corn. I recommend using sweet corn right off the cob. Look for corn that feels firm and has bright green husks. Fresh corn gives the salad a nice crunch and sweet flavor.
When it comes to queso fresco, choose one that is soft and crumbly. A good queso fresco should be creamy with a mild taste. I often find it in Latin markets or specialty cheese shops. This cheese will add a rich flavor to the salad.
Enhancing Flavor
To kick up the flavor, you can add spices. Try adding smoked paprika or cayenne pepper for an extra kick. Both spices will enhance the smokiness from the grilled corn.
For a creamier texture, consider adding diced avocado. It blends well with the dressing and enriches the salad. You can also add more mayonnaise or sour cream if you like it creamier. Just mix it in slowly until you reach your desired consistency.
Serving Suggestions
Serve your salad in a colorful bowl. A bright dish will make your salad pop. For garnishing, add extra cilantro on top. A sprinkle of chili powder adds a nice touch too.
You can also pair this salad with grilled meats or tacos. It makes a great side dish for any summer gathering. The fresh flavors will impress your guests and keep them coming back for more!
Pro Tips
- Grill to Perfection: Ensure you turn the corn regularly on the grill to achieve an even char and enhance the flavor. The slight charring adds a wonderful smoky taste to the salad.
- Fresh Ingredients Matter: Use the freshest corn and produce available. Fresh ingredients will elevate the flavor profile of the salad and provide a better texture.
- Customize Your Spice: Adjust the amount of chili powder according to your heat preference. You can also add diced jalapeños for an extra kick.
- Serve Chilled: For a refreshing experience, let the salad chill in the fridge for about 30 minutes before serving. This allows the flavors to meld beautifully.
Variations
Adding Protein
You can make this salad more filling by adding protein. Grilled chicken or shrimp works well. Just cook the protein on the grill alongside the corn. Chop it into small pieces and mix it in. This adds flavor and makes the dish heartier.
Vegetarian and Vegan Options
If you want a vegetarian or vegan salad, you can swap out the dairy. Use vegan mayo instead of regular mayonnaise. For a creamy touch, try using cashew cream or avocado. These options keep the salad rich and delicious without dairy.
Flavor Twists
You can change the flavor of the salad by adding different herbs or spices. Try fresh basil, mint, or even dill. You can also add a bit of cumin for a warm taste. These twists let you customize the salad to your liking.
Storage Info
Storing Leftovers
To keep your Mexican street corn salad fresh, store it in an airtight container. Place it in the fridge right after serving. This will help keep the flavors intact. The salad stays good for about 3 days. After that, the corn may lose its crunch.
Freezing Instructions
You can freeze the salad if you have leftovers. To freeze, place the salad in a freezer-safe container. Leave some space at the top for expansion. It will last for about 2 months in the freezer.
When you’re ready to enjoy it again, thaw the salad in the fridge overnight. After thawing, stir it well before serving. You may want to add a little fresh lime juice to revive its flavor.
FAQs
What is Mexican Street Corn Salad?
Mexican Street Corn Salad is a fresh and tasty dish. It comes from Mexico, where people sell grilled corn on the streets. This salad takes those flavors and mixes them into a bowl. You get sweet corn, crunchy peppers, and creamy cheese all in one bite. It’s a great way to enjoy summer flavors!
Can I make this salad ahead of time?
Yes, you can! This salad tastes even better after a few hours. To prep ahead, grill the corn and cut it into kernels. Store it in the fridge until you are ready to mix. Just add the other ingredients before serving. Keep the dressing separate until serving to keep it fresh.
Is this recipe spicy?
This salad has a mild kick. The chili powder adds flavor without too much heat. If you want more spice, you can add hot sauce or more chili powder. If you prefer less heat, skip the chili powder. You can adjust it to match your taste!
What can I substitute for queso fresco?
You can use other cheeses if you can’t find queso fresco. Feta cheese offers a similar crumbly texture and salty flavor. Cotija cheese is another great choice, giving a nice tang. Cream cheese can work too, but it will change the texture. Choose based on your favorite flavor!
This blog post presented a tasty Mexican Street Corn Salad recipe. You learned about fresh ingredients, simple steps, and useful tips. We explored variations to suit your tastes and the best ways to store leftovers.
Incorporating flavor twists and protein options makes the dish more fun. This salad is flexible and easy to prepare. Feel free to experiment, and enjoy sharing this vibrant dish with family and friend

Zesty Mexican Street Corn Salad
Ingredients
- 4 ears fresh corn, husked
- 1 each red bell pepper, finely diced
- 0.25 cup red onion, finely chopped
- 0.5 cup queso fresco, crumbled
- 0.25 cup fresh cilantro, finely chopped
- 2 tablespoons mayonnaise
- 1 tablespoon sour cream
- 1 tablespoon freshly squeezed lime juice
- 1 teaspoon chili powder
- to taste salt and freshly ground black pepper
- 1 each avocado, diced (optional for added creaminess)
Instructions
- Begin by preheating your grill to a medium-high setting.
- Place the husked corn directly on the grill grates. Grill for about 10-12 minutes, turning the ears occasionally to ensure they become slightly charred and cooked through.
- Once grilled, carefully remove the corn from the grill and allow it to cool for a few minutes. Once cool enough to handle, use a sharp knife to slice the kernels off the cob and transfer the extracted kernels into a large mixing bowl.
- Into the bowl with the corn, add the finely diced red bell pepper, chopped red onion, and crumbled queso fresco. Mix gently to combine the ingredients.
- In a separate small bowl, whisk together the mayonnaise, sour cream, lime juice, chili powder, and a pinch of salt and pepper until the mixture is smooth and homogenous.
- Drizzle the dressing over the corn mixture and gently toss everything together, ensuring that all the ingredients are well coated.
- If you choose to add it, fold in the diced avocado at this stage to enhance the salad's creaminess and flavor.
- Finally, stir in the freshly chopped cilantro to infuse the salad with a bright burst of flavor.
- Taste the salad and adjust the seasoning with additional salt and pepper, if desired, to suit your preference.


![- 1 lb Brussels sprouts, trimmed and halved - 3 tablespoons extra virgin olive oil - 2 tablespoons pure maple syrup - 1 tablespoon Dijon mustard - 1 teaspoon garlic powder - 1/4 cup chopped walnuts (optional for added crunch) - Fresh parsley, roughly chopped, for garnish (optional) - Salt - Freshly ground black pepper When making Maple Mustard Brussels Sprouts, the main ingredients are key to flavor. Brussels sprouts bring a nice crunch. Extra virgin olive oil adds richness, while pure maple syrup gives a sweet touch. Dijon mustard adds a tangy kick that ties it all together. You might want to add garlic powder for more flavor. If you like crunch, chopped walnuts work well. A sprinkle of fresh parsley adds color and freshness to the dish. For seasoning, salt and freshly ground black pepper enhance the taste. Be sure to adjust these to your liking. The balance of flavors makes this dish a standout! Check the [Full Recipe] for detailed steps to prepare these delightful sprouts. - Preheat your oven to 400°F (200°C). - Line a baking sheet with parchment paper. This makes cleanup easy. - In a bowl, combine olive oil, maple syrup, Dijon mustard, and garlic powder. - Season with salt and pepper. Whisk until smooth. - Add halved Brussels sprouts to the dressing. - Toss until evenly coated. Make sure every sprout gets some flavor. - Spread sprouts on the baking sheet in a single layer. - If you like, sprinkle with walnuts for crunch. - Roast for 25-30 minutes. Remember to stir halfway through for even cooking. - Check if the sprouts are fork-tender and caramelized. - Garnish with fresh parsley before serving. This adds color and freshness to your dish. For the complete recipe, check out the [Full Recipe]. To get that golden-brown color, you need to space the Brussels sprouts well on the baking sheet. If they are too close, they will steam instead of roast. Stir them halfway through cooking. This helps them cook evenly and get that nice caramelized look. You can add more flavor by mixing in balsamic vinegar for a tangy twist. This will balance the sweetness of the maple syrup. Also, try using herbs like thyme or rosemary. These herbs add a fresh taste that brightens the dish. Use a large mixing bowl when tossing your ingredients. This gives you enough space to coat the Brussels sprouts well. A high-quality baking sheet is key for even roasting. It helps them brown nicely without sticking. For the full recipe, check out the details above. {{image_4}} To make this dish vegan, swap out the Dijon mustard for a vegan option. There are many great choices available, like a chickpea or tahini-based mustard. These alternatives keep the flavor bold and rich, just like the traditional recipe. You won’t lose any taste while making it plant-based. If you need a nut-free dish, simply leave out the walnuts. The Brussels sprouts will still have a lovely texture and taste. The maple and mustard glaze adds all the flavor you want. You can enjoy this dish without any worries about allergies. For a heartier meal, consider adding protein. Roasted chickpeas or crispy tofu work great here. They pair perfectly with the sweet and tangy flavors of the Brussels sprouts. You can serve them together on the same plate for a filling and nutritious dish. This option makes it easy to create a balanced meal. For the full recipe, check out the details above! Store any leftover Maple Mustard Brussels Sprouts in an airtight container. They will stay fresh for up to 3 days. This keeps them safe and tasty for later meals. Just remember to let them cool down first before sealing them up. You can freeze roasted Brussels sprouts for up to 2 months. To do this, place them in a freezer-safe bag or container. Make sure to squeeze out as much air as possible. This helps prevent freezer burn and keeps their flavor intact. To enjoy your Brussels sprouts again, reheat them in the oven or on the stovetop. The oven gives them a nice crispy texture. If you choose the stovetop, keep the heat medium to avoid burning. Just warm them through until they are hot and ready to eat. For the full recipe, check out the [Full Recipe]. The ideal roasting time is 25-30 minutes. This time allows them to cook perfectly. You want them fork-tender and golden brown. Stir them halfway through to help them caramelize well. Yes, you can prep these sprouts a day ahead. Just mix the Brussels sprouts with the maple-mustard dressing and store them in the fridge. When you're ready to serve, simply roast them before your meal. This saves time and keeps flavors fresh. Pair them with proteins like chicken or fish. They also go great with grains like quinoa or rice. The sweet and tangy flavor of the sprouts complements many dishes well. Absolutely! Maple Mustard Brussels Sprouts store well in the fridge. You can enjoy them throughout the week. Just reheat them in the oven or on the stovetop for the best texture. For the full recipe, be sure to check the earlier sections. This blog post shared a simple and tasty recipe for Maple Mustard Brussels Sprouts. You learned about the main ingredients and optional add-ins. The step-by-step instructions ensure you roast them to perfection. I’ve also shared tips for flavor and storage, plus variations to suit your needs. These Brussels sprouts are easy to make and full of flavor. Try them with your favorite protein for a delicious meal! Enjoy experimenting with this recipe and make it your own.](https://dishtreats.com/wp-content/uploads/2025/06/4f608c6e-5907-49f6-a9cf-d865501fb0be-768x768.webp)