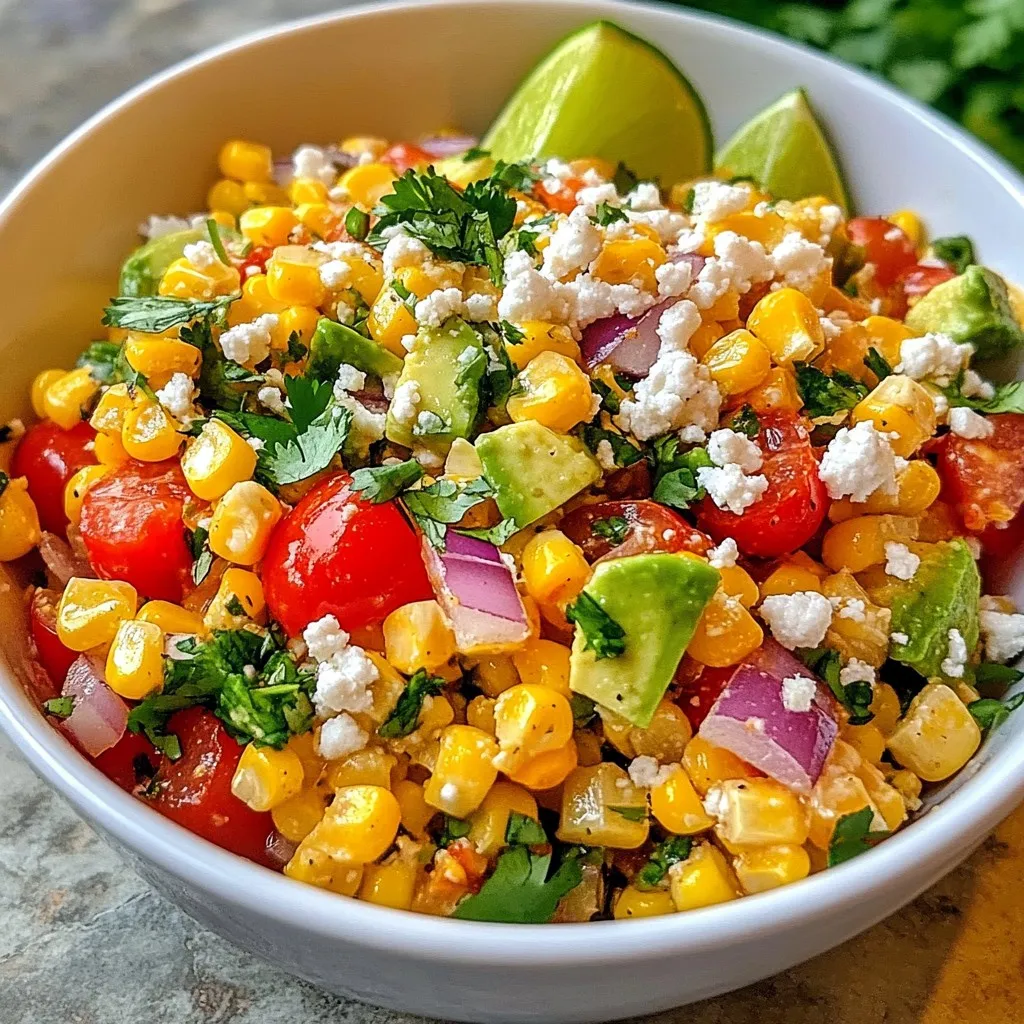
Mexican Street Corn Salad Flavorful and Easy Recipe
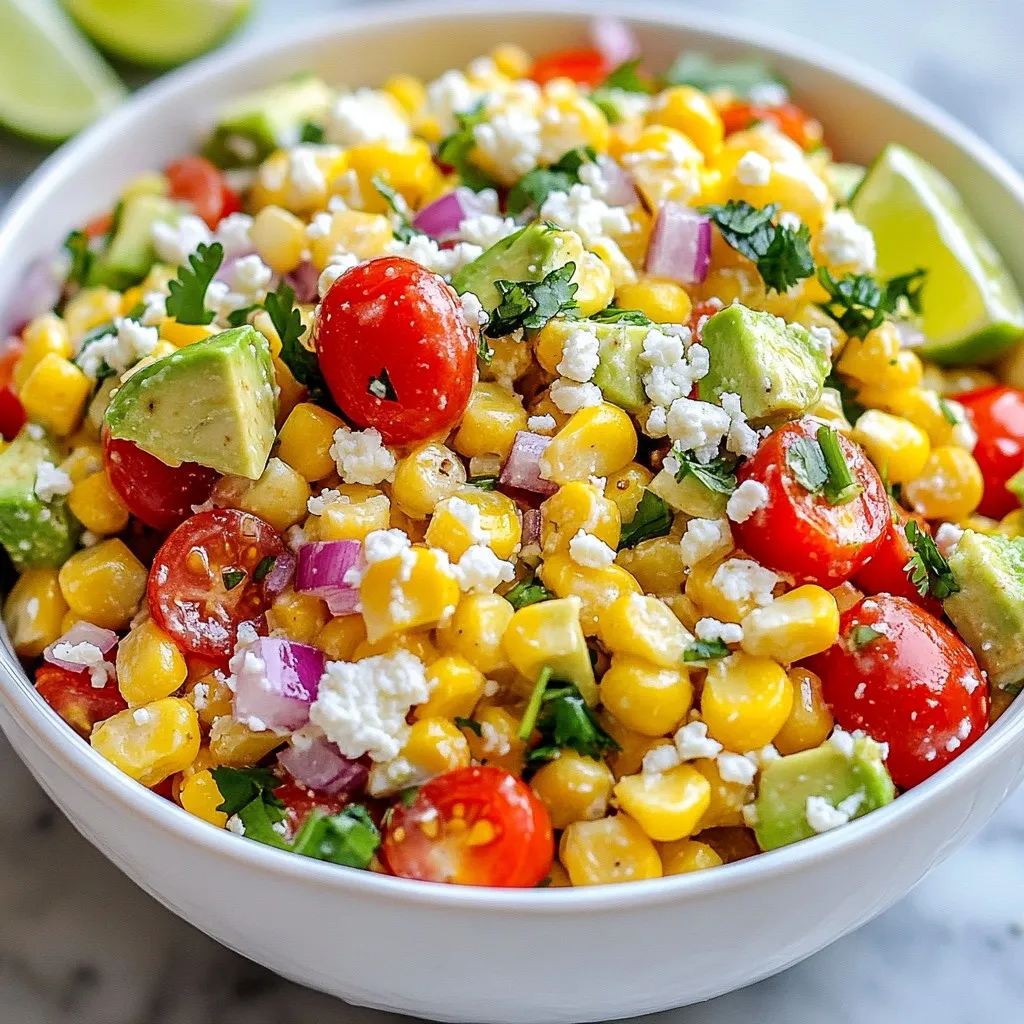

Are you ready to spice up your meal with a fresh and tasty twist? Mexican Street Corn Salad is a colorful dish that brings bold flavors to your table. This easy recipe uses simple ingredients, and I’ll guide you through each step. Whether you enjoy it as a side or main, it’s perfect for gatherings or a weeknight dinner. Let’s dive into making this delicious salad together!
Why I Love This Recipe
- Fresh and Flavorful: This salad combines the sweetness of corn with the vibrant flavors of fresh vegetables, making each bite a delightful taste experience.
- Easy to Prepare:
- Versatile and Customizable: You can easily adapt this salad by adding your favorite ingredients, such as black beans or jalapeños, to suit your taste.
- Perfect for Any Occasion: This Mexican Street Corn Salad is a hit at barbecues, potlucks, or as a refreshing side dish for any meal.
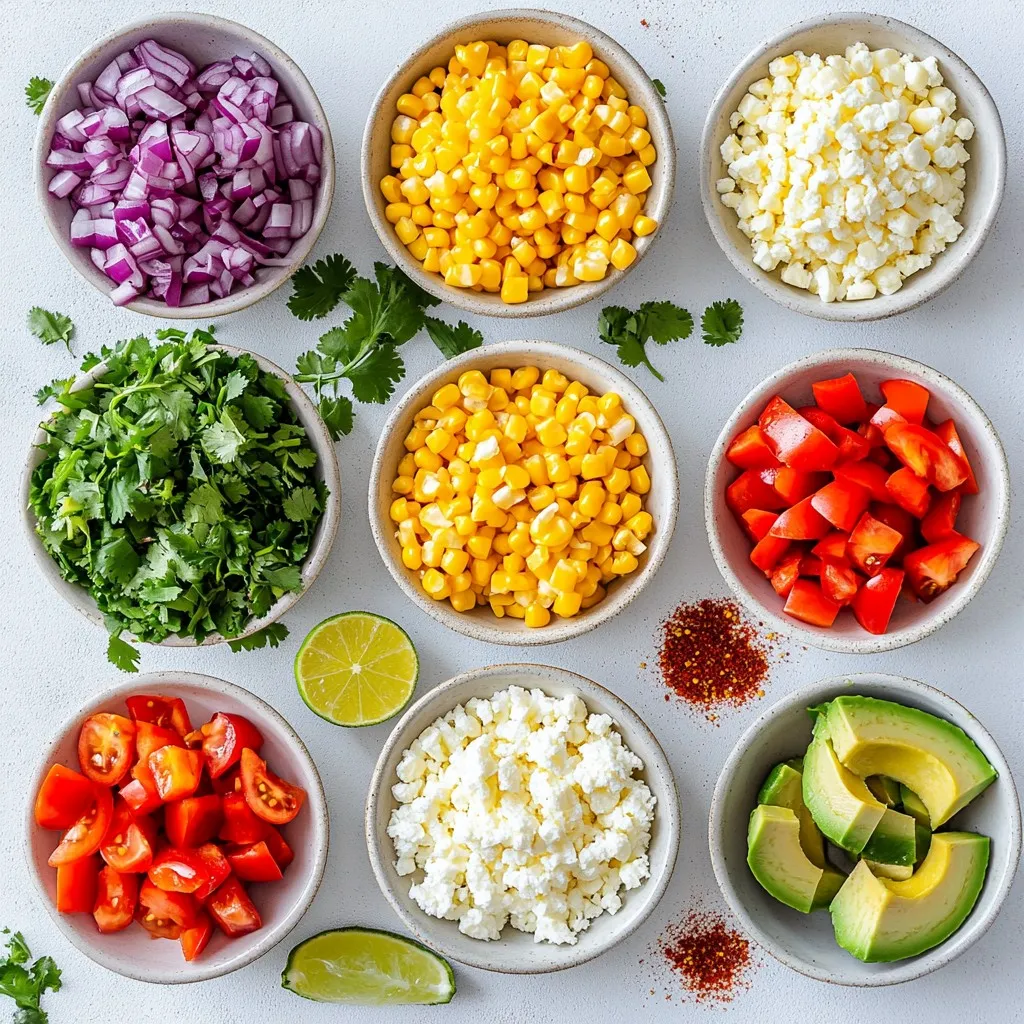
Ingredients
Fresh Corn or Frozen Corn
You can use either fresh corn or frozen corn. Fresh corn gives the best flavor. For fresh corn, take 4 ears. Grill them for about 10 minutes, turning often. This makes the kernels sweet and smoky. Once done, let the corn cool. Then slice off the kernels. If you choose frozen corn, use 4 cups. Thaw it in hot water, then drain it well. Frozen corn is quick and easy.
Vegetables and Herbs
The salad needs some crunch and color from fresh veggies. Use 1 medium red bell pepper, diced small. It adds sweetness. You also need 1 small red onion, finely chopped, for a mild bite. Add 1 cup of halved cherry tomatoes for a burst of juice. Fresh cilantro is key; add 1/4 cup, roughly chopped. For extra creaminess, you can include a ripe avocado, diced. This makes the salad rich and satisfying.
Dairy and Dressing Components
Dairy adds creaminess and flavor. Use 1/2 cup of crumbled cotija cheese, or feta cheese will work too. For the dressing, combine 2 tablespoons of mayonnaise, preferably Mexican-style, with 1 tablespoon of fresh lime juice. This gives a zesty kick. Add 1 teaspoon of chili powder for some heat. Don’t forget salt and pepper to taste. The dressing ties everything together and makes each bite delicious.
Step-by-Step Instructions
Preparing the Corn
To start, you need the corn. If using fresh corn, grill the ears over medium heat. Grill for about 10 minutes, turning often. You want the kernels to be lightly charred and tender. After grilling, let the corn cool a bit. Then, slice off the kernels. If you choose frozen corn, thaw it in hot water. Drain it well before use.
Combining the Vegetables
Next, grab a large mixing bowl. Add the charred corn kernels into the bowl. Now, it’s time to add the other veggies. Dice up the red bell pepper and finely chop the red onion. Halve the cherry tomatoes. Toss all these colorful pieces into the bowl. Mix gently to combine everything.
Making the Dressing
Now, let’s make the dressing. In a small bowl, add mayonnaise, fresh lime juice, and chili powder. Don’t forget a pinch of salt and pepper. Whisk it all together until it’s smooth and creamy. This dressing will bring the salad together.
Tossing and Serving the Salad
Drizzle the dressing over the corn mixture. Carefully toss everything together. Make sure all the ingredients are coated well in the dressing. Taste your salad. Adjust the seasoning with more salt, pepper, or lime juice if needed. You can serve the salad right away for a fresh crunch. If you want the flavors to blend, refrigerate it for up to an hour.
Tips & Tricks
Achieving the Perfect Grill Marks on Corn
Grilling corn gives it a smoky flavor. To get nice grill marks, start with fresh corn. Heat your grill to medium. Grill the corn for about 10 minutes. Turn the ears every couple of minutes. Look for light char marks. This adds flavor and looks great in your salad.
How to Choose Ripe Avocado
Choosing a ripe avocado is easy. First, look for avocados that are dark green. They should yield slightly to pressure when you squeeze them. If they are hard, they are not ripe. If they are too soft, they may be overripe. A ripe avocado will add a creamy texture to your salad.
Adjusting Spiciness and Flavor
Spice level can change based on your taste. Start with 1 teaspoon of chili powder. Taste the salad after mixing. If you want more heat, add more chili powder. Lime juice adds brightness. If you want it tangier, add a bit more lime juice. Adjust the salt and pepper to fit your flavor.
Pro Tips
- Fresh Corn is Best: If you can get your hands on fresh corn, use it for the best flavor and texture. Grilling enhances the natural sweetness and adds a delicious smoky char.
- Customize the Heat: Adjust the chili powder to suit your taste. For a spicier kick, consider adding diced jalapeños or a dash of hot sauce to the dressing.
- Make it Ahead: This salad can be prepared a few hours in advance. Just keep it refrigerated until serving to allow the flavors to meld beautifully without becoming soggy.
- Add More Veggies: Feel free to incorporate other vegetables like diced cucumbers or black beans for additional flavor and nutrition, making this dish even more colorful and hearty.
Variations
Adding Proteins like Grilled Chicken or Shrimp
You can make this salad heartier by adding protein. Grilled chicken or shrimp work great. Both have a nice smoky flavor that blends well. Just grill them until they are well-cooked. Cut the chicken into bite-sized pieces or toss the shrimp in with the salad. This adds a filling and tasty twist.
Vegetarian and Vegan Alternatives
If you want a vegetarian or vegan option, you have choices. For the cheese, you can skip cotija and use a plant-based cheese. For a creamy texture, try using vegan mayo. You can also add beans like black beans or chickpeas. This boosts protein and makes the salad more satisfying.
Seasonal Variations and Additions
You can change the salad with seasonal ingredients. In the summer, add diced mango for sweetness. In the fall, try roasted butternut squash. You can also add other veggies like zucchini or radishes. These additions keep the salad fresh and fun throughout the year.
Storage Info
Best Practices for Storing Leftovers
After enjoying your Mexican Street Corn Salad, store leftovers in an airtight container. Keep it in the fridge for up to three days. Make sure to cover it well. This keeps the salad fresh and tasty. If you add avocado, it may brown quickly. To prevent this, store the avocado separately. You can mix it in just before serving.
Reheating Tips
This salad is best served cold. If you really want to warm it, do so gently. Use a microwave and heat it for short bursts. Stir in between to avoid hot spots. Remember, heating may change the texture and flavors. So, enjoy it fresh from the fridge when you can.
Long-term Freezing Considerations
You can freeze this salad, but be aware of some changes. The corn will hold up well, but tomatoes and avocado won’t. They can get mushy when thawed. If you plan to freeze it, leave out the tomatoes and avocado. Store the salad in a freezer-safe container. It should be good for about three months. When you’re ready, thaw it in the fridge overnight before eating.
FAQs
Can I make Mexican Street Corn Salad ahead of time?
Yes, you can make this salad ahead of time. It tastes even better after sitting for a while. Make it up to one hour in advance. Just store it in the fridge. This lets the flavors mix well. Be sure to keep the dressing separate if you want a fresher crunch.
What can I substitute for cotija cheese?
If you cannot find cotija cheese, feta cheese works well as a substitute. Feta adds a similar saltiness and creaminess. You can also use queso fresco for a milder taste. Each of these options gives you great flavor without changing the salad too much.
How do I make Mexican Street Corn Salad less spicy?
To make the salad less spicy, use less chili powder. You can also skip it entirely if you prefer. Adding more creamy ingredients like mayonnaise can help tone it down. Mixing in more diced vegetables will also balance the heat. The key is to adjust based on your taste.
This blog post covered all you need for a great Mexican Street Corn Salad. We explored choosing fresh or frozen corn, using the right herbs, and making a tasty dressing. I shared tips on grilling corn, selecting ripe avocados, and adjusting flavors. You can also add proteins, try vegan options, and experiment with seasonal ingredients. Proper storage and reheating practices help maintain freshness. Enjoy this salad in any way you like! Dive in, share your creations, and make every bite coun

Mexican Street Corn Salad Delight
Ingredients
- 4 ears fresh corn, kernels removed (or 4 cups of frozen corn, thawed)
- 1 medium red bell pepper, diced into small pieces
- 1 small red onion, finely chopped
- 1 cup cherry tomatoes, halved
- 0.25 cup fresh cilantro, roughly chopped
- 0.5 cup cotija cheese, crumbled (or feta cheese as a substitute)
- 2 tablespoons mayonnaise, preferably Mexican-style
- 1 tablespoon fresh lime juice
- 1 teaspoon chili powder
- to taste salt and pepper
- 1 ripe avocado, diced (optional but recommended)
Instructions
- Prepare the Corn: If using fresh corn, grill the ears over medium heat for about 10 minutes, turning occasionally, until the kernels are lightly charred and tender. Once grilled, let the corn cool slightly before slicing off the kernels. If using frozen corn, thaw it in hot water for a few minutes, then drain thoroughly.
- Combine the Vegetables: In a large mixing bowl, add the charred corn kernels. Then, incorporate the diced red bell pepper, finely chopped red onion, and halved cherry tomatoes. Mix gently to combine.
- Add Fresh Ingredients: Stir in the chopped fresh cilantro, crumbled cotija cheese, and the diced avocado, if you’ve chosen to include it.
- Create the Dressing: In a separate small bowl, whisk together the mayonnaise, lime juice, chili powder, and a pinch of salt and pepper until smooth and creamy.
- Toss Together: Drizzle the dressing over the corn mixture and carefully toss everything together until all the ingredients are well coated in the dressing.
- Taste and Adjust: Sample the salad and adjust the seasoning with more salt, pepper, or lime juice to achieve your preferred flavor balance.
- Serve: This salad can be served immediately for a refreshing crunch, or you can refrigerate it for up to 1 hour to allow the flavors to meld beautifully.

![To make delicious roasted red pepper hummus, gather these key ingredients: - 1 cup canned chickpeas, drained and thoroughly rinsed - 1 large roasted red pepper (store-bought jarred or homemade) - 2 tablespoons tahini - 2 tablespoons extra virgin olive oil, plus more for drizzling - 2 tablespoons freshly squeezed lemon juice - 1 clove of garlic, finely minced - 1/2 teaspoon ground cumin - Salt, to taste These ingredients create a smooth and creamy dip. Each one plays a vital role. Chickpeas give it body. Roasted red pepper adds sweetness and depth. Tahini brings a nutty flavor, while olive oil adds richness. Lemon juice gives it brightness and balance. Garlic adds a punch, and cumin adds warmth. To make your hummus even better, you can add some garnishes: - Fresh parsley, finely chopped (for garnish, optional) - Paprika, for garnish (optional) These garnishes not only look nice but also enhance the taste. Fresh parsley adds a pop of color and freshness. Paprika gives a hint of smokiness and warmth. You can use these garnishes to personalize your hummus. For the full recipe, check the detailed instructions that guide you through preparation and blending for a perfect dip. Roasting Techniques (Oven & Grill) You can roast red peppers in two main ways. The oven is great for a consistent roast. Start by preheating your oven to 450°F (230°C). Place whole red peppers on a lined baking sheet. Roast them for 20-25 minutes. Turn them every few minutes until the skin is blistered and charred. If you prefer grilling, place the peppers directly on the grill. Turn them often until they are blackened all around. How to Steam and Peel After roasting, steaming helps peel the skin. Place the hot peppers in a heatproof bowl. Cover it tightly with plastic wrap for about 10 minutes. This traps steam, loosening the skin. Once cool enough to handle, peel off the blackened skin. Remove the seeds, and set the peppers aside. Food Processor Tips Using a food processor makes blending easy. Start with the chickpeas and roasted red pepper in the bowl. Add tahini, olive oil, lemon juice, minced garlic, and ground cumin. Blend on low speed first. Gradually increase to high until smooth. Achieving Creamy Consistency To get a creamy texture, you may need to add water. If the hummus is thick, add one tablespoon at a time while blending. Keep processing until it reaches your desired consistency. Importance of Seasoning Seasoning makes a big difference in taste. After blending, taste your hummus. Add salt slowly, mixing well after each addition. This helps to enhance the overall flavor. Customizing Thickness If you want a thinner hummus, keep adding water. Blend in small amounts until you reach the right thickness. Remember, you can always add more, but you can't take it out! - Experimenting with Spices: You can add spices to boost flavor. Try smoked paprika for a smoky taste. Or add a pinch of cayenne pepper for some heat. Each spice adds a unique twist to your hummus. - Using Fresh Ingredients: Fresh ingredients make a big difference. Fresh garlic brings a sharp bite. Choose ripe lemons for the best juice. They add zest and brightness to the dish. - Store-Bought Ingredient Options: If you're short on time, use store-bought roasted red peppers. They save you the hassle of roasting at home. Check the jar for quality; it should have no added sugars. - Quick Prep Hacks: Use canned chickpeas to save time. They are ready to go. Rinse them well to remove excess sodium. This step helps keep your hummus light and tasty. - Best Pairings for Hummus: Roasted red pepper hummus pairs well with fresh veggies. Carrot sticks, cucumber slices, and bell peppers create a colorful plate. You can also serve it with pita chips or crackers. - Creative Serving Ideas: For a fun twist, serve hummus in cute bowls. Drizzle olive oil on top for a glossy finish. Add a sprinkle of paprika and fresh parsley for color. It looks great and tastes even better. For the full recipe, check out the [Full Recipe]. {{image_4}} To make your hummus spicy, add fresh jalapeños or crushed red pepper flakes. Start with a small amount. Blend everything well and taste. Adjust the heat to your liking. For a balanced flavor, add a bit of honey or maple syrup. This sweetness can tone down the heat and enhance the taste. Fresh herbs give hummus a bright twist. Try adding basil, cilantro, or dill. Just chop them finely before blending. These herbs pair well with roasted red pepper. They add freshness and depth. You can also mix in some sun-dried tomatoes for a Mediterranean vibe. It brings a rich flavor that complements the hummus nicely. Want to make your hummus even healthier? Add superfoods like spinach or kale. They blend in well and boost nutrients. If you have dietary needs, this hummus is easy to adjust. It's naturally vegan and gluten-free. You can enjoy it without worry. Check the full recipe for more tips on adding these healthy ingredients. To keep your roasted red pepper hummus fresh, use an airtight container. Glass containers work best to avoid any odors. If you do not have glass, BPA-free plastic containers are also a good choice. This way, your hummus stays tasty and does not absorb other flavors in the fridge. Homemade hummus lasts up to one week in the fridge. Make sure to check for any signs of spoilage before eating. If it looks or smells off, it is best to toss it. You can freeze hummus for longer storage. First, place the hummus in a freezer-safe container. Leave some space at the top for expansion as it freezes. You can also use ice cube trays for smaller portions. To thaw, place the frozen hummus in the fridge overnight. This will help keep its texture smooth. If it seems a bit thick after thawing, simply add a splash of water and stir well. Enjoy your hummus in wraps, sandwiches, or with fresh veggies. - Start by gathering your ingredients. - Roast the red pepper and cool it. - Blend chickpeas, roasted pepper, tahini, olive oil, lemon juice, garlic, and cumin. - Add water for the right texture. - Season with salt and blend again. - Serve it with a drizzle of olive oil. Making roasted red pepper hummus is simple. You can easily prepare it at home. Follow the quick steps above, and you have a fresh dip ready in about 35 minutes. For the full recipe, check out the detailed instructions provided earlier. - Fresh veggie sticks (carrots, cucumbers, bell peppers) - Warm pita bread or pita chips - Crackers or breadsticks - Grilled meats or seafood - Salads as a dressing Roasted red pepper hummus is versatile. It pairs well with many foods. Fresh veggies make a crunchy, healthy option. You can also enjoy it with pita bread for a classic taste. - Local grocery stores often carry it. - Check health food stores for unique brands. - Look in the deli section for fresh options. - Popular brands include Tribe, Sabra, and Hope. If you prefer buying hummus, many stores have pre-made options. Check your local store's shelves or the deli section for fresh varieties. Each brand may offer a unique taste, so explore a few! - High in protein from chickpeas. - Contains healthy fats from olive oil and tahini. - Rich in vitamins from red peppers and garlic. - Low in saturated fat and cholesterol-free. Roasted red pepper hummus is a healthy snack. It offers many nutritional benefits. The chickpeas give protein, while olive oil adds healthy fats. This dip is not just tasty; it's good for you too! Roasted red pepper hummus is easy to make and packed with flavor. We discussed key ingredients like chickpeas, roasted red peppers, and tahini. You learned step-by-step how to prepare and blend, plus tips to enhance taste and texture. Explore variations by adding spices or herbs to fit your taste. Don't forget how to store your hummus for freshness. I hope this guide inspires you to create your own hummus and enjoy it!](https://dishtreats.com/wp-content/uploads/2025/07/4eff3fe8-7a50-4e3c-86ee-c946a92fe799-768x768.webp)